What have you done to your rig today?

Inukshuk

Rising Sun Member
Joined
Aug 24, 2005
Messages
8,038
Location
Denver, CO
Hey Daniel did you ever get the code from the Outlaws trip figured out? was it indeed the speed sensor?

Yes. The mechanical pin that links the speed sensor electronics (the part that screws onto the to the part that stabs into the t-case) sheared when the sensor seized. I bought a used one from Bruce Minney (Thanks Bruce!) I just finished replacing the o-ring on that part that stabs into the t-case. Its a common leak source on 80's. I had not realized the "speed sensor" was not the whole assembly so I took the whole assembly from Bruce. His o-ring was typical old and crumbly. I'd already replaced mine a few years back so it was in decent shape and I put it on the part I have to get back to him. Its still pliable and only slightly flattened.

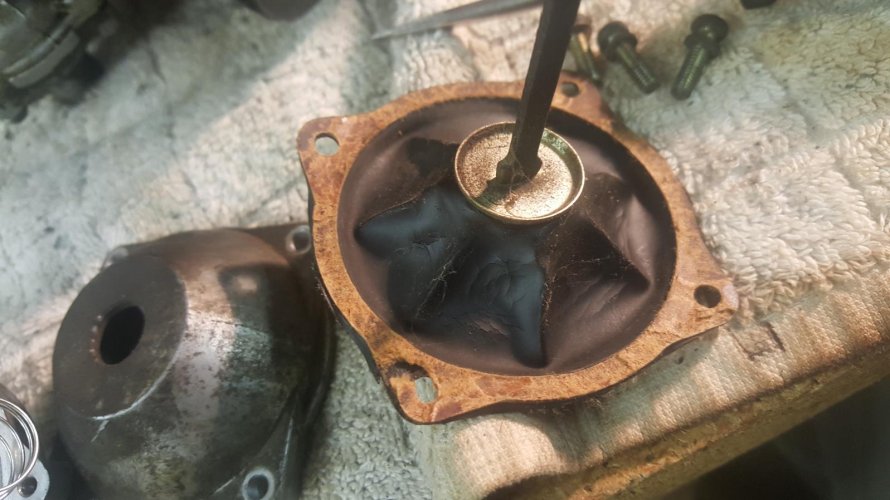
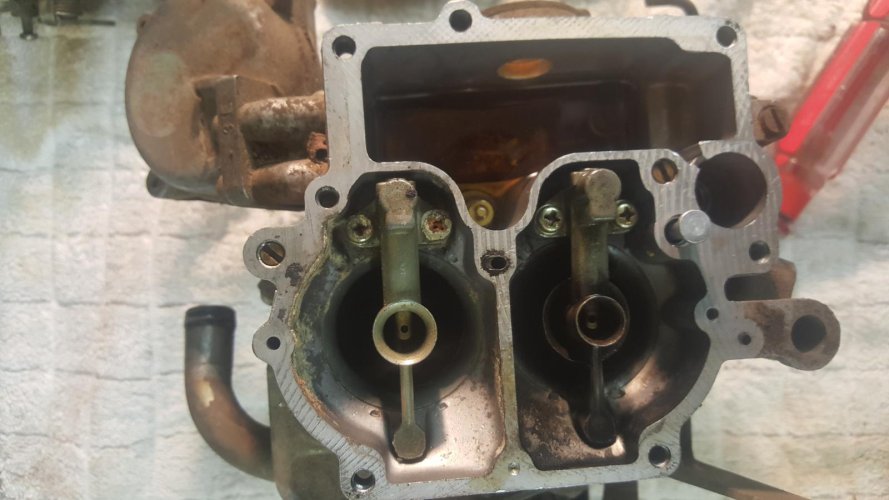
Now the interesting part is that I noticed his sensor was installed "rotated down" while mine was "rotated up". I noticed because when "rotated down" the sensor blocks the bolt that holds the retaining key. The sensor mechanicals spin in gear oil. The shaft that holds the plastic gear (which engages a worm drive in the t-case) has a screw-type groove machined into it assuring constant gear oil bath and there are no seals. The seal is at the sensor end. I wonder if I starved my sensor of oil by rotating it up years ago. Before I re-inserted the pin, I drizzled in gear oil

Today I also replaced the felt gasket for the "bug cup", installed new washable Toyota air filter (you can only wash one so many times), and a PCV valve, grommet, and hose.
 

Cocarlisle

Hard Core 4+
Joined
Apr 11, 2014
Messages
760
Location
Golden
Cleaning the absolute nastiness out of my 2f carb in my new to me 75
Thank god for rebuild kits
Everything was plugged
Primary and secondary jets
Most all vents
Main jet on the secondary side
Both diaphragms were toast
Plunger was toast

I can't believe it ran
 

Attachments

  • 20170428_225800.jpg
    20170428_225800.jpg
    147.2 KB · Views: 308
  • 20170428_215635.jpg
    20170428_215635.jpg
    123.5 KB · Views: 307

subzali

Hard Core 4+
Joined
Aug 22, 2005
Messages
10,637
Location
Denver CO
Daniel, is the big cup aka the "tuna can" on the bottom of the air filter housing?
 

White Stripe

Hard Core 4+
Joined
May 5, 2015
Messages
1,318
Location
Milky way galaxy
Been working on installing my aqualu tub. Trying to do a nice job. It's taking more time than I thought.
 

Attachments

  • 20170416_054310.jpg
    20170416_054310.jpg
    168.3 KB · Views: 296

Inukshuk

Rising Sun Member
Joined
Aug 24, 2005
Messages
8,038
Location
Denver, CO
Daniel, is the big cup aka the "tuna can" on the bottom of the air filter housing?


Yes


Sent from my iPhone using Tapatalk
 

Rzeppa

Rising Sun Member
Joined
Aug 24, 2005
Messages
8,710
Location
Kittredge CO, USA
Been working on installing my aqualu tub. Trying to do a nice job. It's taking more time than I thought.

You sure that's not going to be done by Cruise Moab? :rolleyes:

Looking good Mike, but I can see why you had to bail. Are you doing that at CTS or do you have your own lift?
 

White Stripe

Hard Core 4+
Joined
May 5, 2015
Messages
1,318
Location
Milky way galaxy
You sure that's not going to be done by Cruise Moab? :rolleyes:

Looking good Mike, but I can see why you had to bail. Are you doing that at CTS or do you have your own lift?

I was going to take it out their with everything done except paint until I got sick. Aqualu has not been real helpful with fit issues. Been a learning experience.
 

rover67

Rising Sun Member
Joined
Nov 1, 2007
Messages
9,580
Location
Boulder, Co
Been working on installing my aqualu tub. Trying to do a nice job. It's taking more time than I thought.

Looking good!!!! I'd love to see it in person sometime, I've always been interested in their tubs.
 

Rezarf

Hard Core 4+
Joined
Aug 25, 2005
Messages
5,914
Location
In Uncle Ben's Shadow
I nearly got my 100 series roof rack finished up. A few more beads to finish off the tacks of the hoop and I am off to paint.
 

Attachments

  • IMG_0975.jpg
    IMG_0975.jpg
    158 KB · Views: 334

rover67

Rising Sun Member
Joined
Nov 1, 2007
Messages
9,580
Location
Boulder, Co
whoaaaaaaaa thats awesome! Nice work Drew!
 

rover67

Rising Sun Member
Joined
Nov 1, 2007
Messages
9,580
Location
Boulder, Co
Fixed an exhaust leak on the 80 series. Thing broke down on me on Santa Fe. Blew the EFI fuse. Turned out the idle air control motor we're shorting out intermittently. Those things are not cheap. For the exhaust leak it turned out the air tube on a exhaust manifold was falling apart. So I took it apart and welded it back together. Some studs broke pulling it apart so I had to drill and tap new holes install new studs. Rear main seals leaking so I got to get ready to do that. Btw, i got these hid offroad lights on the front. Anyone know where to get a replacement lens???

nice work those are not the fun jobs but they feel good to get done!
 

nakman

Rising Sun Member
Staff member
Joined
Aug 23, 2005
Messages
15,195
Location
north side
Yeah Drew that looks sweet, man.
 

Rezarf

Hard Core 4+
Joined
Aug 25, 2005
Messages
5,914
Location
In Uncle Ben's Shadow
whoaaaaaaaa thats awesome! Nice work Drew!

Yeah Drew that looks sweet, man.

Thanks guys, I literally couldn't have done this without your generosity of your rack parts Tim, they are top notch and give the rack a very professional look. Still debating a floor, I really want a 2" grid of some sorts but I am too cheap to buy a sheet of the stuff at the steel yard prices, all my scrap yards are turning up short. But as it is, it is light. I am going to paint it, run it this summer and weld on permanent tabs where I want them for my solar panel, and solar shower. Tim, it has only taken me 3+ months! :thumb:

I call it the RezaGobiviti Rack. :lmao:
 

subzali

Hard Core 4+
Joined
Aug 22, 2005
Messages
10,637
Location
Denver CO
I worked on the 80 this week!

Added Airlift airbags to the rear, and added my Puma compressor mount and got it set up for quick removal of the Puma compressor so I can use it in my 40 as well.

And I just feel darn good about working on it. Makes me happy to drive it again. And I'm looking out the window at it while at work. I guess maintenance is a drag (seems like all the work I've put into it so far is maintenance - seat reupholstering, tune up, oil changes, brakes, exhaust, coolant flush, tranny flush, and the great wheel bearing/spindle debacle of 2016), but adding goodies makes it fun! Now I want to add more! Still more maintenance to do (rear axle rebuild, shocks, brake fluid flush and coolant flush), but breaking it up by doing mods really makes it easier to handle.
 

LARGEONE

Rising Sun Member
Joined
Jun 12, 2007
Messages
3,178
Location
Broomfield, CO
Finally got around to making an adjustable rear panhard bar. Now let's see if I can keep the jam nuts tight?!!! I did use red locktite on one side and kept one side adjustable. Hopefully this will help keep it from coming loose.
3c0333eb11859ad537125f2798b03458.jpg
4212de12c036d2ed7f377a366c82d68c.jpg
94d06d724388a896b990538e6c6c7eee.jpg
c38ee43f1f90ef2801d55957ac7439f7.jpg


Sent from my iPad using Tapatalk
 
Back
Top