What have you done to your rig today?

DaveInDenver

Rising Sun Ham Guru
Joined
Jun 8, 2006
Messages
13,960
Location
Grand Junction
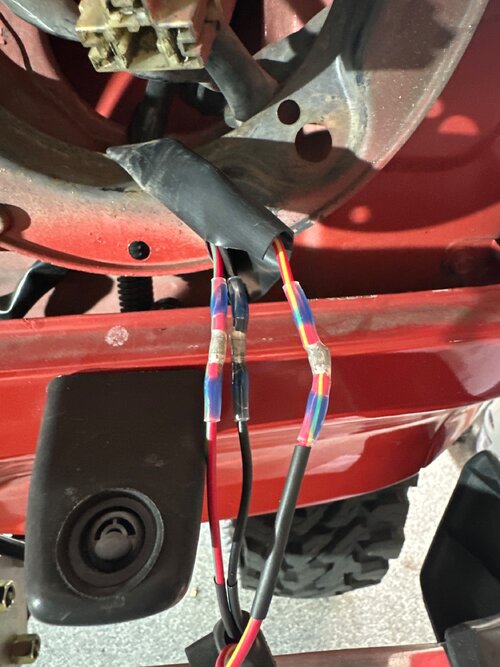
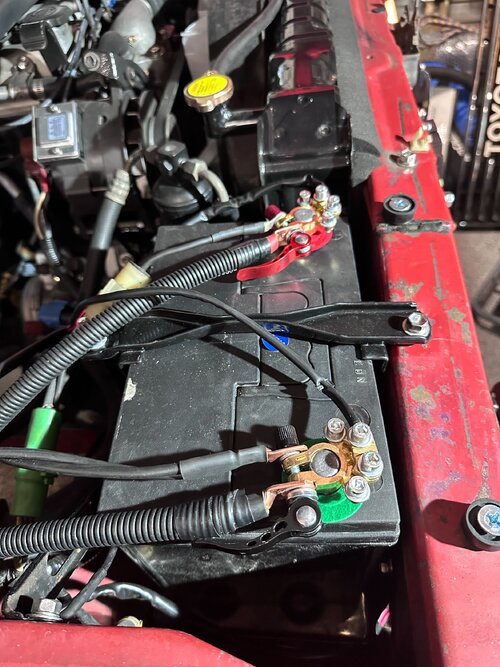
Just an fyi, but if this is your finished connection it looks like the solder never melted in your connectors.
I'm not done, don't have a good way to connect to the battery, so it's sitting unfinished right now.
You may not understand what he's talking about. It looks like you already hit your splices with a heat gun since the shrink is shrunk. But the solder didn't flow so the connection is electrically not done.

IMG_2398.jpeg

You will see the outer shrink first but you have to hold the heat longer, enough time for the solder to flow.


View: https://www.youtube.com/watch?v=7Wh5gM8GM70
 

DaveInDenver

Rising Sun Ham Guru
Joined
Jun 8, 2006
Messages
13,960
Location
Grand Junction
No, I got it. The wiring joint is also incorrect, in addition to the soldering. I'll be redoing it.

Thanks!
Copy red leader. Just want to make sure. It's a common mistake I see, VERY common... The other is people trying to crimp them or, rather, mash them flat with pliers.
 

IH8RUST

Lifted
Joined
Jun 13, 2024
Messages
157
Location
Colorado Springs
Here to make Dave in Denver happy and proud of me, the headlights work, and nooooo shorrrrtttttting out. I even greased the connections according to the instructions.

I found a battery terminal connector that allows me to mount the Koito H4 loop without having to cut or hack my way through it. Then, I moved on to finding a spot for the relays; although it's not ideal, it works. Next, I found a trim material (suggested by others) for the headlight bezel. Finally, I replaced the old bumper caps. Pulled it off with my own two hands; that's how bad of a shape they were in. Oh yeah, I need to adjust the headlights, but after I get those gosh-darned grommets replaced.

Now, I have to fix the high beam indicator, thank goodness for Cruiser Trash Parts. I'm about to make your OCD go brrrrrrr with my next task.

Edit: OCD got me; I noticed the washer on the terminals was backwards, so I fixed it.
 

Attachments

  • IMG_2406.jpg
    IMG_2406.jpg
    590.5 KB · Views: 22
  • IMG_2405.jpg
    IMG_2405.jpg
    538.3 KB · Views: 16
  • IMG_2404.jpg
    IMG_2404.jpg
    542.7 KB · Views: 14
  • IMG_2399.jpg
    IMG_2399.jpg
    765.5 KB · Views: 13
  • IMG_2408.jpg
    IMG_2408.jpg
    359.7 KB · Views: 20
  • IMG_2409.jpg
    IMG_2409.jpg
    749.9 KB · Views: 20
  • IMG_2410.jpg
    IMG_2410.jpg
    848.6 KB · Views: 21
  • IMG_2411.jpg
    IMG_2411.jpg
    1.4 MB · Views: 21
Last edited:

Pz10420

Hard Core 4+
Joined
Jun 21, 2020
Messages
531
Replaced the rear passenger speakers in the 81. Never found a good option that didn't require some sort of adapter. Never even considered that they're still available from Toyota...

1000001305.jpg
I would've never thought of this either. How do they sound?
 

MarkEva

Rising Sun Member
Joined
May 15, 2024
Messages
43
This morning I installed an RCI engine skid plate. Tomorrow I'll be working on the middle one. Maybe even the back one.
 

KC Masterpiece

Hard Core 4+
Joined
May 4, 2019
Messages
1,820
Here to make Dave in Denver happy and proud of me, the headlights work, and nooooo shorrrrtttttting out. I even greased the connections according to the instructions.

I found a battery terminal connector that allows me to mount the Koito H4 loop without having to cut or hack my way through it. Then, I moved on to finding a spot for the relays; although it's not ideal, it works. Next, I found a trim material (suggested by others) for the headlight bezel. Finally, I replaced the old bumper caps. Pulled it off with my own two hands; that's how bad of a shape they were in. Oh yeah, I need to adjust the headlights, but after I get those gosh-darned grommets replaced.

Now, I have to fix the high beam indicator, thank goodness for Cruiser Trash Parts. I'm about to make your OCD go brrrrrrr with my next task.

Edit: OCD got me; I noticed the washer on the terminals was backwards, so I fixed it.
Nice spot for the relays. Mine are just dangling about.
 

Capriblue45

Rising Sun Member
Joined
May 28, 2023
Messages
380
Started to build the sleep platform for the troopy today. This is going to be a basic platform with hinged sections in the top to be able to wheel and camp out of the troop carrier for extended weekends. The top of the platform will be size of a queen mattress and is low enough that I can just barely sit up without hitting my head. Thinking I'll do a drawer fridge for this one, anyone have a good experience with any manufacturers?

Finished up the wood work today now just need to run some power to an outlet for the fridge. I have a trifold queen size mattress coming tomorrow from amazon to finish up the sleeping deck. I built this in 2 sections that are bolted together and fit very snug around the wheel wheels to lock it in place. We will have more than enough storage under the deck to camp out of this for multiple days. Bought a cheap drawer fridge for now, it got good reviews on line but I built the deck so the inside board can be moved over if I go to something different in the future.
 

Attachments

  • design.jpg
    design.jpg
    65.9 KB · Views: 12
  • sleep platform 3.jpg
    sleep platform 3.jpg
    64.1 KB · Views: 10
  • Sleep platform 2.jpg
    Sleep platform 2.jpg
    72.9 KB · Views: 12
  • sleeping platform.jpg
    sleeping platform.jpg
    78.7 KB · Views: 11
  • SP 5.jpg
    SP 5.jpg
    56 KB · Views: 3
  • SP 4.jpg
    SP 4.jpg
    60.8 KB · Views: 5
  • SP 7.jpg
    SP 7.jpg
    81.4 KB · Views: 4
  • SP 6.jpg
    SP 6.jpg
    51.7 KB · Views: 4
  • SP 9.jpg
    SP 9.jpg
    71.9 KB · Views: 4
  • SP 8.jpg
    SP 8.jpg
    66.1 KB · Views: 4
Last edited:

MarkEva

Rising Sun Member
Joined
May 15, 2024
Messages
43
I used to work on VW's decades ago and had a pile of metric fasteners that were all mixed up. I got a thread gauge and caliper and sorted everything into about 8 ziplocks. I also finished the 3rd of 4 skid plates for my Tacoma. Now all I need to do is burn up 1/4 tank of gas so I can put on the gas tank skid.
 

Attachments

  • IMG_3427.jpeg
    IMG_3427.jpeg
    1.3 MB · Views: 11

Capriblue45

Rising Sun Member
Joined
May 28, 2023
Messages
380
Slee got another batch of their 250 sliders back in stock so I went to their office and picked up a pair yesterday. I looked at a lot of manufacturers for the 250 and I think theirs fit the body lines the best. I also like that they are a functional step to help get to the roof rack. My garage queen may not see the trails for many years to come but if it does i am ready.
 

Attachments

  • sliders 3.jpg
    sliders 3.jpg
    61.5 KB · Views: 10
  • sliders 2.jpg
    sliders 2.jpg
    49.8 KB · Views: 10
  • sliders 1.jpg
    sliders 1.jpg
    65.7 KB · Views: 10

simps80

Rising Sun Member
Joined
Jan 22, 2009
Messages
2,897
Location
Arvada, CO
continued to declutter the garage by bolting on stuff i have owned for greater than 730 days…
in this case it’s the napa version of the standard no frills 8x8 awning i bought back from this thread:
[EMBED content="thread-34603"]https://risingsun4x4club.org/xf/threads/napa-roof-rack-awning.34603/[/EMBED]

I don’t always advertise product on my vehicles but when I do I prefer it to be big box corporations.. or Tim’s stuff 😀

utilized @nakman rack receivers - great product!

IMG_9154.jpeg

IMG_9153.jpeg
 
Back
Top