What have you done to your rig today?

On the RX

Rising Sun Member
Joined
Nov 19, 2016
Messages
2,137
Location
Superior
I had a brake hanging up on the passenger front. Took it all apart just to see that the positions in the caliper were all moving smoothly, which they were. Greased up the dry slider pins and called it good. Also chased down some rattles.
Rattle 1: loose bolt on bud built center skid. Tightened up nice, I must have started it and never returned after I tightened the others.
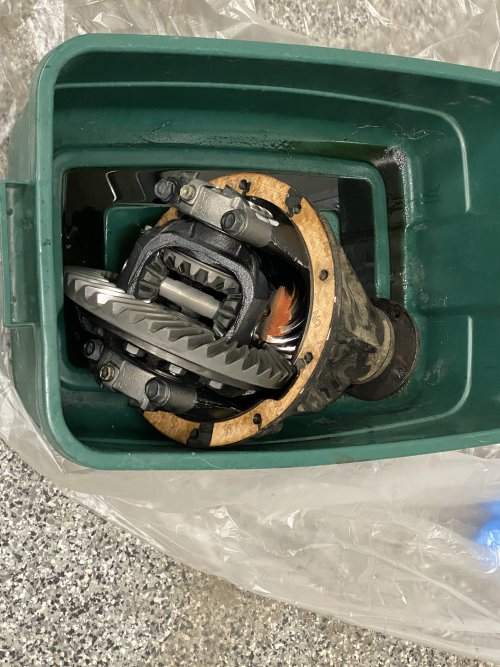
Rattle 2: little horseshoe harmonic balancer on center diff is rattling on the center skid. Not sure how to fix.
Rattle 3: exhaust tip is too close to the bumper and does some heavy petting when hot. Also noticed that the rubber hanger has a tear. Need to pop off the last section of pipe and trim about a half inch off the tip plus grab a new rubber piece for the hanger.
 

DomOfTheDead

Event Coordinator
Joined
Jun 2, 2019
Messages
1,169
Location
lakewood
Rear suspension revamp. Cut off old spring hangers and installed shackle flip. Some of the rivets came out easier than some of the others😬. Toytec rear shocks, u bolt flip and bumpstops. extended flexible brake lines front and rear. I struggled with my mityvac trying to bleed the brakes but i am not achieving the pedal feel i desire with it. Probably user error on that one.
20200308_142427.jpg
20200308_142416.jpg
20200308_123916.jpg
20200308_123622.jpg
 

Mendocino

RS Chapter Eternal
Gone But
Not Forgotten
Joined
Sep 27, 2005
Messages
2,466
Location
North Side
Today I adjusted my Staun’s to preset pressure levels to speed deflation on the 200. I have wanted to do this for a couple of years. Now that I have an 8’ 9” garage opening and could do it in the garage.

I used the spare on the rear bumper so I did not have to get close to the ground and could stand up.
7A49A41B-A83C-4BEB-8AFE-DB8981E65307.jpeg

My goal was 20#s for the fronts and 25#s for the rears. Our 200 is quite heavy, particularly in the rear, so I run the higher pressures on my Nitto Ridge Grapplers.

I started by base-lining the four Staun's to see where they were set. The variability was high: 12#s to 27#s. After testing, I put each one in a labeled bag.
04FD00D4-AAC0-4201-9AF6-4E38FBEBC63A.jpeg
I had the air fill hose close by to reinflate the spare after each test.
D285234C-97A0-4F0E-B06D-128EE2166179.jpeg

I initially used calipers to measure the overall length of each Staun to correlate the baseline deflation pressure to the length. I then adjusted the overall length for the desired deflation pressure. This did not work consistently. My guess is that there was spring variability between Staun’s. In the end I did in manually via trial and error.

C635FCC0-590B-43B3-A14C-CE7E8C5CA9D5.jpeg

I used two pairs of pliers to set the Staun lock ring. To identify the front (20# deflation pressure) from the rear (25#) I used nail polish to paint the rear’s red (Red for Rear).

I’m super happy I finally did this.
 
Last edited:

twentyfooteighty

Cruise Moab Committee
Joined
Nov 28, 2018
Messages
1,284
Location
Salida, CO
Andy and I did a thing. This week, Jackson will do a thing too. Then Andy and I will do a thing again in the other order.
 

Attachments

  • E862B387-C2BB-4FD0-9B04-E03603F51351.jpeg
    E862B387-C2BB-4FD0-9B04-E03603F51351.jpeg
    1.3 MB · Views: 215
  • B57D2E49-B8A4-4740-A672-44DD9BD06F29.jpeg
    B57D2E49-B8A4-4740-A672-44DD9BD06F29.jpeg
    1.1 MB · Views: 211

HoneyBadger

Rising Sun Member
Joined
Apr 24, 2013
Messages
1,852
Location
Pine
Justin and I finally tracked down a mysterious and horrible grinding noise coming from under the Honey Badger.
Thought it might be the rear output bearing on the T-case going out, but that wasn't it. Then replaced the carrier bearing because it was legitimately blown up. But that wasn't it. Turned out be dry U-joints in the double cardin on the rear half of the newly rebuilt drive shaft assembly. Might have had some dirt caught in there as well. Which is surprising because as you all know I only go wheeling at the mall...:confuse2:
Anyways we flushed it out and re-greased everything and it seems to have fixed the issue. For now. So we'll see. PRO TIP: Always make sure your shaft is properly lubricated...:ranger:
But while we were under there we also noticed that the rear splines are not seating on themselves enough. So looks like I'll have to have the rear driveshaft lengthened about 2-1/4" to make it ride on the splines correctly.
Ah well. It's just money, right?:dunno:
 

Stuckinthe80s

Rising Sun Member
Joined
Dec 29, 2017
Messages
2,367
Location
Lakewood, CO
I got about 150 into it and like 6 hours labor. It was worth it for sure but their are no reproduction dashes for my 80 so I didnt have that option open to me.
That's about how much time I thought it would take. For me it would probably be twice that! There are probably 4 times the number of minitrucks around the world compared to the number of 80 series so it makes sense the market hasn't offered up a replacement dash for them. That and the fact that your dash was only on a few model years.

It really looks good!
 

coax

Hard Core 4+
Joined
Oct 21, 2008
Messages
994
Location
Bend, OR
Continued the tear down. It sure is easy to remove the oil filter when everything is out of the way :D Just have to get a few stubborn exhaust bolts out, pull the wiring harness through the FW, disconnect fuel line, transfer linkage and then the crossmember to pull it out. I'm hoping one more full day of work and I'll have the engine out of the car.

FC544811-228F-4236-82A5-E7B81B9F7B29.jpeg
 

White Stripe

Hard Core 4+
Joined
May 5, 2015
Messages
1,318
Location
Milky way galaxy
I finally found a temperature sensor kit that fit in the switch blank spot of a 80 series. I'm using it for monitoring transmission temperature since I will be pulling trailers from time to time. But could be used for almost anything. Found it on etsy. He makes the kits for bmw's specifically, but with a little sanding of the opening it fit pretty good.
20200309_165845.jpg

I also found a used pop up camper on Facebook. Never owned a camper before. It's a trail pop up so it's fairly tall, has brakes, a spot for a ATV, 35 gallon water tank, toilet, indoor and outdoor shower, and new canvas.
20200310_071917.jpg
 

Inukshuk

Rising Sun Member
Joined
Aug 24, 2005
Messages
8,019
Location
Denver, CO
2006 100. Noticed a coolant drip a week ago. Tore into it Sunday night and the problem was plainly the thermostat housing O-ring. Disassembled and cleaned it all up. Had I known how expensive Toyota pink is I would have drained into clean containers for re-use ($18/gal). $3.00 o-ring, Toyota Pink and Black FIPG from Stevinson Monday AM, reassembled Monday PM, drove it to work today. (y)(y)

IMG_6186.jpg60539957767__8381B969-3785-422D-AEE5-983A85EA72B2.JPG60540605647__80091D64-39D0-4FC3-AE37-0D1CA5649D0E.JPGIMG_6212.jpg60550797092__1D0175EF-D5EB-410D-B860-3B43DCE4C59B.JPG
 

IoN6

Rising Sun Member
Joined
Sep 2, 2019
Messages
1,259
Location
Arvada
Hopefully it isn't ban-worthy... But I loaded up and moved my CJ5, first time it has seen day light in a decade 😩
IMG_20200312_162846.jpg
 

Telly

Rising Sun Member
Joined
Jan 4, 2008
Messages
1,611
Location
Monument
Dropped the fuel tank and installed the Underdog Racing Development fuel pump with external fuel filter kit in my new to me 07 FJ Cruiser. Took most of the day because I cleaned and rattle canned some undercarriage surface rust. Original intake fuel filter was incredibly dirty and I'm sure was original with 142,000 miles. The new set-up cured the pour high RMP performance. Yippee!
 

Romer

Moderator
Staff member
Joined
Aug 22, 2005
Messages
10,430
Location
Centennial, Colorado
Lots of projects

Trailtailors rear hatch storage
img_0262-jpg.2238542


Swapped to a National Luna Fridge so I could have a Fridge AND a Freezer
img_0201-jpg.2238543


National Luna Light for the rear hatch
dsc03837-jpg.2238545


Slee Skids Plates
dsc03840-jpg.2238549

BP51 Suspension
dsc03842-jpg.2238552

Swapped the ARB for a Slee Rear Bumper
dsc03845-jpg.2238556


and swapped my headunit for one of the Chinese Tesla style Android units
dsc03843-jpg.2238560

img_0281-jpg.2238562
 

Inukshuk

Rising Sun Member
Joined
Aug 24, 2005
Messages
8,019
Location
Denver, CO
Spooled 60' of amsteel blue on the winch under tension. Removed 85' of 3/8 cable the other day.
With the remainder from the group buy I'll have a 20' and 65' extensions
IMG_6343.jpg
 
Last edited:
Back
Top