• RS MAY CLUB MEETING
    Hi Guest: Our monthly RS meeting on Wed. May 1st will be held at the Rooney Sports Complex. Details and directions are here. Early start time: 7:00 pm. to take advantage of daylight. We'll be talking ColoYota Expo and Cruise Moab.
    If you are eligible for club membership, please fill out an application in advance of the meeting and bring it with you.

Fiona, the blowed up 80 build

jps8460

Cruise Moab Committee
Joined
Feb 15, 2013
Messages
2,926
Location
Broomfield
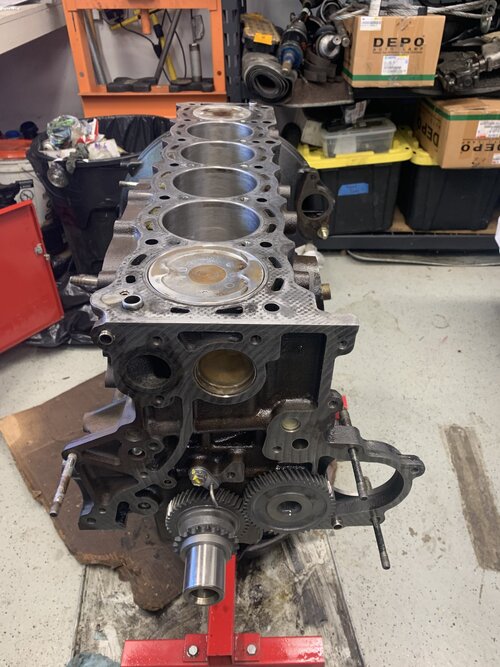
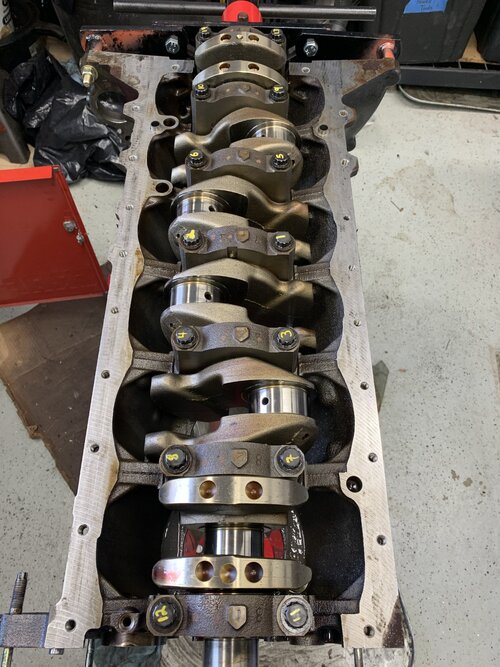
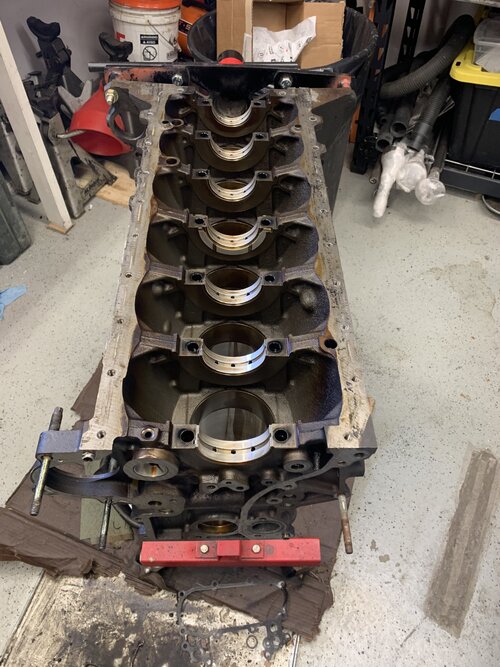
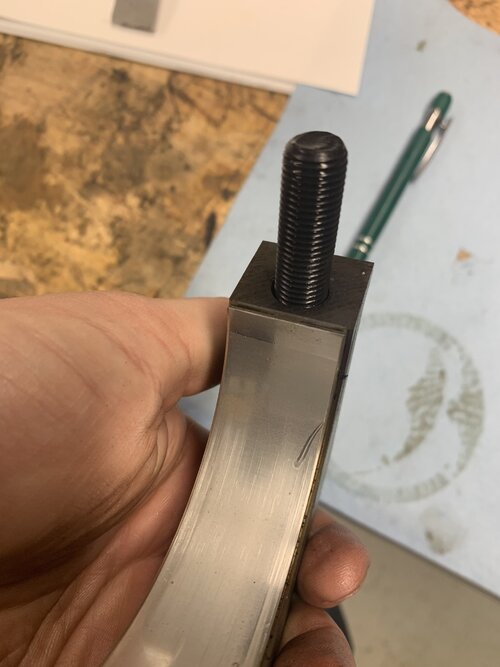
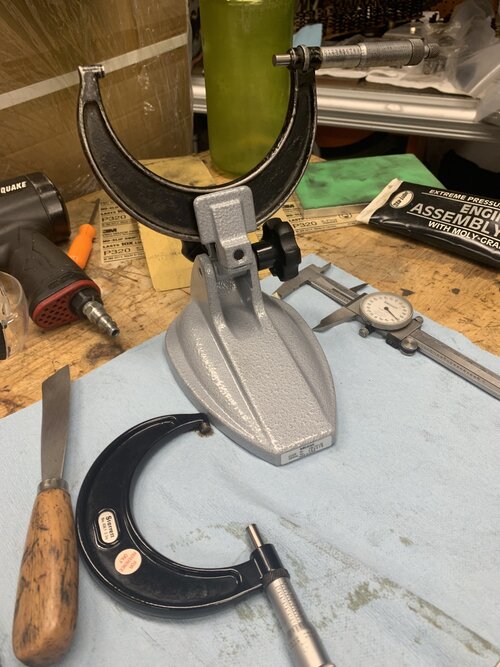
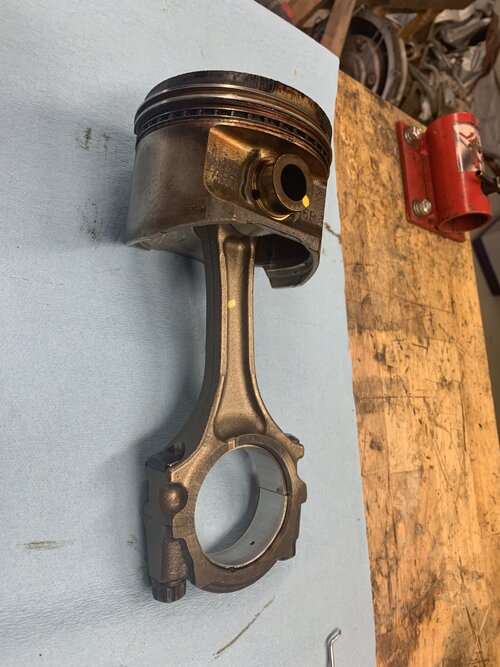
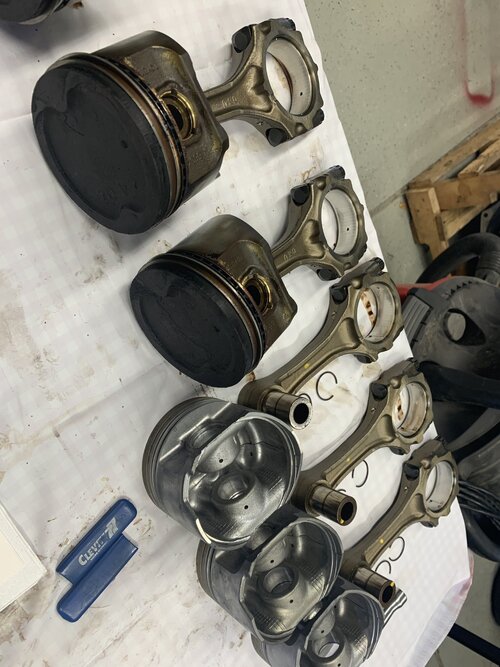
Somewhere in between those last two steps I inspected the crank and bearing. The crank is in near perfect condition. I’ve seen brand new $1200 racing cranks that were in worse shape than this. I did have one bearing that had a deep flaw. I’ll replace that one.

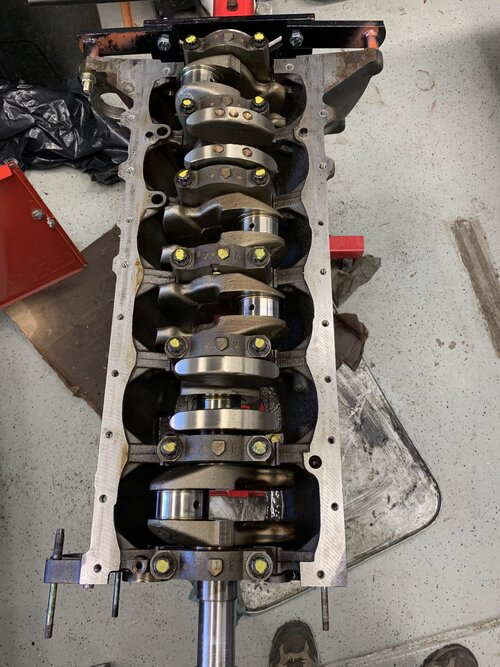
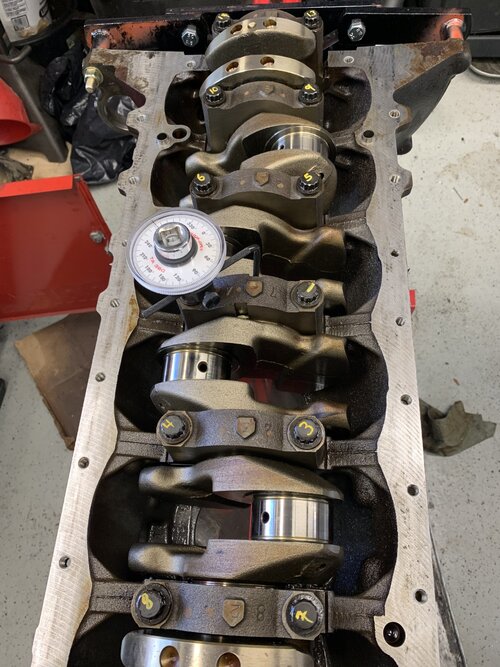
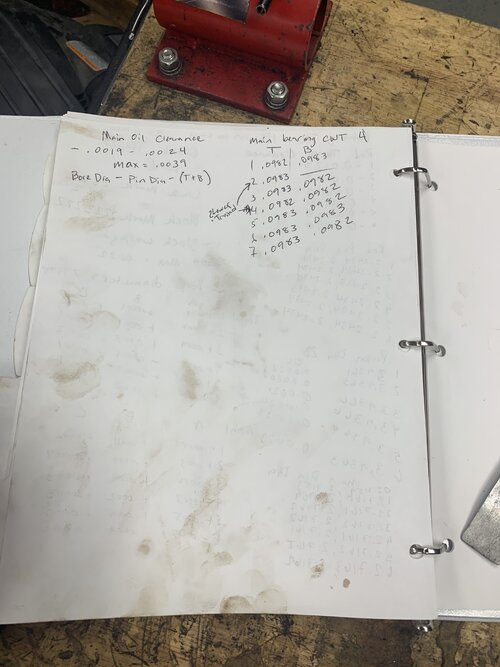
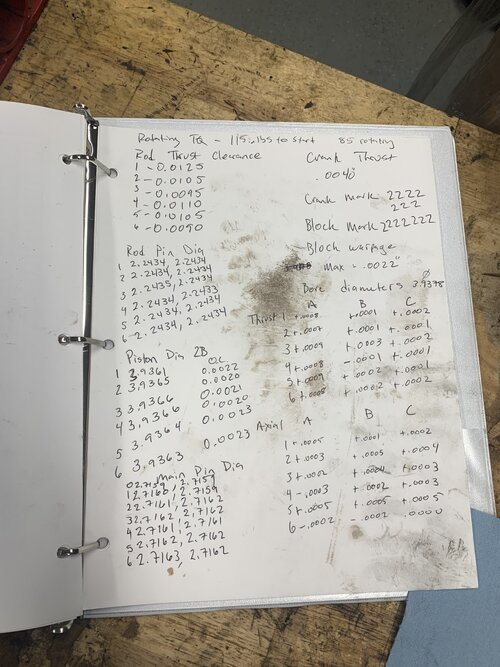
all oil clearances are in spec, so it’s getting put back together with all main bearings except #2
 

Attachments

  • C06AFB02-AD58-43FB-9480-E6C06E6EC4C4.jpeg
    C06AFB02-AD58-43FB-9480-E6C06E6EC4C4.jpeg
    1.8 MB · Views: 153
  • 36E4C94A-FC45-40E1-B3F8-4F257D59DF21.jpeg
    36E4C94A-FC45-40E1-B3F8-4F257D59DF21.jpeg
    2 MB · Views: 157
  • AA550259-83B3-4295-9999-08E297B54934.jpeg
    AA550259-83B3-4295-9999-08E297B54934.jpeg
    1 MB · Views: 163
  • CD307ADD-C45D-4F0B-984A-DA5072CBA575.jpeg
    CD307ADD-C45D-4F0B-984A-DA5072CBA575.jpeg
    1.6 MB · Views: 157
  • 86B2C2B1-9DED-4B97-8563-4EA290C3F57D.jpeg
    86B2C2B1-9DED-4B97-8563-4EA290C3F57D.jpeg
    1.1 MB · Views: 160
  • 41CAAC3F-7A16-4E6E-B44C-7A2A793F7C8F.jpeg
    41CAAC3F-7A16-4E6E-B44C-7A2A793F7C8F.jpeg
    1.1 MB · Views: 153
  • 3070F210-55FA-44F9-A640-79523F0960E5.jpeg
    3070F210-55FA-44F9-A640-79523F0960E5.jpeg
    921.7 KB · Views: 140
  • 6AABF20F-58A1-4F75-A6CA-1FC88CC986F9.jpeg
    6AABF20F-58A1-4F75-A6CA-1FC88CC986F9.jpeg
    1.3 MB · Views: 149

jps8460

Cruise Moab Committee
Joined
Feb 15, 2013
Messages
2,926
Location
Broomfield
I moved on and started inspecting Pistons and bores. The Pistons all had very minor scuffing on the major thrust side. Nothing noteworthy though.

piston to bore oil clearances were all on the high side, but well within spec. Boy do I love my ultrasonic cleaner.

ring lands all look great. Piston 6 showed the most scuffing, but insignificant by anyone’s standards.

I opted for a new set of standard Toyota rings. 3 top compression rings showed signs of wear, so I figured I’d seal those jugs up for a few hundred thousand more miles.
 

Attachments

  • 026FE800-9A5B-4B7D-85B6-C9D1996EF725.jpeg
    026FE800-9A5B-4B7D-85B6-C9D1996EF725.jpeg
    1.6 MB · Views: 147
  • 72B1EF8C-86FA-4A25-B60D-118AF9924AD1.jpeg
    72B1EF8C-86FA-4A25-B60D-118AF9924AD1.jpeg
    1.6 MB · Views: 156
  • 30F2125A-6F94-443F-BCBC-0742225BDBB3.jpeg
    30F2125A-6F94-443F-BCBC-0742225BDBB3.jpeg
    1.5 MB · Views: 158
  • A109D6F5-F33E-4833-A2AC-9A3B195FB72B.jpeg
    A109D6F5-F33E-4833-A2AC-9A3B195FB72B.jpeg
    1.2 MB · Views: 146
  • BDD988DA-6914-44FC-886E-D43354C6985E.jpeg
    BDD988DA-6914-44FC-886E-D43354C6985E.jpeg
    2 MB · Views: 153
  • A8E98047-0844-4011-90CC-2E1343A94E35.jpeg
    A8E98047-0844-4011-90CC-2E1343A94E35.jpeg
    1.5 MB · Views: 147
  • 431722B6-9084-426A-B371-C0BA058D7458.jpeg
    431722B6-9084-426A-B371-C0BA058D7458.jpeg
    1.4 MB · Views: 132
  • 1A062C20-988C-4307-9428-5A1E188D3D98.jpeg
    1A062C20-988C-4307-9428-5A1E188D3D98.jpeg
    1.4 MB · Views: 144

jps8460

Cruise Moab Committee
Joined
Feb 15, 2013
Messages
2,926
Location
Broomfield
I need to inspect the main bolts, rod bolts, rod bearings, bores, clearances, and wrist pin bushing and bore oil clearances next.

I’m ordering most of my bottom end stuff tomorrow.

after my rings and replacement bearing, and timing chain stuff shows up, I should be able to get the bottom end together shortly.

then it’s finish inspecting the head and cams and slapping them back together.

I went ahead and ordered a new timing cover and oil pump from @cruiseroutfit
 

fjc man

Rising Sun Member
Joined
Dec 18, 2016
Messages
299
Location
Commerce City, Colorado
In your pictures of the pistons, your oil control rings looked stuck / compressed. Definitely won’t hurt to have new ones. I did see they’re on the list. It’s coming along nicely.
 

Notyourmomslx450

Cruise Moab Committee
Joined
Aug 4, 2014
Messages
3,256
Location
Westminster
I have some assembly lube doing nothing but taking up space if you want it.
 

jps8460

Cruise Moab Committee
Joined
Feb 15, 2013
Messages
2,926
Location
Broomfield
In your pictures of the pistons, your oil control rings looked stuck / compressed. Definitely won’t hurt to have new ones. I did see they’re on the list. It’s coming along nicely.
They were actually free on all Pistons, but yea, they’ve definitely seen better days.
I have some assembly lube doing nothing but taking up space if you want it.
ooo I always like more lube :)
 

White Stripe

Hard Core 4+
Joined
May 5, 2015
Messages
1,287
Location
Milky way galaxy
Have you thought about doing some porting on the head? It's a little time consuming but if you have the time you might pick up 20hp or more. I ported a 3vzfe motor and it was very noticeable above 3k rpm. I just used cheap Chinese carbide bits. It was very inexpensive to do.
 

jps8460

Cruise Moab Committee
Joined
Feb 15, 2013
Messages
2,926
Location
Broomfield
Have you thought about doing some porting on the head? It's a little time consuming but if you have the time you might pick up 20hp or more. I ported a 3vzfe motor and it was very noticeable above 3k rpm. I just used cheap Chinese carbide bits. It was very inexpensive to do.
The thought crossed my mind, a basic bowl blend and short side touch up, but I don’t have time as it is. I’m sure this head could benefit from it a lot. I guess she’ll just remain a stocker.
 

LARGEONE

Rising Sun Member
Joined
Jun 12, 2007
Messages
2,875
Location
Broomfield, CO
You are a bad-ass! I can barely tackle an oil change these days!
 

coax

Hard Core 4+
Joined
Oct 21, 2008
Messages
994
Location
Bend, OR
@jps8460 If you have any need for some random parts in the event you need them; still have these. Free. Would send them to you flat rate box.


jps8460

Cruise Moab Committee
Joined
Feb 15, 2013
Messages
2,926
Location
Broomfield
@jps8460 If you have any need for some random parts in the event you need them; still have these. Free. Would send them to you flat rate box.

Man, thanks for the offer. I’m doing good on parts so far. I’m a really good hoarder lol.
 

jps8460

Cruise Moab Committee
Joined
Feb 15, 2013
Messages
2,926
Location
Broomfield
I made some good progress this week. I got the bottom end cleaned and put back together.

I found a couple of interesting things. #1. The “block” section of the service manual has a copy paste error. It states that the rod and main bearings have the same thickness “0.0983” or whatever it is. In reality the rod bearing thickness is much thinner, more like 0.0693 ish. #2. The OEM engine gasket kit shorted me an oil cooler gasket.

After scratching my head for a min, I figured everything out.

I found all of my rod oil clearances to be right around 0.002, so perfectly acceptable.

all of my rod bolts and main bolts were in spec for diameter and reused.

Once the bottom end was together, I started in on inspecting the head/valvetrain more on that later
 

Attachments

  • 75C0B76A-3D05-4313-A201-2590A6D1A1A5.jpeg
    75C0B76A-3D05-4313-A201-2590A6D1A1A5.jpeg
    1.6 MB · Views: 141
  • A7A1F18C-5450-4DD5-8605-9A2AD432EE53.jpeg
    A7A1F18C-5450-4DD5-8605-9A2AD432EE53.jpeg
    2 MB · Views: 139
  • BCF3C2F0-7A22-44EB-A62C-451D84C56D81.jpeg
    BCF3C2F0-7A22-44EB-A62C-451D84C56D81.jpeg
    2 MB · Views: 136
  • 2C1CCFA4-95ED-4452-808B-78208DF3807C.jpeg
    2C1CCFA4-95ED-4452-808B-78208DF3807C.jpeg
    1.2 MB · Views: 128
  • A8EFE658-3047-4D75-9D07-1FEC3C02777B.jpeg
    A8EFE658-3047-4D75-9D07-1FEC3C02777B.jpeg
    2 MB · Views: 148
Last edited:

jps8460

Cruise Moab Committee
Joined
Feb 15, 2013
Messages
2,926
Location
Broomfield
I got the bottom end buttoned up this weekend. Getting things functionally clean is such an ass beating. Anyhow everything went well.

A couple of notes:
1. 1 tube of black toyota FIPG is just the perfect amount for 1 - 1fzfe.
2. The oil pump gear is driven off of a gear that sloppily fits the crank snout. I would imagine that if you don’t get the balance pulley bolt tightened to spec, it makes a racket and eventually shears the woodruff key. This would lead to 0 oil pressure. I gave it a preliminary whack with the 1/2” impact. I’ll probably whip up a tool to hold the pulley when finishing the job. The slop is there to facilitate matching up the drive splines for the oil pump.
3. I found out that I’m missing one water pump stud (I bought this as a “non-dressed” long block. So o had to order it from Mr T.
4. The relief valve in my oil cooler was pretty coked up and did not move easily. I disassembled it, cleaned it and put a new spring in it.
5. My oil pump outer gerotor was borderline on OD and had some scratches in it. So, I put a new pump on from Mr. K
anyhow, not much to report, just a lot of tedious cleaning and gluing stuff together

onto the head!
 

Attachments

  • 28FC2BC0-BDD9-404B-8DE6-F1EF46F0FBA9.jpeg
    28FC2BC0-BDD9-404B-8DE6-F1EF46F0FBA9.jpeg
    3.7 MB · Views: 140
  • DA1268B6-EE3C-4526-B50C-6C6A9EED8877.jpeg
    DA1268B6-EE3C-4526-B50C-6C6A9EED8877.jpeg
    3 MB · Views: 140
  • 44B72CE8-07F3-42A2-BB36-9AD1D162FC53.jpeg
    44B72CE8-07F3-42A2-BB36-9AD1D162FC53.jpeg
    3.8 MB · Views: 142
  • 61394440-0316-4500-B02E-68A3ADC7E45C.jpeg
    61394440-0316-4500-B02E-68A3ADC7E45C.jpeg
    2.6 MB · Views: 137
  • 4B4F8B6A-8FF3-4F3E-8BD6-44DD2941D685.jpeg
    4B4F8B6A-8FF3-4F3E-8BD6-44DD2941D685.jpeg
    1.5 MB · Views: 133

jps8460

Cruise Moab Committee
Joined
Feb 15, 2013
Messages
2,926
Location
Broomfield
I started getting the head whipped into shape.

I cleaned and lapped all of the valves. I couldn’t find my dykem, so I used gear pattern compound. It made it trickier to see the contact after lapping, but it did the trick. I was expecting a simple clean up, so I lapped with 320 grit silicon-carbide.
All of the margins were fine. The contact on the exhaust valves were all pretty wide (a couple were barely out of spect, but it will be ok for my needs.

The intake valves are all dialed, no concerns there.

I just have 1 exhaust valve that won’t clean up. We have a bin full of them at work, so I’m going to steal one and see if I can get it lapped into shape. If not, I’ll just take the whole head in for a proper valve job.

Does anyone in the club have and pilots and 45 and 70 degree stones they want to bum me? :)

anyhow, everything is looking good with guide clearances and valve stem diameters.
 

Attachments

  • 822DA11A-736F-49FF-94FD-E4C9470BB87E.jpeg
    822DA11A-736F-49FF-94FD-E4C9470BB87E.jpeg
    1.8 MB · Views: 135
  • 2B112BEB-EA7A-48A2-A8E2-950F54EED8BB.jpeg
    2B112BEB-EA7A-48A2-A8E2-950F54EED8BB.jpeg
    1.8 MB · Views: 136
  • 8DFA9F22-C0BA-4DF8-B83C-AC0BF97A3974.jpeg
    8DFA9F22-C0BA-4DF8-B83C-AC0BF97A3974.jpeg
    2.2 MB · Views: 131
Last edited:

rover67

Rising Sun Member
Joined
Nov 1, 2007
Messages
9,322
Location
Boulder, Co
I bet the right stuff is in the valve grind kit me and Drew used for the race car. LMK if you need it. It’s pretty backwoods but it works
 

jps8460

Cruise Moab Committee
Joined
Feb 15, 2013
Messages
2,926
Location
Broomfield
I bet the right stuff is in the valve grind kit me and Drew used for the race car. LMK if you need it. It’s pretty backwoods but it works
Maybe, I was half joking, using stones without being able to dress them in a grinder makes me nervous lol. I’m sure I’ll get it figured out.
I looked back after the post, this is the exhaust valve that had excessive valve lash, so something is up.... not sure which came first chicken or egg.
 

rover67

Rising Sun Member
Joined
Nov 1, 2007
Messages
9,322
Location
Boulder, Co
we have the setup to dress them also but it is still a shadetree setup lol
 

FunkyYota

Rising Sun Member
Joined
Nov 6, 2019
Messages
304
Location
Evergreen
Real thorough. Nice!

Maybe I missed it, but did you find the source of the knock? Honestly those bearings look fine.

Here are the mains I took out of a Ford 390FE a couple weeks ago. Yours look new comparatively.
4EBE2F61-27A6-401B-9D60-C158B570F6E2.jpeg
 

jps8460

Cruise Moab Committee
Joined
Feb 15, 2013
Messages
2,926
Location
Broomfield
Real thorough. Nice!

Maybe I missed it, but did you find the source of the knock? Honestly those bearings look fine.

Here are the mains I took out of a Ford 390FE a couple weeks ago. Yours look new comparatively.
View attachment 99367
I haven’t torn down the engine in the 80 yet. This is a long block that I had hoarded. It was a good runner with 230k on the clock.

Those puppies are shot. And discoloration on the main caps? Looks like that was about ready to catch and spin.
 

jps8460

Cruise Moab Committee
Joined
Feb 15, 2013
Messages
2,926
Location
Broomfield
Well, I got a bunch done over thanksgiving. I had to source some bolts and misc from Mr. T which held some progress up.

But, I got it close enough that it justified sorting the garage and pulling the ol’ girl in to start the tear down.

The alt nut was broken, and the plug/pig tail were is shambles. I found a clean pig tail to solder in.

The ext wire that goes to the distributor was also f’ed, and I was able to source a clean one to solder in.

Once again, I had trouble getting my torque angle meter set up and working properly. So, I just followed the manual. It basically says after torquing, put dots on the front side of the bolt head. Turn 90deg in sequence, then turn another 90. The dots should face the back.

I had to tweak the lash on a couple of valves. I got the proper lash discs today. I’ll pop those in and then button up the valve cover :).

Aside from that, it’s a bunch unbolting, re-bolting, swearing, and it should be good to go.
 

Attachments

  • D900FCB3-8E2D-4780-9169-AE0DB5AF3103.jpeg
    D900FCB3-8E2D-4780-9169-AE0DB5AF3103.jpeg
    1.4 MB · Views: 122
  • CC0D1EDF-3A63-4BE4-A63B-4EEDC9CB4BE8.jpeg
    CC0D1EDF-3A63-4BE4-A63B-4EEDC9CB4BE8.jpeg
    1.2 MB · Views: 126
  • 60EF6B66-7232-4587-9373-4F9FAF855DAF.jpeg
    60EF6B66-7232-4587-9373-4F9FAF855DAF.jpeg
    1.6 MB · Views: 123
  • 93406383-4AA3-43A8-9C6D-3AD35D33DD67.jpeg
    93406383-4AA3-43A8-9C6D-3AD35D33DD67.jpeg
    2.8 MB · Views: 114
  • A8AEAF47-A4EF-418D-86F2-F92C260571D5.jpeg
    A8AEAF47-A4EF-418D-86F2-F92C260571D5.jpeg
    1.4 MB · Views: 119
  • 87932768-592C-4CFD-90A7-30F53B852F0A.jpeg
    87932768-592C-4CFD-90A7-30F53B852F0A.jpeg
    1.5 MB · Views: 118
  • 7D94F31E-09A1-4992-824C-5170F85FC29E.jpeg
    7D94F31E-09A1-4992-824C-5170F85FC29E.jpeg
    1.9 MB · Views: 111
  • 967C8376-E9F6-4FB2-B7CD-7B6DB4EF76B0.jpeg
    967C8376-E9F6-4FB2-B7CD-7B6DB4EF76B0.jpeg
    2.1 MB · Views: 120
  • 738746A8-B5C4-49AB-9CD9-F6DDF012F275.jpeg
    738746A8-B5C4-49AB-9CD9-F6DDF012F275.jpeg
    1.6 MB · Views: 110
  • CACED9DE-0CC4-430B-907B-A86EA11C7857.jpeg
    CACED9DE-0CC4-430B-907B-A86EA11C7857.jpeg
    3.7 MB · Views: 119
Top