YAAAAASSSSS!!!!!I bought an 1996 FJ80. And put a battery in it. the truck is a little rough around the edges; 260k, no lockers, dry rot tires, needs brakes, dead battery, front seats are beat up but it runs pretty good and my plans are for hard usage. Huge thank you to @DanielChase for the lead, negotiating and help getting the truck home! Now to get it through emissions....
-
Hey Guest:
Wed. April 1st is the next Rising Sun meeting, and you won't want to miss it. We're doing our annual offroad recovery equipment demonstration and trail skills training aka "Jack It Night" at Envision Fabrication. Meeting starts at 6:30 p.m. (early). All are invited to attend! Click for more information and location.
You are using an out of date browser. It may not display this or other websites correctly.
You should upgrade or use an alternative browser.
You should upgrade or use an alternative browser.
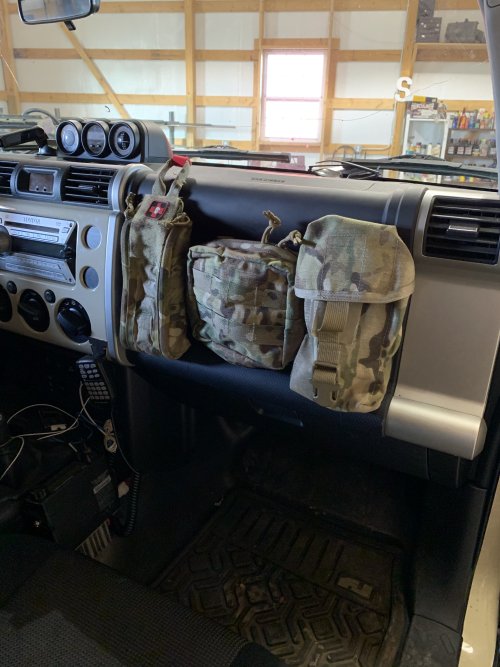
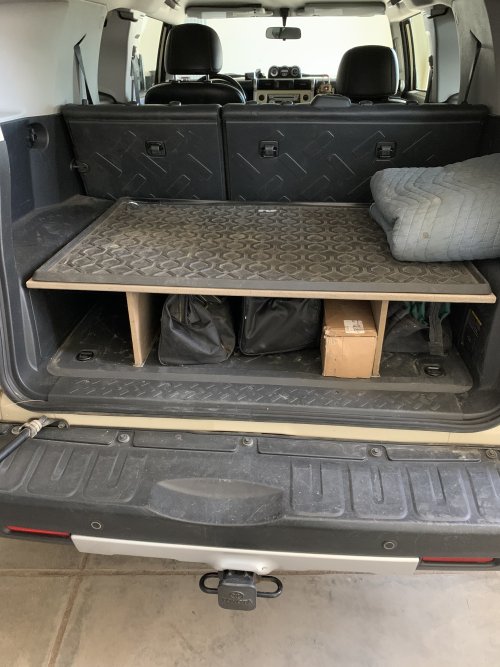
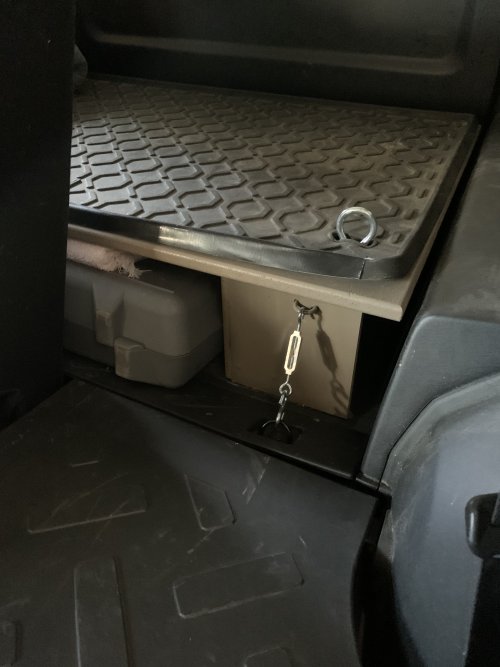
What have you done to your rig today?
- Thread starter HoneyBadger
- Start date
Stuckinthe80s
Rising Sun Member
So I've had my third pedal in my 80 for about 6 months now and a few weeks ago I started feeling some slop in the throw. Upon investigation I found out that the firewall was actually tearing around the bracing plate I put in to actually prevent this from happening. It obviously didn't work:

This image is after I pulled the sheet metal out to help align it back but you can tell that the fabricated clutch pedal bucket was actually beginning to pull the metal in towards the cabin.
My clutch pedal bucket is a fabbed up gig I got from a Mud member after he switched to a factory setup. He warned me that this was going to happen but I didn't think it would happen this quickly. The factory bucket has an arm that connects to the bottom side of the cowl valley for support/ prevention of this happening. This one does not:

So for the meantime, I welded a piece of angle iron on top of the bracing plate and then another piece on top of that to brace the whole assembly against the lip under the hood:

It's kinda hard to tell but you probably get the jist. I'm thinking it will at least last long enough for me to figure out a more permanent solution.
This image is after I pulled the sheet metal out to help align it back but you can tell that the fabricated clutch pedal bucket was actually beginning to pull the metal in towards the cabin.
My clutch pedal bucket is a fabbed up gig I got from a Mud member after he switched to a factory setup. He warned me that this was going to happen but I didn't think it would happen this quickly. The factory bucket has an arm that connects to the bottom side of the cowl valley for support/ prevention of this happening. This one does not:
So for the meantime, I welded a piece of angle iron on top of the bracing plate and then another piece on top of that to brace the whole assembly against the lip under the hood:
It's kinda hard to tell but you probably get the jist. I'm thinking it will at least last long enough for me to figure out a more permanent solution.
KC Masterpiece
Hard Core 4+
- Joined
- May 4, 2019
- Messages
- 2,050
Swapped out the old tired alt with a denso reman. No noise for about 2 minutes. Then it came right back. Everything else spun nice with no noise so not sure what my culprit is. Belts maybe? They are oem with only 20k on them but do look a little dry....
Old alt definitely has bad bearings. Going to rebuild for a trail spare.
Old alt definitely has bad bearings. Going to rebuild for a trail spare.
CardinalFJ60
Rising Sun Member
AlpineAccess
Hard Core 4+
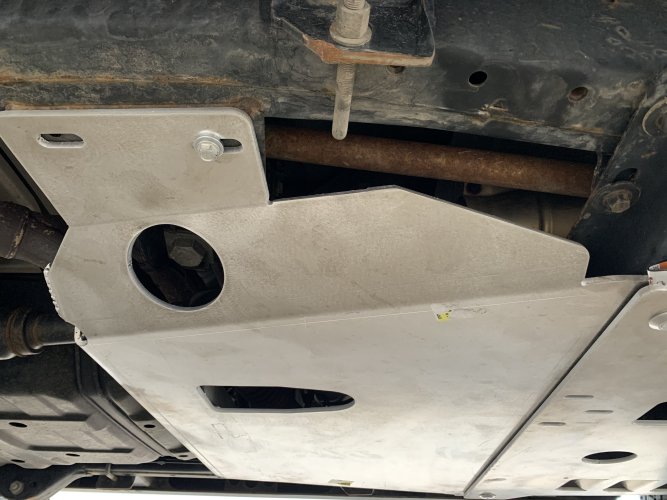
Good Grief those are well thought out. They make my ASFIR skids look like bar stock.Dissent off road Aluminum skid plates on the LX.


krice118
Trail Ready
Got some rear adjustable Tough Dog shocks from Trail Tailor and going to install this weekend, Any advice for replacing 100 series rear shocks? Tips and tricks appreciated.
@krice118 squirt those shock ends with PB Blaster today, again tomorrow, can't reallly do it too much. You have to drop the spare to get to the top bolts. And if I remember correctly that top one is a real bugger to access. but if you free the bottom completely then you can remove it by just getting a wrench on it and spinnng the shock, rather than twisting the bolt. Kinda like the front shocks on an 80.. same deal.
krice118
Trail Ready
@krice118 squirt those shock ends with PB Blaster today, again tomorrow, can't reallly do it too much. You have to drop the spare to get to the top bolts. And if I remember correctly that top one is a real bugger to access. but if you free the bottom completely then you can remove it by just getting a wrench on it and spinnng the shock, rather than twisting the bolt. Kinda like the front shocks on an 80.. same deal.
Thanks Tim. I'll post up some pics later. I also have a Victory 4x4 front bumper and comeup winch coming. Gamiviti Rack last year and bumper and new suspension 2021 - good time to be a 23 year old Wagon.
Flex head ratchet wrenches are really nice for this job. Depending on if you have oem shocks or something else in there the top but can be different sizes. Dm me if you get stuck and need to borrow. IIRC the tough dogs are a different size nut. They also don’t come with the bushing washers, not necessary but you should have some from your take offsGot some rear adjustable Tough Dog shocks from Trail Tailor and going to install this weekend, Any advice for replacing 100 series rear shocks? Tips and tricks appreciated.
AlpineAccess
Hard Core 4+
22mm flex head ratcheting wrench!
The TD shocks have a different size nut though, think its 24mm so putting it back on sucks.
The TD shocks have a different size nut though, think its 24mm so putting it back on sucks.
Finally got around to installing my WeBoost cell phone booster and antenna yesterday, then I took it for a test run up Switzerland Trail. It definitely improves reception, but once you get down in the canyon, there's no signal to be found (not surprising). The Rhino Rack folding antenna mount made installation a breeze, though it is horribly overpriced, IMO (as is the case with most Rhino Rack stuff). I do like that I can fold the antenna down when I'm not wheeling, because it looks pretty stupid up there. 
I need to find a better spot to mount the booster itself, but the 2nd row floorboards will do for now.


I need to find a better spot to mount the booster itself, but the 2nd row floorboards will do for now.
Inukshuk
Rising Sun Member
Slept in it.

DomOfTheDead
Event Coordinator
Tire day for the taco: pulled off the 305/70 Coopers on method pseudo-locks and installed 285/75 Bfg ko2s on OE alloy 16s. With the 305 STTs on, the steering had noticeable drag and was over-stressing components causing failures. 285 all terrains should help lighten the load (slightly) and improve performance in winter weather, on road handling and mileage. The 305s will be making their way to my 80....

OHUZJ100
Locked
- Joined
- Jul 11, 2019
- Messages
- 284
Replaced the roof rack moulding and cleaned the channel where it sits. The thread here on RS is pretty concise and should lead anyone doing the same in the right direction


Then I had to redo the rear brake fitting kit. The dipsh*t who installed them last didn't take his time. Oh wait, I did my brakes last
The rotors or pads were passively squealing and making metallic sounds when turning. I bought a new kit and shims for $45 bucks, and I can ensure you I will never make that mistake again. Tip: replace your fitting plates one at a time to ensure everything is correct.

Finally, I bled the brake system and put new toyota dot 3. Pedal is firm, and trucks stops great now.
This was my first time using a utility in Tech stream. If you have a 100, or the option in general you absolutely should use techstream to "air bleed" your system. This bleeds the abs module and having a computer control the flow of fluids works amazing. Interestingly, on my 98' I can only air bleed the fr and fl. My guess is you can only do all the lines if you have VSC equipped vehicle.
Good times, having a LC that stops good is pretty cool I guess
Then I had to redo the rear brake fitting kit. The dipsh*t who installed them last didn't take his time. Oh wait, I did my brakes last
The rotors or pads were passively squealing and making metallic sounds when turning. I bought a new kit and shims for $45 bucks, and I can ensure you I will never make that mistake again. Tip: replace your fitting plates one at a time to ensure everything is correct.
Finally, I bled the brake system and put new toyota dot 3. Pedal is firm, and trucks stops great now.
This was my first time using a utility in Tech stream. If you have a 100, or the option in general you absolutely should use techstream to "air bleed" your system. This bleeds the abs module and having a computer control the flow of fluids works amazing. Interestingly, on my 98' I can only air bleed the fr and fl. My guess is you can only do all the lines if you have VSC equipped vehicle.
Good times, having a LC that stops good is pretty cool I guess
AlpineAccess
Hard Core 4+
I've been trying to find a rattle on the 100 for years. Was messing around by the ABS module re-routing my brake controller wires when I heard something rattle oh so quietly. Grabbed my inspection light. Low and behold, I present:.

It's the size of a walnut. Somewhere a squirrel is really proud of himself.
Also my tensioner pulley and idler pulley decided to start making noise, so pulled those off and have new ones on the way. The idler pulley on this motor is the most solid idler I've ever removed from a vehicle - has some serious heft to it. Original bearings in them at just under 200k. These pulleys could easily just have new bearings pressed in but I can't find the tensioner bearing for sale.
Just finished installing the mil spec battery terminals to get rid of the hodgepodge I had connected before. Digging these things. Busted out the welder to make my own bolts from all thread and nuts I had laying around, and fabbed a 90* turn bracket for the fusible link and welded in the old battery post using an old engine cover bracket that was laying around. Fun little project.
Next is the 27F I have ordered but Costco didn't have in stock. My current battery is only holding about a 60% charge.
Johnny Utah
Rising Sun Member
@AlpineAccess would you mind sharing a link to what kind and where you got the battery terminals? Thanks!
AlpineAccess
Hard Core 4+
For sure. These are the ones I got. They are made in USA and arent just coated to look like lead like some of the other ones.@AlpineAccess would you mind sharing a link to what kind and where you got the battery terminals? Thanks!
I replaced the 3/8 bolt on the backside with a 5/16 bolt so that I didn't need to drill out everything. Worked great and has plenty of contact.
You will need to make a 90* twist for the fusible link with something highly conductive and with enough meat on it for the amperage. Lots of guys on mud using brass stock and twisting it. I used an old piece from an engine cover bracket - cut what I needed, reshaped it with the torch, drilled a hole and tacked in the post top from the old battery terminal. I wanted something that would fit under the boot supplied by fastronix. Brass would have been infinitely easier to shape up but I didn't want to go to the store. Here's what it looks like:
Not pretty but it works and has more meat to it than the stock setup.
Last edited: