IH8RUST: FJ60

MonPetiteShoe

RS Club Commander
Cruise Moab Committee
Joined
Oct 7, 2020
Messages
632
Location
Aurora
The EGR cooler, attached to the EGR valve, has two pipes extending from it: a hard line that routes up to the manifold and a flexible, corrugated pipe connected to the EGR valve. The new supplied EGR cooler had the corrugated line and the EGR valve attached as one unit. This had to be separated to feed the corrugated section through the new header tubes. This fought us for hours trying to separate the cooler and the line. After many rounds of heating, quenching, and trying to loosen it, it finally released
The hardline that routes exhaust into the cooler was a bear. I had been fighting with it for significantly longer than I had anticipated. I heated it, quenched it, heated it, quenched it, new tools, old tools, percussive persuasion... It didn't matter, the big ol' nut would not budge. Frustrated, I moved onto another project and left the EGR cooler for the next day. With a good night sleep, and some head scratching I returned the next morning with renewed purpose. I had a plan of attack. That EGR pipe was going to get removed. God as my witness. As I manipulated the cooler for set up, it simply came loose without any tools. Relief, and a little bit of a let down.

Freakin' sweet write up! No one can fault you for not being thorough.
 

RDub

Trail Ready
Joined
Feb 9, 2021
Messages
372
Location
Boulder, CO
The j-pipe on mine also had a stuck nut. Lots of PB Blaster, a bit of percussive persuasion, and a 3-foot long pipe wrench and it unscrewed like it was meant to. That all took about a week to accomplish. Only to find that the j-pipe flange weld was cracked most of the way around. New is available from SOR, but we welded it and so far so good. That whole EGR system is a cluster kluge.
 

IH8RUST

Lifted
Joined
Jun 13, 2024
Messages
170
Location
Colorado Springs
Freakin' sweet write up! No one can fault you for not being thorough.

It's fun to write this to acknowledge all the effort, and I figured someone else might benefit from knowing how much work it might require. Every rig will be unique, but the major mechanical components usually get the same treatment. What I also didn't find online is the collective or institutional knowledge base of how much work might go into it. It's always the isolated or localized posts about something, but none about the complete story.

Also, I agree that preserving and working on the emissions gear is a mess. I'm a law-abiding citizen who has chosen to maintain my settings near factory defaults. I will eventually replace the catalytic with a compliant one; God help me if anything goes sideways. Additionally, I wish the regulations were more lenient regarding emissions from older vehicles. Is there a Jay Leno that can save us from Colorado?
 
Last edited:

IH8RUST

Lifted
Joined
Jun 13, 2024
Messages
170
Location
Colorado Springs
Replaced the front running light housing against my better judgment, I should have restored it.

IMG_2466.JPEG
IMG_2465.JPEG

Back to the tail lights! Last week, after replacing the headlights, I turned my attention to replacing the bulbs with LEDs. I started walking around the rig, pulling out items and replacing bulbs.

I posted this on Mud, but I will re-post it here for the sake of thoroughness. Here's the breakdown:


ComponentStatus
Headlights✅ Working
Brake Lights✅ Working
Dash Illumination✅ Working
Front Side Markers✅ Working
Rear Side Markers❌ Not Working
Tail Lights (Rear)❌ Not Working
License Plate Lights❌ Not Working
Rear left turn signal✅ Working
Rear right turn signal❌ Not Working

I mentioned @Cruisertrash's Fusible Link in the post just as a data point, that I replaced the OE Fusible Link. He joins in the fun, and we go back and forth with each other. I check the ground on the rear harness; nope, it's good. The voltmeter buzzes like I got the wrong answer on The Price Is Right.

I keep going, now, I'm into day two or three (I lost track) of frustration, sleep over it, go back to it, use the Volmeter to start testing out the connections, wiring, turns out, there is current going from the battery to the fuse box, but none going back to the rear. I then start questioning my sanity.

I wake up again and ask, "Has this always been like this?" I go and check out the security camera footage of the driveway for the evening hours to see if it has, sure enough, yup, the running and brake lights have been borked all along as far as I can date it. OK, then.

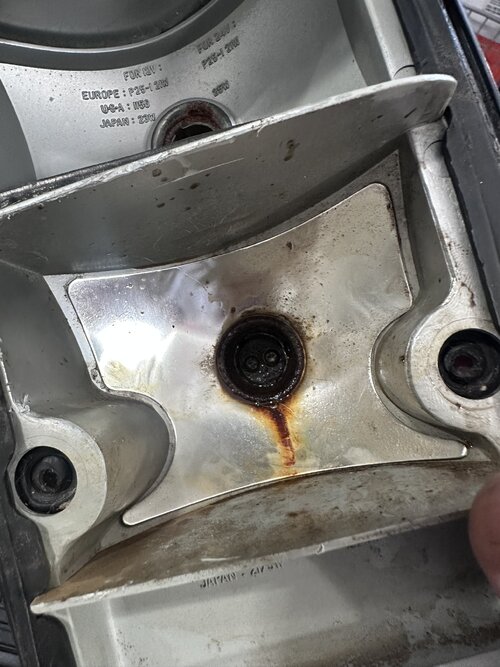
I remember two distinct holes on the floorpan. I also remembered that there was a harness in place, so I crawled under it to look, and sure enough, I found the source.

IMG_2430.jpg
IMG_2429.jpg

My theory, as I explained on Mud, is that when the guys sandblasted it last year, they punched through what was already an existing hole, ripping through the harness. No wonder I had sand in the cabin, and this explains it. Look what happened to my girl.

IMG_2442.JPEG
IMG_2445.JPEG
IMG_2446.JPEG

What's interesting is that it never shorted or blew the fuses, even with the cheap Amazon variety. I replaced those with the fancy LittleFuse Glows. The pressure from the sandblast nozzle had just ripped through the wires cleanly, and this explains why things weren't working.

Someone on Mud told me that I could access the harness from the top by removing the scuff plate, carpet, and kick panel, and it's right there. Yup, sure enough, time to get to work, and luck for me, I'm now an expert in what-not-do with the soldering harness. Dave in Denver would be proud of me. After correcting the issue, I tested the voltmeter with 12V power in all connections, so that's solved.

Amazingly, my cluster gauge Oil Pressure is right on the money now, 3/4 at idle, and 1/2 at running speeds, which was previously at 1/2 and 1/4, so there was current flowing from the oil sender, but inconsistently. I don't know if this is related, but the rig is running better now. It could be my imagination, but it feels a little punchier, and I haven't yet figured out if any of those wires would have made a difference.
 
Last edited:

IH8RUST

Lifted
Joined
Jun 13, 2024
Messages
170
Location
Colorado Springs
I attempt to remove the bulb from the rear tail light, but it won't budge. It's rusted and fused to the socket. I broke the bulb right off.

Well, crap.

IMG_2478.JPEG
IMG_2484.JPEG

OK, so I should buy a replacement assembly. I visit SOR and buy a pair.

IMG_2477.JPEG

DO NOT BUY! The aftermarket socket and tension spring are terrible. I emailed SOR, and a lovely lady picked up the phone to call me and explain that they do suck, and it's the only available option, and they're willing to refund. I'll eat the cost, back to restoring the OE.

IMG_2485.JPEG
IMG_2486.JPEG
IMG_2487.JPEG
IMG_2488.JPEG
IMG_2479.JPEG

There, I did it. I took the time to pull the old bulb out, hoping I wouldn't damage it. I used a punch tool from the rear of the socket to push it through. I then used the rotary tool to resurface. I seated the new 1157 LED in place, and it works! I get to keep the OEs. Only one bulb was harmed during this episode. I also got new rear markers with Super-Bright LEDs:

She blinds everybody with her super high beams, She's a squirrel-squashin', deer smackin' drivin' machine, Canyonero! Canyonero! Canyonero! Whoa, Canyonero! Whoooooaaaa!
 

Attachments

  • IMG_2484.JPEG
    IMG_2484.JPEG
    797.3 KB · Views: 12
  • IMG_2477.JPEG
    IMG_2477.JPEG
    911.8 KB · Views: 8

Cruisertrash

Rising Sun Member
Joined
Aug 18, 2020
Messages
2,882
Location
Denver
I had to buy 5 complete used EGR systems to make one good one. Finally got a cooler where the bolts came out so I could open it and clean the rust out. Got a working valve. I have replacement brass ferrules for the j-pipe if anyone ever needs them. Originals are NLA, although the upper ferrule is still being produced by Toyota for now 😎

Glad your truck didn’t burn down @IH8RUST. Those wires definitely got pretty dang hot there!
 

IH8RUST

Lifted
Joined
Jun 13, 2024
Messages
170
Location
Colorado Springs
Out with the old, in with the OEM freshness. All of the lines were replaced and flushed, but the valve was old, rusty (IH8RUST), and probably would leak sediments back into the lines over time. Those Harbor Freight clamps are handy (thanks JohnnyP for the recommendation).

1752243541379.jpeg
1752243574267.jpeg
 

IH8RUST

Lifted
Joined
Jun 13, 2024
Messages
170
Location
Colorado Springs
Future-proofing: I bought an e-brake cover, but the color didn't match, so I used a leather balm to recolor it. I was skeptical, but it turned out way better than I thought it would. You can use SEM on the leather, but I opted for the balm instead; it rubs in nicely, gets absorbed and sticks to the material.

IMG_2490.JPEG

1752246106352.jpeg
IMG_2492.JPEG
IMG_2491.JPEG
 
Last edited:

RDub

Trail Ready
Joined
Feb 9, 2021
Messages
372
Location
Boulder, CO
Where did you source the e-brake cover?
 
Back
Top