IH8RUST: FJ60

Cruisertrash

Rising Sun Member
Joined
Aug 18, 2020
Messages
2,881
Location
Denver
@IH8RUST This is some great background. You pinged me for a little assistance with the fusible link replacement kit, but I didn’t really know what you were up to with your truck. Now I know!

Great job picking Cruisers & Company. Solid dudes, solid work. I know folks at some of the other places you mentioned - Classic Cruisers, OTM, etc - and they’re all good folks too. But they’re also super busy!

Anyway, thank for grabbing some of my little widgets, and keep up the good work.
 

IH8RUST

Lifted
Joined
Jun 13, 2024
Messages
170
Location
Colorado Springs
Dude! Sweet write up. It's pretty awesome seeing the whole picture, and it was a pleasure being a part of it. Your 60 is sorted. That H55 makes a world of difference.
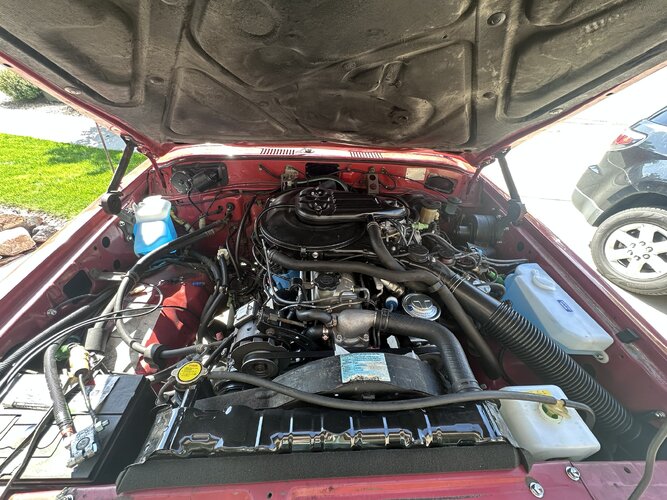
All the pictures I have are of my hand tracing vac lines to supplement the emissions manual. Pretty boring stuff.

First off, second man crush. I'm thrilled you got to work on this, as we share a fondness for the '60s, and my rig couldn't be in better hands than yours. I'm jealous you do this for a living, and I just sit behind a dumb screen.

Second, post'em hand pictures. the boring stuff is so handy.

@IH8RUST This is some great background. You pinged me for a little assistance with the fusible link replacement kit, but I didn’t really know what you were up to with your truck. Now I know!

Great job picking Cruisers & Company. Solid dudes, solid work. I know folks at some of the other places you mentioned - Classic Cruisers, OTM, etc - and they’re all good folks too. But they’re also super busy!

Anyway, thank for grabbing some of my little widgets, and keep up the good work.

Haha! Oh yeah, my ignorance and conflating an unrelated electrical problem with the install was the source of the problem, and I've been waffling in the forums to find my answers. I appreciate your help on Mud! I'll get to that update here eventually. Also, I still have the core flasher module. I need to get it to you. I'll be sure to leave it at the shop when I visit next so that you can pick it up.
 

IH8RUST

Lifted
Joined
Jun 13, 2024
Messages
170
Location
Colorado Springs
Let's see, the motor arrived in one piece, and it was accepted. Now, I'm waiting for the shop to clear its backlog so that I can ship the rig to them.

1752012862241.jpeg


In the meantime, I'm shipping a variety of new parts to C&C, including a new exhaust kit, headers, fan clutch, cooling fan, HEI ignition distributor, flywheel, air cleaner assembly, and a rebuilt carburetor. I remember Johnny said the carb looked in a good shape, was looking at the brass screw as a form of verification that it passed the visual inspection. Oh yeah, I still have to learn how to fine-tune that. Maybe someday soon.
 

IH8RUST

Lifted
Joined
Jun 13, 2024
Messages
170
Location
Colorado Springs
There was a lull between December and February. I kept in touch with Johnny to see when I could drop it off. We agreed that mid-February to mid-March 2025 would be the target date. On March 10, 2025, the rig was delivered to C&C.

IMG_2066.JPEG
9417E4E9-DAB8-4944-8EA1-57419AEAB496.JPEG
13A36231-EA8A-4F3D-A46A-6B2BC74C2107.JPEG

Now, it's in their capable hands, and I'm going to pull all the logs from the invoices to tell you all about the work done. However, I'd like @MonPetiteShoe to chime in whenever he can, or is willing to do so. I arranged a quick trip to the shop after the crew removed the components to hit the previously unreachable parts of the undercarriage.
 

IH8RUST

Lifted
Joined
Jun 13, 2024
Messages
170
Location
Colorado Springs
March 18, 2025.

"Was this thing on a beach!?

94C26879-81CD-46C4-B200-8FB0B22AB695 (2).JPEG
3158E66F-DB09-4B68-8FCD-BE9ADF6D61AB.JPEG

The decision to perform the sandblasting before the new motor installation was the right call, even if it wasn't a planned step. It just made logical sense. Without removing any of the major components, this would not have led to this outcome, but it wasn't a concern of mine, given that it was going to be removed and replaced. Also, it's worth noting that I spent days using the compressor to blast, and there was still that much media left. So. Much. Media.
 
Last edited:

IH8RUST

Lifted
Joined
Jun 13, 2024
Messages
170
Location
Colorado Springs
Initially, I had planned on using Dobinson's IMS, but then I changed my mind. However, when I was in the shop chatting with Johnny, I asked him to add it back to the work order. I decided it made sense, and it was the right call, as I would later find out. So, it gets a lift, which means it'll need new wheels.
 
Last edited:

IH8RUST

Lifted
Joined
Jun 13, 2024
Messages
170
Location
Colorado Springs
I dropped off two tote bins full of the spare parts I had procured before the rig arrived at the shop. I didn't take a picture of everything, just a few, but I recall @MonPetiteShoe's reaction when he saw them; it was pretty damn funny.

Brand new OEM fuel tank. There's a recall I wasn't aware of. My original was in decent shape already, but since I'm going all in, I might as well just buy it, so I did, and I'm glad that I did. It turned out MonPetiteShoe's FJ60 needed a fuel tank, so I donated my old one to him. Win-win.

My A/C was shut down, so I bought a new compressor and rebuild kit to get that out of the way. Separately, I found a smog pump and restored it before delivery.

IMG_2079.JPEG

1752076118334.jpeg
1752076134055.jpeg
1752076138916.jpeg
1752076142125.jpeg
1752076151743.jpeg
1752076164271.jpeg
 

IH8RUST

Lifted
Joined
Jun 13, 2024
Messages
170
Location
Colorado Springs
I got to visit the shop for a short while to blast and paint the previously unreachable areas of the undercarriage, finishing the project. I'm grateful for the opportunity Johnny gave me to do that. The bonus was that I got to hang out with @MonPetiteShoe and talk shop, life, and other things. Can't imagine a better way to spend a Friday. It was a total blast, and I got to see the different projects, including a groovy iron pig.

IMG_2102.JPEG
IMG_2101.JPEG
IMG_2100.JPEG

1752077698338.jpeg
IMG_2097.JPEG

There, nice and painted. That was a solid 6 hours of work, my version of a "stage 1" restoration. Heh.

Meanwhile, we found out the air rail on my original motor is beyond salvage, so I bought one off of eBay, turned out to be a bust, so I posted here asking for one: https://risingsun4x4club.org/xf/threads/‘84-air-injection-manifold.37433/

Luckily, @Capriblue45 had one that he was willing to part with; I drove 2.5 hours to pick it up from him and got to hang out and see his projects. Life goals.
 
Last edited:

IH8RUST

Lifted
Joined
Jun 13, 2024
Messages
170
Location
Colorado Springs
March 17 - 21, 2025

Compression Test the old motor, it's for sale!
Drain and dispose of fluids. Remove the front grille, hood, radiator, driveline, disconnect the engine's electrical components and hoses, remove the drivetrain, remove the exhaust, and clean and remove sand from all parts being removed. Go through the parts and inventory.
Separate Drivetrain for bellhousing and palletize engine + Transmission.
Drain the gas tank, dispose of the gasoline, and remove it in preparation for the new tank. Also, remove the tire carrier and replace the fuel vapor separator.
Remove body mount hardware: loosen, pull back the interior to reach the bolt heads, ensure they aren't seized, unseize any stuck ones, and remove all but four bolts.
Unpalletize and mount the new motor on the engine stand to dress with/ new parts.
 
Last edited:

IH8RUST

Lifted
Joined
Jun 13, 2024
Messages
170
Location
Colorado Springs
April 15 - May 8, 2025

Add engine accessories: spark plugs, thermostat housing (remove from old engine, clean, and install), and motor mounts (driver-side mount was pulled from old motor).
Body Mount Replacement - Inventory and determine the location of each body mount, as they do not precisely match the originals. Lift the body, replace the mounts, insert and tighten all hardware.
Flush heater cores in both directions with hot water and CLR. Remove the passenger seat and the rear heater core to flush it, then reinstall the rear core and seat.
Knuckle Job: removed and replaced a knuckle stud that was compromised and a hub stud that was stretched.
Build Tcase w/ 4:1's onto transmission.
Install Gas Tank.
Prepare and Paint Various parts, including the motor mount, alternator bracket, and coolant line.
Modify the rear half of the split case to accept the 4:1 gearset. Build a split case onto the back of the transmission.
Remflex Gasket.
Oil Cooler Gaskets.
Thermostat Housing gasket.
Suspension removal and Installation. Also supplied the inverse shackles.
1752120694520.jpeg
Evaporator replacement - remove the evaporator from the dash, remove the evaporator, clean the evaporator box, install the new expansion valve, install the new evaporator, and reattach the dash.
Put the interior back together.

New H55F:
IMG_2146.JPEG
 
Last edited:

IH8RUST

Lifted
Joined
Jun 13, 2024
Messages
170
Location
Colorado Springs
May 5 - 21, 2025

Instead of lengthening and shortening factory shaft we opted to go with new shafts due to the amount of sand in the double cardan joint on the front shaft. After receiving the quote back from our driveshaft shop on redoing the factory shafts it made sense to go new. These were lengthened and shortened to fit the new transmission.
Removal of crankshaft pulley off of old and install on new motor. Threads of crankshaft on new motor were damaged at some point (see email), we were able to successfully repair them without pulling the front timing gear cover.

1752102735531.png
Install the water inlet pipe, thermostat pipe, and hose to the water pump.
Install the supplied painted oil filter/oil cooler housing only to find that it does not have provisions for the oil pressure sensor (see email). The unit supplied was from a FJ40 (oops!) without the oil pressure sensors. Remove the oil filter/oil cooler housing from the original motor, clean up, and install it onto the new engine.
1752102790613.png
Install pilot bearing, throw-out bearing, clutch/flywheel to new engine, clean old bellhousing (greasy and tons of sand stuck to it), modify bellhousing for H55F, mate H55F/tcase to engine, motor mounts, starter, install into vehicle, hook up crossmember, clutch slave cylinder, starter wires and transmission wires.
Install the engine temperature sensor, route the rest of the heater lines at the firewall, install the new heater valve, and install the heater lines in/out of the oil cooler. Bend and massage the upper heater return line to fit the new distributor. Fix the wiring going to the temperature sensor and re-loom.
Install front engine accessories: Install fan clutch, AC Compressor, Power steering pump (a new pump did not have a pulley, so the old pulley was removed and installed onto the new pump), alternator, fan clutch/pulley, and smog pump.
Install intake/exhaust manifolds, carburetor isolator plate, and carburetor/throttle linkages.
Remove the required emissions equipment from the old 2F.
Install all emissions equipment - this took much longer than expected, and fought us the entire way.
The EGR cooler, attached to the EGR valve, has two pipes extending from it: a hard line that routes up to the manifold and a flexible, corrugated pipe connected to the EGR valve. The new supplied EGR cooler had the corrugated line and the EGR valve attached as one unit. This had to be separated to feed the corrugated section through the new header tubes. This fought us for hours trying to separate the cooler and the line. After many rounds of heating, quenching, and trying to loosen it, it finally released.

The hardline was not included in the supplied unit and had to be removed from the old cooler and then reinstalled onto the new unit and header. This process also required multiple rounds of carefully heating, cooling, and attempting to undo the coupler without rounding off the threads that thread into the EGR Cooler.
A good amount of time to trace and replace all the vacuum lines/hoses, vacuum switching valves, smog pump lines, and any other components related to the EGR/Emissions System. I only wish we'll get those hand pictures.
Install new clutch master cylinder on firewall.
Install a new headlight washer bottle and lines from the Rust Farmers.
Fill Front/rear diffs, H55f, and splitcase with fluid.
Driveshaft front and rear - NEW.

The install:
image0.jpeg
1752103037271.jpeg
IMG_2230.jpg
1752103051608.jpeg
1752103055896.jpeg
1752103062829.jpeg
1752103066777.jpeg
 
Last edited:

IH8RUST

Lifted
Joined
Jun 13, 2024
Messages
170
Location
Colorado Springs
May 5 - June 16, 2025

Install Front + Rear Drive Shafts.
Install Exhaust from header to tailpipe - This was tweaked and required massaging to fit.
Redo the main starter lead and negatives going from the battery to the block.
Radiator install with fan shroud, fans, belts.
AC system - install compressor, lines, new condenser, and charge system. The new condenser did not fit as well as initially thought. Brackets on the sides had to be moved and inverted so that the condenser cleared the top core support brace.
Diagnose why the clutch won't bleed, order a line, swap the clutch line, and bleed the clutch.
Install new brake lines and bleed the system, including the axle-to-caliper and extended frame-to-axle lines.
Start the vehicle, cold tune, warm up, and then hot tune the carburetor, setting the timing.
Set valve clearance when hot
Swap Alternator Pulley - One included on the new alternator was not the same as the one originally on the vehicle.
Swap the U-bolt flip kit for stock spring buckets on the front axle. Studs coming off the U-bolt flip kit would not work with the Dobinson Shock eyelet. Not enough nut engagement to be safe with the 4Plus kit. Torque and cut the U-bolts flush so they don't hang up when off-road.
Fill and bleed the power steering.
And add the R134a Refrigerant.

The start of a beautiful thing:
 
Last edited:

Cruisertrash

Rising Sun Member
Joined
Aug 18, 2020
Messages
2,881
Location
Denver
Oil pressure sensors on 60 came in two locations: either in a hole in the bracket directly below the oil filter, or in one of the big banjo bolts on the oil cooler. One of those banjos would have a threaded hole in the middle. I just discovered that a couple weeks ago actually.
 

IH8RUST

Lifted
Joined
Jun 13, 2024
Messages
170
Location
Colorado Springs
June 18, 2025

The second Johnny told me it's ready, I had a tow truck dispatched to C&C to pick it up the same day. I got impatient, to be honest. Either way, I'd take it back to the shop, but at least for now, I'll get it back, install the new wheels and tires, and get it running. I got it on a Wednesday, and by the next day, I had the new wheels installed.

First, went to Discount Tire to pick up the Yokohamas. They told me they can't install because their computer is warning that the wheel and tires are incompatible, and that stuffing the tires into the wheels is a big-ole-danger. While they're debating if they can or not, I'm emailing City Racer and posting on Mud to find out why. City Racer replied almost immediately and told me, "That's what everyone says, find someone else who will." Good enough.

I told them to help me pack the tires into the rig, and then I drove one street over to the local mom-and-pop shop. Oh, look, the colors match. Also, I watched the homie lift it on four rolling jacks by throwing caution to the wind. Says the guy who threw caution to the wind against a computer tire-to-wheel fitment recommendation.

1752121395900.jpeg
IMG_2343.JPEG

Oh yeah, now we're looking aggressive, I believe Johnny said it had previously skipped leg days. No More!

Look at what Cruisers and Company did for me, look at this thing. This is "stage 3" restoration-worthy craftsmanship right there.

IMG_2346 (1).JPEG
IMG_2345 (1).JPEG
IMG_2344 (1).JPEG
IMG_2340.JPEG
IMG_2339.JPEG
IMG_2338.JPEG
IMG_2336.JPEG
1752121659831.jpeg
1752121708941.jpeg
1752121757798.jpeg
1752121793088.jpeg
1752121832053.jpeg
1752121909236.jpeg
1752121940708.jpeg
1752121994542.jpeg
1752122027853.jpeg
1752122048934.jpeg
1752122070617.jpeg

Okay, we're almost caught up, and I've probably left out some details. I'll need to edit and update the previous replies as I recall them.
 

Attachments

  • IMG_2340.JPEG
    IMG_2340.JPEG
    1.1 MB · Views: 17
Last edited:

IH8RUST

Lifted
Joined
Jun 13, 2024
Messages
170
Location
Colorado Springs
Went for a leisurely drive off of Mount Herman Road from the Monument to Woodland Park to give it a go. 1-2nd, 4H, easy drive, it grips and crawls like a champ. I haven't had the chance to go 4L. I saw some boulders, but I chickened out and stuck to the path. Soon, I'll muster the courage to give it a proper go.

There's my happy face.

IMG_2355.JPEG
IMG_2360.JPEG
1752123320330.jpeg
 
Last edited:

IH8RUST

Lifted
Joined
Jun 13, 2024
Messages
170
Location
Colorado Springs
Installed the Koito fog lamps from Cruiser Cult, turned out to be a nice addition. I wasn't happy with the wiring, so I ended up removing it to redo it. I also found the old-school 2-wire connectors from Eastern Beaver, which allow me to do it correctly, without shortcutting or circuiting my way through it. I've crimped thousands of CAT6 wires for work, but crimping the spade connector is way more satisfying. I need to find excuses to do more.

IMG_2393.JPEG
1752122769108.jpeg
1752247431864.jpeg
 
Last edited:

IH8RUST

Lifted
Joined
Jun 13, 2024
Messages
170
Location
Colorado Springs
I purchased the Koito headlights from Cruiser Trash Parts, so I installed them. I even made a few mistakes along the way that flared up @DaveInDenver OCD: https://risingsun4x4club.org/xf/threads/what-have-you-done-to-your-rig-today.21646/post-460489

IMG_2403.JPEG
IMG_2399 (1).JPEG
IMG_2398.JPEG
1752123882667.jpeg
IMG_2410.JPEG
IMG_2411.JPEG
IMG_2406.JPEG

I even reinstalled a C-channel with a new rubber seal around the bezels.

While messing around with the lights, I realized I have, and have had, a bigger and very much unrealized problem on my hands. The tail light is partially operational, but the brake lights aren't working. I have driven the vehicle after sunset in the past. It's a miracle I didn't get pulled over or into an accident.
 
Last edited:
Back
Top