Trigger Pulled

Joined
Apr 18, 2012
Messages
197
Location
Louisville
Met a bunch of Rising Sun guys today at Tim's house in Louisville to pull apart Matt's 60. Great bunch of guys, great work ethic, got a lot done, and had a lot of fun! Really looking forward to future get togethers and workdays!

Was really nice to meet you, and i hope we get a chance to work together some more! (i guess i know we will, as your drivetrain is in my garage...)

with some warmer temps of course.

I DIG IT when people share this stuff, as long term it becomes a resource for others, and provides me entertaining content to peruse. :cheers:
 
Joined
Mar 25, 2012
Messages
299
Location
Coal Creek Canyon
I actually tracked down the glass shop, etc. yesterday morning. I didn't go so far as to make an appointment due to its place on the priorities list, but I found my guy at a good price and turnaround time.
 
Joined
Mar 25, 2012
Messages
299
Location
Coal Creek Canyon
Sooo.... Today was a bust... According to the USPS tracking info, my ignition parts were to arrive today. It was a warm day (upper 30s) though, so I didn't want to waste half of it waiting for the postman. A set of new suspension bushings was including among the many boxes this thing arrived in, and I figured it was a one banana job...

The DS front shackle was absolutely one banana. That's where the fun stopped. The DS frame mount pivot refused to cooperate. Refused. I broke two screw drivers. I tried every prying and hammering implement I own. Eventually I pulled out a pulley puller and had just enough real estate to get the bastard far enough out to manipulate. Wow. Getting the new bushings in was a breeze, but then I had to get the whole package back together. This was another exercise in futility. For starters, the "flat spot" that I have to work with can really only be called that if you don't actually look at it. It's also sand and small rocks... and snow. Floor jacks don't work too well if they can't roll. In case you didn't know, they pull the truck sideways. If you have to put the truck up and down enough, you'll move it a good 6 feet on the diagonal so that you're constantly laying in fresh snow. Additionally, despite owning 2-3 floor jacks and a whole fleet of jack stands, all I managed to move up here was the one jack... So that made things even more fun. At one point in my frustration, I decided it would be best to disconnect the axle from the spring so I could take the weight off the spring and move it around a bit easier... Unfortunately, a rock (one assumes) had hit the quarter inch thick steel plate that the u-bolts connect to making one of the u-bolts immovable until I can get the truck to an air hammer... I finally managed to get the bastard of a pin back in its hole using a pry bar, the spring as a fulcrum, the frame as a secondary fulcrum, and a screwdriver as a sort of sliding lock mechanism... Then I was able to bring the pin home.

At this point, I had a phone conference... When I came inside, I took off my glove to find that what I thought was some sort of rusty spring lube (I honestly hadn't given it much thought) was actually a glove full of blood. At some point (fairly early I imagine) I did SOMETHING to my left index finger... No idea. But lots of blood. The wound(s) honestly don't make a lot of sense... Not a cut really, or a pinch, lots of little abrasions (maybe) and a big sort of tear... Anyway, phone conference...

I go back out there thinking I'm on the home stretch. NOT! I buggered up the last few threads on the damn stud. Despite having several dozen taps and dies (in the state even!), I didn't have the one I needed. I managed to straighten the threads a bit (debatable in retrospect) with a chisel, then promptly cross threaded the whole thing...

At this point I needed to pick my wife up from work, and the sun was going down... I went to McGuckins and got a tap/die set (I always buy them in pairs), a set of ratchet straps, and another nut...

This is not my first automotive ro-day-oh, but what a crappy day... The ignition parts did come, but I didn't even pretend to try to do anything about it.
 

corsair23

Hard Core 4+
Joined
Jul 11, 2006
Messages
8,610
Location
Littleton
I admire your "sticktoit-tiveness" :thumb:

Especially under less than ideal wrenching conditions. When I first read that this was going to be your new DD I wondered how well it would all work out.

Oh and TJ, that comment made me :lmao: :D
 
Joined
Mar 25, 2012
Messages
299
Location
Coal Creek Canyon
Aside from a brief (and boring) stint with a '99 4Runner, my previous DD was a '62 VW Bus. "Sticktoit-tiveness" is a nice way to put it. Most people call it crazy. People with certain degrees in certain fields have a name for it too. ;) My wife and I generally call it my "tick" or "itchiness".

I guess I'm done for the day... I fixed the cross threaded stud and got that all back together. I'm not going to pursue that avenue any further until I have better working conditions. I'm pretty sure one of the bushings is in a bad way, but as it sits at the worst it'll just bind up a little. I should probably get greasable hardware anyway...

I got most of the ignition kit installed. I need some 14-16 gauge butt connectors (it seems I only have 10-12 gauge in my stash) and a smaller coil bracket... My wife took the car, so I'm as done as I can be today... Lame. I believe I have meetings all day tomorrow and possibly Sunday, so this is as far as she goes until I have time, daylight, favorable weather, and a chance to go down into town for some parts. So close, yet so far...

If I had the stuff I need (or the means to get it), all I have left to do isset timing, adjust the valves, and set the carb idle in terms of function. I also need to get it to electricity so I can pull a few sheared bolts to reinstall the windshield washer reservoir and the headlight bezel. Also the DS jump seat needs access to electricity to drill out some filler and a hole in a patch plate the PO installed. Then it's off for inspection, plates, swap the spare wheel, tires, and a windshield... Essentially, one more favorable day's worth of work and one day driving all over Denver and I'm there... Unless some other ridiculous thing crops up. Given my luck lately, it's either a sure thing or I'm due some good karma.
 
Joined
Mar 25, 2012
Messages
299
Location
Coal Creek Canyon
Great news everyone (a la Professor Farnesworth)! My wife picked the stuff I needed up on her way home from work, and I'm running again! REALLY well too! It's still pretty cold, and I accidentally forgot to pull the choke, but it still started up like a champ! Unfortunately though, that vacuum leak wasn't rectified after all... At least not all the way. Since I had help, a fully charged battery, and a running engine (finally!) I was able to track it down. I used a long piece of fuel line to track down the leak, and it's coming from between the master cylinder and the brake booster... I don't know the specifics on this setup yet (feel free to chime in), but it could be as little as some form-a-gasket, a real gasket, or I could be stuck for a new master/brake booster... Thoughts?
 

corsair23

Hard Core 4+
Joined
Jul 11, 2006
Messages
8,610
Location
Littleton
Joined
Mar 25, 2012
Messages
299
Location
Coal Creek Canyon
Some quick perusal of a few manuals tells me the #1 booster seal is the likely culprit... NLA. Option 2 is to get a rebuild kit... Also NLA. It seems a few companies snatched up all the rebuild kits and are using them to rebuild as a service... Soo... Unless anyone knows different, I'm on the hook for a new brake booster.
 
Joined
Mar 25, 2012
Messages
299
Location
Coal Creek Canyon
We posted at the same time. I'm hesitant to do too much to the engine itself in terms of upgrades because it'll get a 1HZ in the next few years, but brakes will only ever be seeing front discs and the stock booster seems appropriate for the task. Given the all-in cost of a rebuilt booster (not much different from a similar 80-series booster), it doesn't make sense to do any unnecessary modifications. Stock rocks.
 

subzali

Hard Core 4+
Joined
Aug 22, 2005
Messages
10,638
Location
Denver CO
If you were to try and rebuild the booster, I think you also need some sort of huge spring compressor, which most people don't invest in. You could always go with a junkyard 60 series or minitruck booster to get you by for now. So do you have no power brakes then?
 
Joined
Mar 25, 2012
Messages
299
Location
Coal Creek Canyon
I have power brakes. It's not a super heavy vacuum leak. It's kinda like the exhaust leak on that v8 I mentioned a page or two back. I hear those things. It's not enough to affect much, but it will be before long, and in the meantime it's not doing the 5 and 6 exhaust valves any favors. You can barely hear it when the engine is running, then you can hear it die down after the engine shuts off. It's faint enough that its taken me this long to track it down (though the other things that keep making the engine not work haven't helped the matter), and it's enough that I want it fixed before I start driving this thing daily.

Does anyone have any experience with fjparts.com? After core they have rebuilt boosters for $275-ish, which is pretty good from what I've seen even for the sort of boosters that need modification to make them work.
 
Joined
Mar 25, 2012
Messages
299
Location
Coal Creek Canyon
Had a pretty productive day, all things considered. I was able to fire it up pretty easily, but I couldn't get it to go into first. I figured it was idling a little high, so I dropped the idle a bit and realized I should probably get a tach so I knew what I was doing. I hooked it up, and it was idling very smoothly at 400 RPM... That's pretty cool; nearly diesel territory. I brought it back up to the FSM spec 650, but it still wouldn't go into gear. I finally got tired of messing with it, and just slammed it in. I guess something was bound up from when I had to persuade it out of four wheel drive the other day.... Anyway, it shifts fine now! With the more or less factory spec jetting and timing where it should be, it had no trouble muscling its way up the driveway in 2HI. Rock n' roll! Once I had access to electricity, I was able to drop the front apron and remove the sheared bolts that were preventing the bezel from being installed. Then I went around to the back and removed the body filler from the captive nuts that were preventing installation of the PS jump seat, drilled the necessary hole through the PO's patch panel (riveted diamond plate aluminum to the top of the wheel well...), and installed the seat. I noticed a missing exhaust stud where the exhaust attaches to the manifold the other day (luckily, there was no discernable leak associated with it) and put a new one in. Then I removed the DS front wheel and set about removing the sheared bolts from the windshield washer setup. That didn't go so smoothly... One of the holes I drilled through the bolt was off (it's hard to center a drill upside down and at an angle), so that sucks. Then my extractor exploded (as hardened steel tends to do) in one of the others... I went and dug out my grinder (found it!) and cut all the nuts off with a cutoff wheel (not too gracefully either...). I'm short some hardware to finish the job, but it'll give me something to do while I wait for the brake booster to arrive. Almost there!
 
Joined
Mar 25, 2012
Messages
299
Location
Coal Creek Canyon
Bezel on with proper spacers (made from what I believe is 1/4" agricultural fuel line..), and windshield washer system installed. I used SOR's kit (which is the same as CCOT's and is supposedly universal). It has no instructions whatsoever, and ALMOST works as is... I ended up having to remove the pump from the reservoir, flip it around 180, then pry up the tabs on the metal housing to clock the outlet appropriately. It wasn't at all difficult, but it seems it wouldn't be hard to find a kit that actually works without having to be torn apart first...

Anyway, my neighbor offered me his garage (nice flat concrete floor!) and his floor jack (mine made its first dying move the other day), so I'll probably go up there and finish the bushings tomorrow....

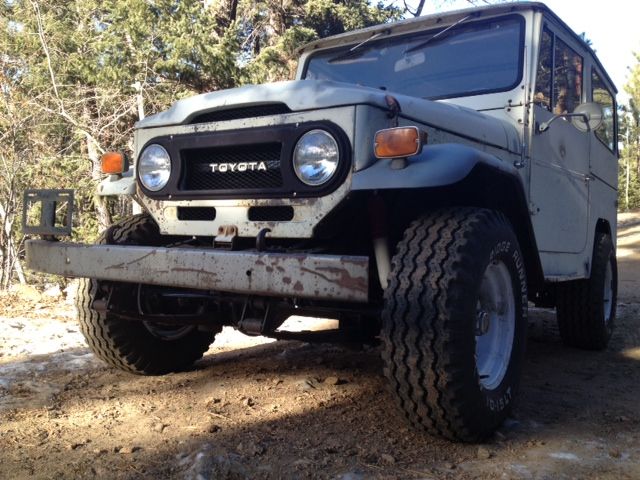
Here's how she sits (I'm probably going to paint the hold downs to match the bezel in the not too distant future... That's flat black exhaust paint because it sort of matches the look and is what I have).

photocopy-1_zps0007bfc3.jpg
 

MDH33

Hard Core 4+
Joined
Mar 8, 2006
Messages
7,897
Location
Trapped in a corn field
Excellent. :thumb: That concrete floor should make adjusting your brakes a little easier too. Have you made a tool yet? ;)
 

MDH33

Hard Core 4+
Joined
Mar 8, 2006
Messages
7,897
Location
Trapped in a corn field
A brake adjusting tool?

Thought I remembered something about your brakes locking up a wheel and needing to be adjusted. wasn't sure if you had done that or not yet. Sorry, don't have time to read through the last 20 or so pages to catch up. On my 40, a standard brake adjust tool was futile, no room to work it, so I ended up making a custom one. I think Zepp and I might be the only folks still running all drums. :hill:
 
Joined
Mar 25, 2012
Messages
299
Location
Coal Creek Canyon
It didn't lock, but it did pull one way or the other. I have a standard issue brake adjusting tool, but haven't tried messing with it yet. I figured a screw driver would do the job if the brake tool was a no-go (as was the case in the application I bought it for). What are the details on the tool?
 
Back
Top