Trigger Pulled

Joined
Mar 25, 2012
Messages
299
Location
Coal Creek Canyon
Here's a question!

My neighbor offered me use of his garage today, and I took him up on it. We were able to fix the bushing that wasn't really seated correctly, then he had to go. I still had use of the garage, so I attempted to see if it was worth further pursuit. I figured the best starting place was the most difficult bushing so I know if I'm going to be able to finish the task or not. The PS front spring mount has the driveshaft close enough to it to prohibit successful use of my gear puller method that was successful on the other side (I gave it a try anyway). I was able to get the pin out about 5mm, but couldn't get it to budge another inch. I didn't want to out stay my welcome by getting it apart and not being able to extract it later, so I put it back together and figured I'll try another day.

So here's the question: How do people do this? It's such a one banana affair that I MUST be doing something horrifically wrong. The manual is mum on the subject, and I figure there's some tribal knowledge that I've not yet had bestowed upon me...

So far I've tried prying with a variety of pry-things, banging with a variety of bang-things, a pulley puller, I've tried all of these with and without lube (PBlaster and synthetic grease when I could), I've tried with a ratchet strap, I've tried with multiple jacks in multiple configurations..... Does it help to undo the shackle and the mount simultaneously? I don't know that it makes sense to unbolt the springs from the axle... Are there any magic words? What's the trick? What am I missing?
 

corsair23

Hard Core 4+
Joined
Jul 11, 2006
Messages
8,610
Location
Littleton
I don't know the tricks other than what I read people doing which includes a lot of heat and even cutting the bushing to split it.

In your case, I'd probably just drop the front drive shaft to gain space to work...nice to have extra space when working on a difficult problem and dropping the shaft "should be" quick and simple :hill: - Not sure if you need to mark the driveshaft position so it goes back in where it was...80 series ones are a bit tempermental to avoid vibrations.
 
Joined
Mar 25, 2012
Messages
299
Location
Coal Creek Canyon
At this point, unless I hear some brilliant means of pin/bushing extraction I'm just going to run what's on it for now (rough as it may be) and replace things when I do the lift and greasable shackles. Then I can just cut/drill things out and not worry about being able to get it back together again. The things that will suffer wear are things that will be replaced in said operation anyway...
 

farnhamstj

Hard Core 4+
Joined
Aug 22, 2005
Messages
2,609
Location
vail co
I saw-zalled the pin on both sides, then burn the bushing/hammer the rest of the pinout. I do not like grease-able pins. I had 2 break in the middle where the grease holes were. don't recall the brand.
 

rover67

Rising Sun Member
Joined
Nov 1, 2007
Messages
9,581
Location
Boulder, Co
I also use an oxy acetylene torch. Heat the pin up till the thing basically melts/burns itself out of the bushing.

bushings can also be a bear.. more heat for those too. basically burn them out
 

PabloCruise

Hard Core 4+
Joined
Aug 23, 2005
Messages
2,783
Location
Northern CO
Why do you need to re-use them?

I would replace all the hardware.
I sure wouldn't be trying to do bushings at this time of year w/o a garage! Wait until you are ready to do the lift.
Bushings suck to replace - blue-tip wrench is your ticket...
 
Joined
Mar 25, 2012
Messages
299
Location
Coal Creek Canyon
Between meetings and while waiting for my brake booster to arrive, I decided to go out and adjust the brakes to make up for the pulling whichever way it was (I feel pretty confident now it was to the right without really needing to even start it up)... Turns out, when the PO rebuilt the brakes, he put all of the rear wheel cylinders on the passenger side and the fronts on the drivers side... What's more, they're backwards on the passenger side to boot so that there are shocks and steering linkage in the way on at least half the cylinders... That's pretty dumb... I was already planning to take it to a brake shop to have the fluid flushed (I don't feel like killing my hands with my little vacuum pump on 8 cylinders... 4 is bad enough, never mind the amount of fluid that would be involved), so I guess I'll have them move the cylinders around while they're at it...

On the rear cylinders, the adjusting wheel rests on some rubber boots. Is there supposed to be any lube or anything in there? The wheels seem pretty fond of the boots and I had to take one wheel down just to see what the hell was going on and fix the clip that is supposed to hold the boot in place.
 

rover67

Rising Sun Member
Joined
Nov 1, 2007
Messages
9,581
Location
Boulder, Co
make yourself a cap to pressurize the reservoir on the MC. Makes bleeding brakes alone a snap.
 
Joined
Mar 25, 2012
Messages
299
Location
Coal Creek Canyon
ALRIGHT! Productive day! Negotiations with various entities at home and abroad, minor little tweaks to some business stuff, managed to get my wife's new Colorado plates on her car, and pick her up from work on time! Interspersed throughout all of this, I also managed to figure out a minor brake inconvenience, replace my brake booster (which solved my vacuum leak), adjust my valves (fair save a tight #5 intake), baseline my carb, and get the truck cleaned out and packed up.

If anyone can think of anything I've missed in all of this in terms of baseline maintenance and tuning let me know now!

Tomorrow, I'm going to Midas first thing to have them swap the brake cylinders around to their correct wheels and positions, flush the system (which should be rolled into that operation), and have them adjusted (why not while I'm there right?). I don't like bleeding brakes solo, and I especially don't like doing it when my cylinders are all messed up and there are eight of them. After that, I'm off to the inspection station, then the license plate office, then Jim's Yota Yard to hopefully swap my spare (I grabbed a spare wheel to match what was on the truck, but I was a skosh off in my recollection), then to Discount Tire, then (time permitting) hopefully to a windshield shop to have the windshield replaced! Busy day planned.
 
Joined
Mar 25, 2012
Messages
299
Location
Coal Creek Canyon
I wouldn't trust a Midas tech either. That's why I explained what was needed very carefully, then stood there and watched (and occasionally pitched in) while the work was being done. I ended up changing all of the fluids (save the coolant, because apparently aircooled guys forget about those sorts of things) and swapping the cylinders around correctly. I chatted up the guy doing the work (their highest trained guy on staff) and the manager while it was all going on. Turns out, the manager is marrying the daughter of the owners of Alcan springs and is getting me the hookup. Also, they didn't charge me on the books. Just a cash deal between me and the tech that did it. After about 5 billable shop hours and a decent amount of various fluids, I walked away for $125!!! I would have had a good portion of that in oil, gear oil, brake fluid, washer fluid and coolant (if I had remembered the coolant)... Cool guys too. Had a good time, and I feel good about the work. Highly recommended.

Then I went and got the inspection. My battery died (and would not come back) at some point, and I got a new one. Turns out the one in there was date stamped 2001... Go figure. Luckily it happened two doors down from a FLAPS, and it was on the to do list. Then I got the emissions testing done. Passed with flying colors. I think even for a modern car... The fail threshold for HC was 1,000ppm, and I had only 14ppm. Pretty sweet.

Then I went and got my plates. No line, no problems. Left with plates in hand.

Then went up to Jims to swop out my mismatched spare. On the way, I noted that 65 mph was a pretty good cruise speed. Then I noticed that I wasn't even getting into the secondaries until about 67 mph. 70 mph is a pretty good cruising speed too. I still had really old tires on at that point, so I didn't want to test that too much.

Next I stopped to get some SS hardware to install the plates, then went and had the new tires installed.

Now I'm at home and have to leave for a meeting in Arvada in about 15 minutes... Busy day.

New on the list: fine tune the carb at lower altitude (weak in the slow jets, needs to have idle adjusted at a lower altitude), PS brake light is not working, there's a pronounced rattle in the transfer case linkage, there was a sympathetic vibration at idle that will be a bear to track down, and there's some clutch chatter from that leaky rear main seal. Also, the temp gauge seems to be a little numb and reads a little on the low side. Gas mileage so far (which includes lots of idling in the driveway and a few undocumented miles) is about 11... Not great. Shooting for 15.
 
Joined
Sep 2, 2011
Messages
199
Location
Colorado
That's my kind of hookup!!!!! Unfortunately I don't usually get my kind of hook up. I usually get the make up dumpster sex kind of hook up. Happy to get it, but sure it wasnt the best... Omg, did I just type that?!?
 

subzali

Hard Core 4+
Joined
Aug 22, 2005
Messages
10,638
Location
Denver CO
Very nice work, all of it. Do I remember correctly that you had a wobbly distributor that was of concern at some point?

Don't forget to change the coolant ;)

Have you greased the driveshafts yet? What kind of tires did you get?

15 mpg should be attainable, that's where your carb tweaking should come in handy.
 
Joined
Mar 25, 2012
Messages
299
Location
Coal Creek Canyon
Yeah. The distributor wobble was the bolt in the distributor clamp breaking in such a way that it would take nominal torque, but not hold things steady. I rectified it immediately with a new bolt.

Coolant change is en route. The radiator is new, so the coolant is most assuredly full and decent. The only downside is the corrosion potential from sitting which is worth a few gallons of coolant to be sure.

First though, it didn't want to start this morning. I think it had mostly to do with trying to tweak things too much for the emissions testing. I was in meetings all day today, and will likely also be in meetings all day tomorrow, so it may not be back up until Monday at the earliest.

I have not greased anything yet, I haven't located my grease gun (though I'm pretty sure it's in the state). That said, the PO seems to have thoroughly taken care of that sort of thing. I plan to address it for sure when I rebuild the drag arm linkage (which finally showed up today).

Tires are 31" Cooper Discoverer M+S studded. I'll get a set of more suitable wheeling tires come warmer climes. The tires that were on there along with a single 35X12.50 will be up for sale very soon for someone's trail rig. LOTS of tread left on them, just old.

Carb tweaking is the plan for Monday. I wasn't entirely pleased with the performance yesterday. It had a tendency to die at idle (though only occasionally) and not idle consistently (like it was maybe wandering a bit). It may be due to another smaller vacuum leak, the distributor is more worn than I thought, or just the fact that I need to get the carb fully dialed in (I baselined it up here instead of down where most of the driving will occur, so it is pretty thoroughly lean). I'll start with the carb (since it's something I can control with the parts on hand), then see if there's something else afoot.
 
Joined
Mar 25, 2012
Messages
299
Location
Coal Creek Canyon
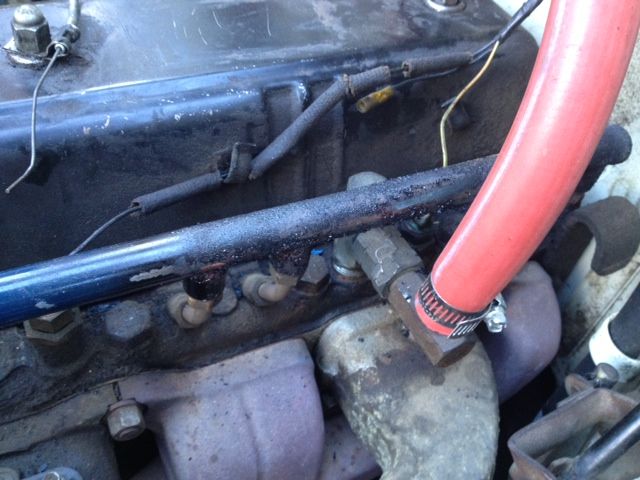
I went to pull the carb to replace the crappy Warner accel pump boot, plunger, and mess with the jetting and found this:

photo-6_zps476f24eb.jpg


Air rail got hot enough to kill the paint... Not cool. Additionally, it only seems to be occurring at 4, 5, and 6. I could have done it with too lean a secondary slow and pushing it too hard, but it could be a number of other things. I'm really not all that familiar with this sort of emissions kit, so I'm curious if anyone has any ideas.
 
Back
Top