FJ60 Help Needed

Capriblue45

Rising Sun Member
Joined
May 28, 2023
Messages
612
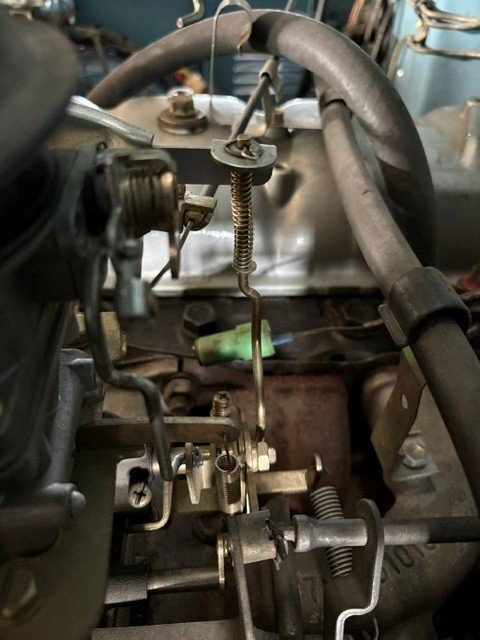
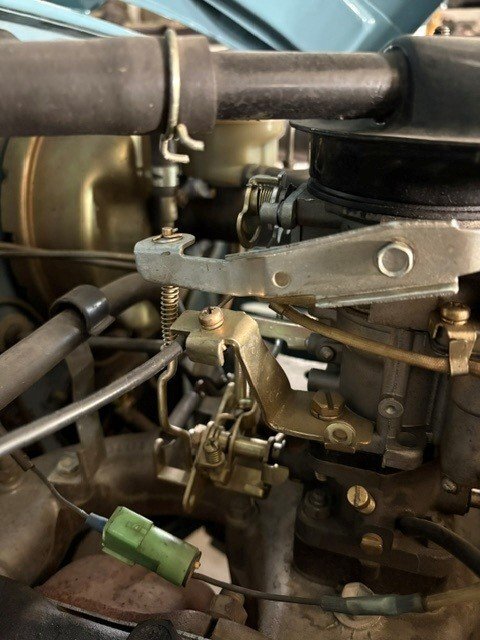
on further review of your photos it looks like the wire that goes to the fuel kill solenoid is attached to the choke cable holder. The wiring for the solenoid should route around to the front of the carburetor below the accelerator pump arm like in my picture.
 

Attachments

  • Choke bracket 2.jpg
    Choke bracket 2.jpg
    64.1 KB · Views: 72
  • choke bracket.jpg
    choke bracket.jpg
    70.1 KB · Views: 69

Wonvoul

New-ish
Joined
Aug 24, 2025
Messages
10
Location
Aurora
on further review of your photos it looks like the wire that goes to the fuel kill solenoid is attached to the choke cable holder. The wiring for the solenoid should route around to the front of the carburetor below the accelerator pump arm like in my picture.
I believe I have that bracket sitting with the old parts from the rebuild. I'll try putting that back on!

The wiring should be easy enough to reroute. Does the side matter?
 

Capriblue45

Rising Sun Member
Joined
May 28, 2023
Messages
612
It should go around the right side of the carb as viewed from the drivers seat.
 

Cruisertrash

Hard Core 4+
Joined
Aug 18, 2020
Messages
3,108
Location
Denver
@Capriblue45 nailed the choke cable issue. The brass ferrule on the cable needs to be held in place for the cable to operate just like bicycle & motorcycle cables. Bowden cable is the proper term.

The fuel pump NEEDS the spacer, period. You can try running without, but the result is broken pieces of the fuel pump arm at the bottom of your oil pan and possibly damage to the cam shaft. Sometimes things get so caked with grease & grime that the spacer blends into the block and you can’t see it. Perhaps there was some wonky aftermarket pump that didn’t require it, but it probably wasn’t worth using. Buy a Koyosan or nothing at all.

I second @MonPetiteShoe advice on the fuel tank, it sounds like you’re possibly sucking up small corrosion particles from the tank (among other possible explanations). Toyota has a recall on those from the 90s that’s still valid as long as it’s never been done. I’ve had two 60s where the dealership replaced the tanks for free under this recall. Go to this website and type in your VIN number. If a recall for seat belts pops up you can ignore that. Look for an outstanding fuel tank recall. If it doesn’t show up, then it’s been done. If it DOES show up you can come back here for advice on the long process of getting it done.

Carb rebuilds, lots of ways to go wrong. The Bakelite spacer between the upper and lower half needs to be in place correctly among other things. Use some of the gaskets provided in the kit, but not others. The primary butterfly opening at rest and the secondary kick up angle need to be set precisely. The secondary diaphragm can easily have a vacuum leak even if you think you installed it correctly. The two ball bearing valves inside the carb are easily to switch/mix up (small one in the big hole, big one in the small hole). The carb also requires the spacer/heat shield below it. Check your vac hose connections 5 times just to be sure.

Also make sure the timing is set to stock, the valves are adjusted, and then tune the carb while it’s on the motor, following the “lean drop” method outlined in the manual. A vacuum gauge is extremely helpful here, bordering on necessary. Would be helpful for all of us to know your current vacuum gauge reading at idle after the truck is hot as well.

 

Rzeppa

Rising Sun Member
Joined
Aug 24, 2005
Messages
9,019
Location
Kittredge CO, USA
The fuel pump NEEDS the spacer, period.

Nope. Nope. Nope. Not period. Some do, some don't in my first-hand experience.

When CCoT sent me their new aftermarket offering ~20 years ago for my evaluation, I held it up next to my new (right out of the box) spare I had bought from Stevinson and immediately noticed that the arm was longer (stuck out farther) than the OEM one. I contacted Stephen McClung at CCot and informed him, and he replied that they would start including the spacer with their aftermarket fuel pumps.

I have replaced many, many fuel pumps on Fs and 2Fs over the decades and many hundreds of thousands of miles and some need that spacer and some don't.

The super easy way to determine that is as I described, hold them up side by side and see how far the arm sticks out.

If your old one doesn't stick out as far, and worked fine for however many hundreds of thousands of miles, but the new one sticks out farther, then you need the spacer (insulator in Toyota jargon) and need to source it before you put the new pump in. Otherwise cam > fuel pump arm, bend arm , no pumpy). If you didn't have the spacer and the new fuel pump arm sticks out the same as your old one, then you don't need the spacer. If you put in a fuel pump in with the shorter arm but with the spacer, then no pumpy either.
 

Cruisertrash

Hard Core 4+
Joined
Aug 18, 2020
Messages
3,108
Location
Denver
Nope. Nope. Nope. Not period. Some do, some don't in my first-hand experience.

When CCoT sent me their new aftermarket offering ~20 years ago for my evaluation, I held it up next to my new (right out of the box) spare I had bought from Stevinson and immediately noticed that the arm was longer (stuck out farther) than the OEM one. I contacted Stephen McClung at CCot and informed him, and he replied that they would start including the spacer with their aftermarket fuel pumps.

I have replaced many, many fuel pumps on Fs and 2Fs over the decades and many hundreds of thousands of miles and some need that spacer and some don't.

The super easy way to determine that is as I described, hold them up side by side and see how far the arm sticks out.

If your old one doesn't stick out as far, and worked fine for however many hundreds of thousands of miles, but the new one sticks out farther, then you need the spacer (insulator in Toyota jargon) and need to source it before you put the new pump in. Otherwise cam > fuel pump arm, bend arm , no pumpy). If you didn't have the spacer and the new fuel pump arm sticks out the same as your old one, then you don't need the spacer. If you put in a fuel pump in with the shorter arm but with the spacer, then no pumpy either.
I know you have tons of experience Jeff, I’m not trying to throw you under the bus! On the other hand, the annals of Mud are littered with post after post of “Why did my fuel pump break immediately after installing it?” It’s up there with “I ripped all the vacuum lines out and now my truck doesn’t run, help!” type of threads that you see almost weekly. Additionally the Toyota EPC diagram shows the spacer, and Mr. T has a pretty good track record for correctness. I’ve found only one potential mistake in a description of an obscure and non-critical vacuum valve.
 

Wonvoul

New-ish
Joined
Aug 24, 2025
Messages
10
Location
Aurora
@Capriblue45 nailed the choke cable issue. The brass ferrule on the cable needs to be held in place for the cable to operate just like bicycle & motorcycle cables. Bowden cable is the proper term.

The fuel pump NEEDS the spacer, period. You can try running without, but the result is broken pieces of the fuel pump arm at the bottom of your oil pan and possibly damage to the cam shaft. Sometimes things get so caked with grease & grime that the spacer blends into the block and you can’t see it. Perhaps there was some wonky aftermarket pump that didn’t require it, but it probably wasn’t worth using. Buy a Koyosan or nothing at all.

I second @MonPetiteShoe advice on the fuel tank, it sounds like you’re possibly sucking up small corrosion particles from the tank (among other possible explanations). Toyota has a recall on those from the 90s that’s still valid as long as it’s never been done. I’ve had two 60s where the dealership replaced the tanks for free under this recall. Go to this website and type in your VIN number. If a recall for seat belts pops up you can ignore that. Look for an outstanding fuel tank recall. If it doesn’t show up, then it’s been done. If it DOES show up you can come back here for advice on the long process of getting it done.

Carb rebuilds, lots of ways to go wrong. The Bakelite spacer between the upper and lower half needs to be in place correctly among other things. Use some of the gaskets provided in the kit, but not others. The primary butterfly opening at rest and the secondary kick up angle need to be set precisely. The secondary diaphragm can easily have a vacuum leak even if you think you installed it correctly. The two ball bearing valves inside the carb are easily to switch/mix up (small one in the big hole, big one in the small hole). The carb also requires the spacer/heat shield below it. Check your vac hose connections 5 times just to be sure.

Also make sure the timing is set to stock, the valves are adjusted, and then tune the carb while it’s on the motor, following the “lean drop” method outlined in the manual. A vacuum gauge is extremely helpful here, bordering on necessary. Would be helpful for all of us to know your current vacuum gauge reading at idle after the truck is hot as well.
Being that I did cheap out on the fuel pump when I replaced it, is Cruiser Corp a reliable source for a replacement? It's a bummer they don't sell the pump with the spacer and gaskets, but they haven't done me wrong yet.


I have a sneaking suspicion this is the primary culprit, likely combined with some of the other common fuel-related problems, and of course my oversight of connecting the choke cable brace/mount after the carb rebuild (can't wait to see what I messed up there!)
 

Cruisertrash

Hard Core 4+
Joined
Aug 18, 2020
Messages
3,108
Location
Denver
Being that I did cheap out on the fuel pump when I replaced it, is Cruiser Corp a reliable source for a replacement? It's a bummer they don't sell the pump with the spacer and gaskets, but they haven't done me wrong yet.


I have a sneaking suspicion this is the primary culprit, likely combined with some of the other common fuel-related problems, and of course my oversight of connecting the choke cable brace/mount after the carb rebuild (can't wait to see what I messed up there!)
Get a Kyosan from Cruiser Outfitters.
 

Wonvoul

New-ish
Joined
Aug 24, 2025
Messages
10
Location
Aurora
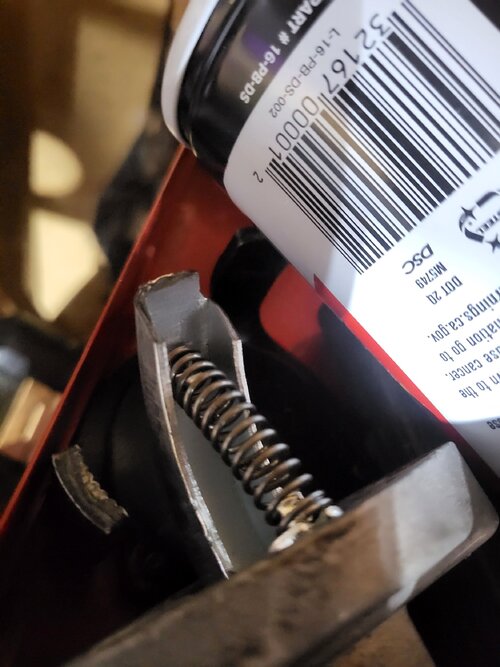
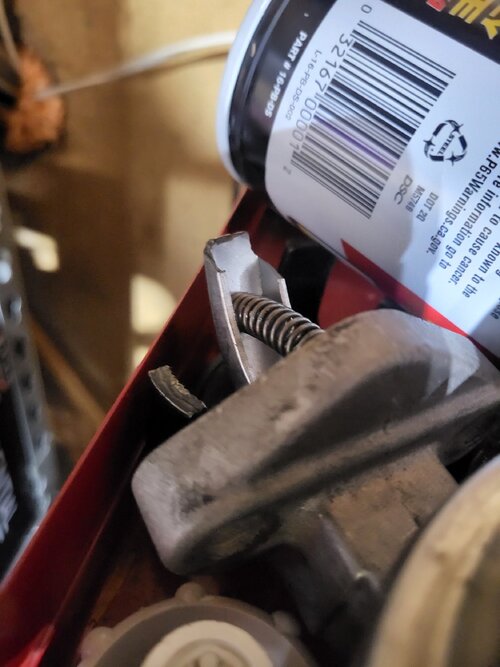
Looks like there's been a little snappage.

Kyosan fuel pump going in once it arrives, along with dropping the oil pan to get any shards out.

I'll update once that's done. One step closer!
 

Attachments

  • 20260611_131114.jpg
    20260611_131114.jpg
    485.2 KB · Views: 60
  • 20260611_131106.jpg
    20260611_131106.jpg
    461.1 KB · Views: 57

Rzeppa

Rising Sun Member
Joined
Aug 24, 2005
Messages
9,019
Location
Kittredge CO, USA
Looks like there's been a little snappage.

Kyosan fuel pump going in once it arrives, along with dropping the oil pan to get any shards out.

I'll update once that's done. One step closer!

Obviously that was one that needed the spacer.

Do you have a new pan gasket on hand? You will want the one piece ones, the four piece are a total PITA. When you go to reinstall the pan, clean up the gasket surface really well, then put some RTV sealant (I like blue Permatex) all over the mating surface. This is not to seal it, but as adhesive to hold it in place during installation. You'll need around a dozen or so clamps to hold the gasket to the pan while the sealant cures, at least a half day, over night is better. If you don't do this the gasket will want to spooge (tech term) all over the place during install, especially both ends and you'll end up with oil leaks.

You DO have to seal all 4 corners with a good blob of sealant just before install, this is in all the manuals. Don't tighten the bolts so much that they deform the pan! You can always come back and torque them a little more later if needed.

A 2F will drip for days and weeks while the pan is off. Be prepared for that when working under the motor and for while the pan is off. I like to use a big piece of cardboard that I can toss out when done.
 

Wonvoul

New-ish
Joined
Aug 24, 2025
Messages
10
Location
Aurora
Obviously that was one that needed the spacer.

Do you have a new pan gasket on hand? You will want the one piece ones, the four piece are a total PITA. When you go to reinstall the pan, clean up the gasket surface really well, then put some RTV sealant (I like blue Permatex) all over the mating surface. This is not to seal it, but as adhesive to hold it in place during installation. You'll need around a dozen or so clamps to hold the gasket to the pan while the sealant cures, at least a half day, over night is better. If you don't do this the gasket will want to spooge (tech term) all over the place during install, especially both ends and you'll end up with oil leaks.

You DO have to seal all 4 corners with a good blob of sealant just before install, this is in all the manuals. Don't tighten the bolts so much that they deform the pan! You can always come back and torque them a little more later if needed.

A 2F will drip for days and weeks while the pan is off. Be prepared for that when working under the motor and for while the pan is off. I like to use a big piece of cardboard that I can toss out when done.
I ordered the one piece gasket and new oil pan bolts from Cruiser Outfitters. Thankfully, the mobile mechanic suggested earlier in this thread came through and will be doing this round of work for my lazy ass :ROFLMAO:

My FJ is parked in my backyard. Good to know about the drip though, I'll barricade it away from my pups so they do something stupid like lick motor oil.
 

Cruisertrash

Hard Core 4+
Joined
Aug 18, 2020
Messages
3,108
Location
Denver
Obviously that was one that needed the spacer.

Do you have a new pan gasket on hand? You will want the one piece ones, the four piece are a total PITA. When you go to reinstall the pan, clean up the gasket surface really well, then put some RTV sealant (I like blue Permatex) all over the mating surface. This is not to seal it, but as adhesive to hold it in place during installation. You'll need around a dozen or so clamps to hold the gasket to the pan while the sealant cures, at least a half day, over night is better. If you don't do this the gasket will want to spooge (tech term) all over the place during install, especially both ends and you'll end up with oil leaks.
Following comments are for OP in reference to Jeff’s advice.

Zip ties 😉 Use a handful through the bolt holes in the gasket and engine block to hold the gasket, thin ones. Maybe 6-8 of them. Then get the oil pan anchored to the block with 3-4 bolts, they might only be able to reach a couple threads but that’s fine. Cut the zip ties one by one as you go around adding more bolts. When all the bolts are in and the zip ties are cut, then get the bolts fully home. Mind the gasket where it arches under the main bearing caps as you tighten those bolts - it kind of fits into a groove in the caps a certain way.

In my experience cork gaskets seem to do better at swelling with oil to form a seal rather than relying on any goop. Goop, even if just the thinnest of smears, has always resulted in leaks for me. Oil pans, side covers, rear differential cover - tried good n all, leaked every time. Tried no good and got no leaks every time. YMMV.

You DO have to seal all 4 corners with a good blob of sealant just before install, this is in all the manuals.
Definitely read the FSM to see the locations for these four dabs of black RTV (Toyota calls it FIPG, which you can get from the dealer - it’s good stuff). They go in the corners where the caps for the front and rear main bearings are.

Don't tighten the bolts so much that they deform the pan! You can always come back and torque them a little more later if needed.
80-110 INCH pounds of torque, and be prepared to constantly tighten them for a month until they make up their mind to hold torque. All 18 of them … long socket extensions are your friend here.

A 2F will drip for days and weeks while the pan is off. Be prepared for that when working under the motor and for while the pan is off. I like to use a big piece of cardboard that I can toss out when done.

Jeff ain’t wrong here! A 2F will drip forever!
 

RDub

Hard Core 4+
Joined
Feb 9, 2021
Messages
528
Location
Boulder, CO
Having done this job, as well as side cover and timing cover, I agree with most of the great advice. I have had a different experience using “goop” on cork gaskets, (in my case always the black Toyota FIPG). Per advice from Poser on Mud I used it to glue the gasket to the side cover, and then also along the bottom half of the gasket surface that seals against the engine block. Dry for years now. But that’s just my experience. Lots of opinions out there.

For placing the pan gasket I tied the gasket to the pan with small pieces of thin string, much like what @Cruisertrash describes with the tie wraps. That said I’ve never gotten the frickin pan gasket to stop leaking, so there. And I also found old fuel pump arm pieces in the bottom of my pan, apparently a former owner/mechanic got lazy. Good luck!

A final piece of advice. Make sure to take the time to inspect and if necessary flatten any bulges along the pan mounting flange from the bolts being over tightened at some point. The pan is fairly sturdy so maybe not an issue. This is critical when replacing side cover or timing cover gaskets.
 

RDub

Hard Core 4+
Joined
Feb 9, 2021
Messages
528
Location
Boulder, CO
You can try looking at it through the fuel pump arm hole, but it’s way easier to just look up into the open block when the pan is off. The cam is visible.
 
Back
Top