Building a Toyota that fits Douglas

DouglasVB

Rising Sun Member
Joined
May 5, 2015
Messages
2,332
Location
People's Soviet Socialist Republic of California,
The MORE air tank and compressor mount might not fit in my truck. Per this forum post, I need about 14 inches of clear space and I have 12 inches as you can see below (the rubber hose for the AC line is at 12 inches -- it's a bit deceiving in the photo -- and the hard line is at 14 inches). Some people bend that AC pipe and hose out of the way but I'm not so sure I want to be messing with that considering how expensive it is to get AC work done if I screw it up badly enough.

I'll email the company to see if they've got a work-around but I'm not holding my breath.

PXL_20240816_161121917.jpg
 

DouglasVB

Rising Sun Member
Joined
May 5, 2015
Messages
2,332
Location
People's Soviet Socialist Republic of California,
Today I've been working on installing heated seats for my passenger princess. I'm installing a set of Clazzio seat heaters with the Toyota-style hi/lo switches. It's been adventures in upholstery to get the covers off the seat, slide the seat heaters into place, and then wrestle the covers back on. I don't have a hog ring pliers so instead I've used zip ties to connect the rods back together under the covers. It works surprisingly well.

One thing I don't like about the Clazzio seat heaters is that I can't use the rear cross rod on the seat bottom fabric. I've left it in place but not connected to the cushion underneath. We'll see if that was a mistake or not (should I have removed it completely?) after a few months of use. It might break the heater filaments or it might be annoying to sit on. If either is the case, I'll pull the seats out of the truck again and fix them. But I'm hoping it'll be okay as-is.

If you are installing seat heaters, watch this video. It'll answer 99% of your questions.

I first bench tested the heaters and electrical harness/switches to make sure everything worked.

PXL_20240817_165217263.jpg


Then I removed the passenger seat and got to work. My truck appears to have the harness wires for heated seats although I am not using the wires.

PXL_20240817_170103700.jpg


PXL_20240817_170325848.jpg


Pro-tip: remove the headrest before you remove the seat from the vehicle. It makes it a bit easier getting it in and out.

PXL_20240817_170337664.jpg


Lots of wires everywhere under these seats. Getting the fabric cover off is a bit of a PITA. You've gotta roll the clips off.

PXL_20240817_170625975.jpg


PXL_20240817_170627529.jpg


On the passenger seat I did disassemble the airbag side of the seat but on the driver side I figured out that I didn't have to. If you're dexterous, you can get the seat heater up in between the seat cover and the cushion by only removing the non-airbag side of the seat. That'll save you a bunch of time. Also you don't have to fiddle with the airbag.

PXL_20240817_174752362.jpg


This is as far as I removed the seat cover on the passenger side. I didn't bother pulling it all the way off. Someday I might replace these seat covers.

PXL_20240817_180330907.jpg

Here you can see those two cross bar things attached to the seat covers. The rear one does not get reused with the Clazzio seat heaters. On the front one, I cut some slits into the fabric holding the cross bar in lace at either end so that I could slip it under the seat heater.

PXL_20240817_180333946.jpg

This is looking under the seat back cover. You don't have to remove that upper cross bar with the Clazzio seat covers but I didn't know any better for the passenger seat.

PXL_20240817_180336463.jpg


Here you can see the lower seat cover in place. I cut a slit in the heater where there's a blank spot specifically to do that. Be careful to not cut the traces on either side of that blank spot. Then I used zip ties instead of hog rings to get the upholstery back into place.

PXL_20240817_182832476.jpg


Here's the passenger side all buttoned up. I taped the two seat heater connectors together and attached them to another cable in the middle of the seat (look for the two white connectors).

PXL_20240817_191901141.jpg


All done with the passenger seat. I think it looks about 9/10 compared to the factory 10/10.

PXL_20240817_192238562.jpg


NOW!!! ON TO THE DRIVERS SIDE!!!

I did have to remove the airbag cable (yellow) on both seats to get the covers off. Also when you get ready to pull your drivers seat, run the seat forward pretty far. There are some screws you need to access on the trim that are hard to get to if you have the seat pushed back like I normally do when driving.

The drivers side on my truck has power controls. They do get in the way a bit and you have to remove a bunch of stuff to be able to take the covers off. It's also a PITA to get the covers back on because of the extra doodads.

PXL_20240817_202503167.jpg


The seat controls pop off easily using a trim tab tool. I have laid them out in the correct orientation. On the small control, the larger straight opening goes up. On the long control, there is more void space pointing up. So in other words, just flip these over 180 degrees to the right or left and stick them straight on the control stalks. The lumbar button does NOT need to be removed.

PXL_20240817_203904816.jpg


After the trim comes off, then you need to remove that switch assembly and set it aside.

PXL_20240817_204045405.jpg


Here's a close-up of the cables and such.

PXL_20240817_204049072.jpg


Here's the routing for the drivers side airbag cable.

PXL_20240817_204839421.jpg


It looks pretty much the same on the driver side as it did on the passenger side. The only real difference is how the covers clip on. There are some extra clips that are annoying to remove and reinstall.

PXL_20240817_210051774.jpg


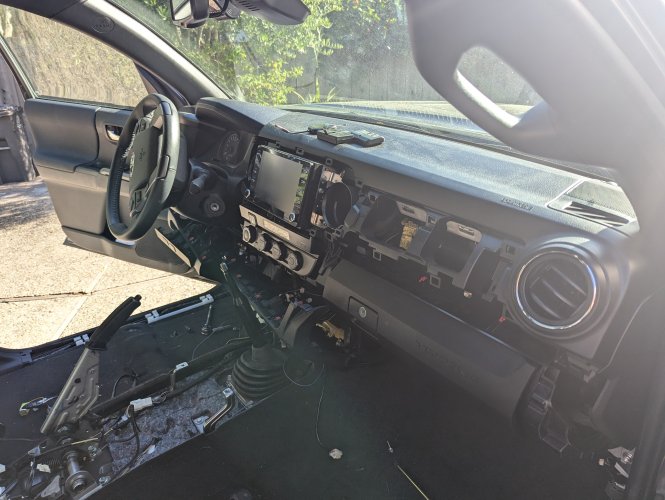
Then the next thing to do was remove the center console and open the dash up to bring the seat heater cables up to the center switch panel and install the switches. And wow there's a lot of dash to remove to do all of this!

Here's the last time my dash was still factory assembled 😅

PXL_20240817_224546074.jpg


Here's the Qi wireless charger. It's not the best charger. Hopefully someone makes a replacement for it eventually.

PXL_20240817_232709814.jpg


The center console removed.

PXL_20240817_232712667.jpg


Here's one of the many computers on this truck.

PXL_20240817_232714606.jpg


Taking more plastic off. It's a PITA to get the glove box out.


PXL_20240818_001050971.jpg


More to come in the next post... I hit the 25 photo limit on this one 😅
 

Attachments

  • PXL_20240818_001048291.jpg
    PXL_20240818_001048291.jpg
    689.1 KB · Views: 163

DouglasVB

Rising Sun Member
Joined
May 5, 2015
Messages
2,332
Location
People's Soviet Socialist Republic of California,
Okay continuing on with a now epic dash disassembly project!

Here's behind the glovebox. There are a bunch of hidden screws that have to be removed to get the glovebox out. All of the trim around it needs to come off including the knee airbag panel.

PXL_20240818_002304793.jpg


Since I was this far into the dash, I decided to install the 2WD-LO mod from BBPond Tuning. You can see the relay and the resistor hanging down in the center of the photo. I tucked all of that in above the two computers.

PXL_20240818_002916898.jpg


I put in the two switches for the heated seas and also the 2WD-LO switch. I moved the Qi wireless charger switch to the middle so I could put the right seat heater switch as far right as possible (the farthest right position is occupied by an aux power port).

Interestingly, there were two cables coming out of the harness for switches that my truck doesn't have (probably the switches that the A/T trucks get but the M/T trucks don't since we don't have crawl control and whatnot). They were pushed into blank spots under the switches.

You might also notice the blue wire in the lower left of the photo. That's coming from the ground wire for the 400 watt anytime inverter mod that I previously installed. I want the ability to turn it on and off rather than leave it in 400 watt mode all of the time. So I have the ground wire extended to the left switch panel where I've added a ground switch to be able to turn it on and off. It tricks the inverter into thinking that the parking brake is pulled.

PXL_20240818_002919408.jpg


For future reference, here's the cable that goes to the USB port on the center console. I'm thinking about how to put a USB splitter behind the dash to have the wireless dongle for Android Auto be in the glovebox instead of hanging down from the visible USB port.

PXL_20240818_004254133.jpg


Since I'm this far into the dash, I figured i might as well work on the left switch panel at the same time. I put in a cable to split off switch illumination from the bed light switch. I also tidied up some wiring from the previous owner. And I have more tidying to do with pushing a bunch of wires into the engine bay for accessories.
The illumination harness is the one covered in cloth with the red and back wires coming out. It goes into a daisy chain set of wires to link with the other switches. It certainly makes things easier.

PXL_20240818_010320791.jpg


This is where I left it for the day. The sun was down behind the hill and the fog was rolling in so I figured I'd go inside to have dinner and then get back to it early tomorrow morning.

PXL_20240818_012422085.jpg


Tomorrow I'll install the anytime backup and forward camera mod. Then I'll reinstall the seats and enough of the dash to make sure that everything works as it should. Then I'll put the interior fully back together. Then I'll install the molle panel and fire extinguisher mount, and the seat jackers from Desert Does It.

The only things I'm missing to complete this adventure in disassembling a Toyota are 1) the expanded left switch panel (the guy who makes the one I want still isn't back in production) and 2) a solution for the aux fuse blocks that are going to be in the engine bay very soon.

I'm thinking about some different DIY options now. We'll see if I can make it to Home Depot tomorrow to look at some ideas I have or if Monterey Car Week will still have the peninsula completely gridlocked.

Oh and if I have the energy after all of this, I've got a set of RCI bumper reinforcement brackets that need to be installed.
 

DouglasVB

Rising Sun Member
Joined
May 5, 2015
Messages
2,332
Location
People's Soviet Socialist Republic of California,
I got most of the work done today and the truck is back together. Here's the list of what I ended up doing:

  1. Installed the heated seats
  2. Installed the 2WD-LO mod
  3. Installed the compressor button
  4. Installed the inverter 400 watt modification enable/disable button
  5. Replaced the LED light bar button with one that's much more OEM-looking
  6. Finished the wiring for the compressor in the engine bay
  7. Added an aux fuse block that's currently on top of the main fuse box under the hood
  8. Redid the dash cam wiring so that it gets power from the aux fuse block in the engine bay (no more fuse taps under the dash)
  9. Repaired the OBD2 port wiring (one wire was broken recently because of the tap wires that the original dealer installed for a tracker that I removed)
  10. Redid the light bar wiring so it uses the aux fuse block
  11. Redid the anti-rodent device wiring so it uses the aux fuse block
  12. Installed Desert Does It brand seat jackers for the passenger seat
Things I did not do because I was running out of time:
  1. Install the anytime backup camera and front camera mod
  2. Add a 12v aux power port on the back of the center console (I need to buy one of these -- I thought I had a spare somewhere but I don't)
  3. Install the RCI front bumper reinforcement bracket
  4. Install the fire extinguisher and quick release on the molle panel
  5. Install a small flashlight mount on the molle panel
  6. Finish the compressor external hose coupling (I'm going to have a coupler in the rear bumper)
Things I need to buy:

  1. lower left switch panel with more switch holes (still waiting for the guy that makes these to get back into production)
  2. Overhead console expanded switch panel (waiting for the company that makes these to restock)

Here are some photos of today's work.

I did look at installing the anytime backup/forward cam today. It was just a bit too involved for what I had time to do. One note for other people... the big white connector on the driver's side is the exact same connector as the big gray connector on the passenger's side. You want the gray connector for one of the harnesses.

PXL_20240818_142350704.jpg


I had the harnesses plugged in before I aborted and returned it to stock. I would have needed to make my own harness to go to the switch and also ran the front camera to where it'll be permanently mounted. I'll install it maybe later this week.

PXL_20240818_143810412.jpg


Here's the Desert Does It molle panel attached to the front drivers seat mounts where I'll eventually mount a fire extinguisher and maybe a pen light. I need to track down some bolts and nuts to attach the quick release mount to the molle panel.

PXL_20240818_151837844.jpg


Here's how I tapped into power for the switches.

PXL_20240818_160801673.jpg


Partially back together!

PXL_20240818_175048111.jpg


Much more back together.

PXL_20240818_192212601.jpg


Here's what I'm doing for the aux fuse panel in the engine bay.

PXL_20240818_213058443.jpg


Here's the routing for the ARB compressor wiring loom (it's running along the top of the back of the engine bay. Look for the black zip tie towards the bottom right in the photo.)

PXL_20240818_213102002.jpg


Here's the whole engine bay.

PXL_20240818_213105842.jpg


And here's the fix I did on the OBD2 port.

PXL_20240818_215627677.jpg


I still need to figure out a permanent mounting solution for the aux fuse block. I think I'm going to have to make my own mount.

I am still interested in having an air tank. Hopefully MORE Fabrication emails me back about if their mount will fit with where my AC line is located.
 

DouglasVB

Rising Sun Member
Joined
May 5, 2015
Messages
2,332
Location
People's Soviet Socialist Republic of California,
I did a little more sorting out of wiring this morning that I didn't quite get to last weekend. Here are a few notes that might help me or someone else in the future:

  • The screws that hold down the manual transmission shifter boot are insulated from ground. Don't use them as ground lol! I had to switch over to a body ground nearby and then my heated seats worked correctly.
  • Be sure to connect the wires for the Toyota switches correctly. I had a couple wired backwards that caused odd switch LED behavior. Also they should not be used to switch ground. Only a hot leg. I had to add a relay in one spot instead of switching ground to correct the LEDs being weird.
  • In order to have the extended ARB compressor harness behave in a way that it requires the ACC or ON position of the key, the tiny ground wire needs to be on a relay. Otherwise while you could put the cab compressor switch on an ACC switched power source, the switch in the compressor bed pocket can turn on regardless of anything else in the truck. The only way to make both switches do nothing if the truck is off is to use a relay on the very small ground wire.
  • The Desert Does It molle panel for underneath the seat does not give much room to install a fire extinguisher of any size. I bought a 2 pound extinguisher and it's too big to fit and not potentially kick it. I did install a small flashlight on the panel though. There's room maybe for one of those small extinguishers with the push button top. Probably this panel is more of a gimmick than something useful.
Some things that I still need to do and am waiting on parts for:

  • Finish the compressor quick connect installation on the rear bumper. The ARB fitting that I got from Amazon was the wrong one. I suspect it might have been a fake because the part number was correct but the part itself was a different part number (impacts the fitting sizes). I'm returning the one I got and I ordered the right one from somewhere else.
  • Install the front bumper frame brackets.
  • Install the front-facing camera and anytime camera switch. I ordered up some thin gauge wire to build the switch harness. I'm planning to put it in the overhead console.
  • Find a small enough extinguisher to install on the Desert Does It molle panel.
  • Decide on overhead switch panel. I'm talking with a guy on Etsy who manufactures a switch panel that replaces the useless sunglasses holder. He can customize it to accept two rows of small switches for either five or six switches per row. I have no idea what I'll do with all of those holes but it seems like an outstanding idea because everyone needs more switches!
Otherwise the truck happily trucks along! And the heated seats are really nice 😎
 

DouglasVB

Rising Sun Member
Joined
May 5, 2015
Messages
2,332
Location
People's Soviet Socialist Republic of California,
Today I installed the front facing anytime camera, the extended left switch panel, and the RCI front bumper reinforcement brackets.

Tomorrow I am going to finally finish the compressor install (I somehow lost my teflon tape... again.... so I'm waiting for some to arrive from Amazon). I also need to diagnose why the seat heater on the driver's seat isn't working. The back heater is working. It might be a loose connection under the seat. And I need to verify the passenger seat is in fact getting hot (hard to tell without sitting on it).

I started out by moving the 2WD-LO switch up to the center roof console. The wire it came with was long enough to do that. I will need to get an expanded switch panel for up there to house it but the only place that I can find that makes them (Meso Customs) has been out of stock for months. So for now the switch is going to dangle behind the mirror.

PXL_20240831_143040067.jpg


Oh I also fixed the aux charging port cable. I had accidentally bumped it loose when I reinstalled everything the other week.

I routed the cable for the 2WD-LO switch with the other cables above/inside from the airbag.

PXL_20240831_143501549.jpg


The below photo will be useful in the future as I try to figure out where to mount radios and such. You can see the 2WD-LO wire in the lower right of the opening.

PXL_20240831_143504387.jpg


I really need to replace the incandescent bulbs with LED bulbs for the interior lights. It's odd that they're even still putting incandescent bulbs in trucks in this century.

PXL_20240831_143508049.jpg


Here's the anytime front/rear camera setup including the harnesses, switch, and whatnot. Not shown is the actual camera. I opted to do final assembly on the harness but in retrospect I should have paid the extra for it to come fully assembled.

PXL_20240831_160837861.jpg


I forgot to get photos of the anytime camera fully installed. I'll get some tomorrow. The front camera is installed below my front license plate bracket. It's not ideal but that was the best option I could come up with at the time. I had originally tried to mount it above the license plate bracket but the camera is designed to either face forward or down, not up. I might try some other solutions in the future if I don't like it where it is.

Next I worked on installing the new left switch panel. I decided to not bother finishing the 3D print surface. It looks good enough installed. I might wrap it eventually with a vinyl sticker but for now I'm happy with it.


PXL_20240831_233942634.jpg


It's a good looking panel filled up with switches!

PXL_20240831_234404639.jpg


The switch panel does require dash plastic modification. I think those tabs are for if you have a Tacoma with the little pocket in the switch console instead of extra switches?

PXL_20240831_234426886.jpg


So I busted out my trusty old Dremel, a Model 370 Series 2, and got to work.

PXL_20240831_235311657.jpg


It isn't pretty but who cares since no one will see it normally! (Please ignore the wiring mess. There's just no great way to make it pretty.)

PXL_20240901_000046385.jpg


These are the pieces I cut out of the dash.

PXL_20240901_000138424.jpg


It looks pretty good in person. The photo picks up the imperfections that you don't really see in person.

PXL_20240901_000107267.jpg


Then I tackled the RCI bumper frame braces. The access is annoying but it isn't too bad overall. You only have to remove the two forward facing nuts and two plastic frame plugs to install it. Below is before I added in the extra bolts on the passenger side.

PXL_20240901_005552916.jpg


This is the left side after being fully installed. It took me about 45 minutes per side going slow because I don't have a 19mm ratcheting wrench. Using a socket and a normal wrench, it took a lot of time and was annoying.

PXL_20240901_015020933.jpg


Anyway that's what I did today. Tomorrow I'll finish up the compressor (assuming the Teflon tape gets here) and I'll diagnose the seat heaters.
 

DouglasVB

Rising Sun Member
Joined
May 5, 2015
Messages
2,332
Location
People's Soviet Socialist Republic of California,
I got the air compressor finished this morning with an air fitting on the rear bumper. There are a few areas where it's just a piece of plastic (no metal backing) so it was easy to drill through. I used a couple fender washers to hopefully make sure I don't break the plastic in the future. I used some braided steel compressor air line to go back to the compressor. The areas where it could rub have some convolute tubing around them.

And lol I still need to get photos of the final camera install.

This evening when it cools down I'll tackle the heated seat issue (if I'm feeling up to it).

Here's the ARB air fitting on the bumper. It's a pretty nice, clean installation.

PXL_20240901_174427168.jpg


Behind the bumper. The braided stainless line connects into the air fitting on the passenger side. The other end runs up into the compressor box.

PXL_20240901_180310047.jpg


As far as I can tell, everything works correctly. I need to grab a pressure gauge to make sure it's building the correct amount of pressure but it seems like both compressors are cycling on and off correctly.
 

DouglasVB

Rising Sun Member
Joined
May 5, 2015
Messages
2,332
Location
People's Soviet Socialist Republic of California,
I got out a little this weekend when I was visiting my parents and did some of the local forest roads.

I still need to check on the driver's heated seat bottom to see if it's working correctly. It seems to be at low heat but maybe at high heat only the back of the seat gets hot but not the bottom of the seat.

I also still need to double check that both compressors are running. I'm like 95% sure but I'll pull one fuse at a time to be sure.

I was looking at my parents Midland radio for gmrs today and I think it could fit in the area where the sunglasses holder is if I 3D printed something to replace the sunglasses holder. I could probably stuff a small CB radio in there, too. Or maybe the face plate from an Icom 2m/70cm radio. One question I've got is if it would be a potential hazard having RF energy run through a coax cable close to the airbag in the A pillar. I'm thinking about it more because I've got to find somewhere to mount radios in this truck and there aren't many options that won't interfere with something else or intrude into where my legs go.

1000039389.jpg

1000039393.jpg

1000039406.jpg


1000039407.jpg


1000039521.jpg
1000039531.jpg
1000039541.jpg
1000039532.jpg
1000039537.jpg
1000039551.jpg
 

DouglasVB

Rising Sun Member
Joined
May 5, 2015
Messages
2,332
Location
People's Soviet Socialist Republic of California,
Today I fixed the driver's heated seat that wasn't working right. There was a loose connection under the seat that took me a while to diagnose. The issue was on the heating pad side where one of the male connectors was backing itself out of the connector housing. At least per the ammeter readings, it should be working now. I won't know for sure until I drive a bit this afternoon.

PXL_20240929_181334304.jpg


I also found the issue with my dual ARB compressors. There was a bad crimp on the All-Pro Off-Road extension harness that came with the bed compressor mount kit. I was really worried for a bit that the problem was in the compressors which would have required unmounting the bed box which would be the biggest PITA ever (it's extremely hard getting it in and out because of very limited access). I ended up having to solder the spade terminal to the wire. It seems that it's just this one bad crimp and all the others are good.

PXL_20240929_192318185.jpg


I have a feeling that in the future I'll be replacing the whole harness from the engine bay back to the compressor and into the compressor wiring as well. It has the white connectors for the compressors that seem to always melt on ARB compressors that see much use and I suspect the wires are a bit under-sized as well. That endeavor will happen when I eventually get a camper shell, aux LiPo battery and solar charger, and run a fat cable from the engine bay to that battery. So maybe this time next year.

I'm still evaluating radio options for 2m/1.25m/70cm, APRS, GMRS, and CB. And eventually maybe 10m.

Meso Customs still is not back in production for expanded overhead switch plates.

I'm still planning to put Archive Garage spring hangers and cross member onto the truck down the road. That'll happen when I do a high clearance rear bumper. Maybe next year.

I'm looking at options for long travel kits to be able to have at least 35" tires. I'm still eyeballing the Marlin RCLT kit. They're $6k now (not including the ~$3-5k of other needed parts or re-gearing for another ~$3-5k if I get a shop to do it). I can almost convince myself that's reasonable 😅 This'll be in a few years.
 
Last edited:

DouglasVB

Rising Sun Member
Joined
May 5, 2015
Messages
2,332
Location
People's Soviet Socialist Republic of California,
Now that the weather is turning cool in Monterey, I can report that the seat heaters are an excellent addition to the truck. If you don't have seat heaters, I highly recommend you get some. Your significant other will suddenly be much happier to ride in your truck.

I got the Toyota heat dual switch kit from here. You can see some photos earlier in this thread of how the install went. If I were to do it again, I might get the single switch variant that has the five heat levels. But what I got is more than enough to make my 👸🏻 very happy.

This is probably the single best mod that I've ever done.
 

DouglasVB

Rising Sun Member
Joined
May 5, 2015
Messages
2,332
Location
People's Soviet Socialist Republic of California,
We went down to Thousand Oaks, CA last weekend to see some friends. On the way back, we took a circuitous route including 20 or so miles of dirt in the vicinity of Pine Mountain Club. The truck did great through all of it.

I'm still thinking about a camper shell. After a camping trip to Big Sur a few weeks ago, I would really like at least a shell for more storage space but it would be cool to not take so dang long to setup a tent.

Anyway here are a few photos on the dirt we did. We were hoping to spot some condors but we only saw buzzards.


PXL_20241110_233528464.jpg

PXL_20241110_233544021.jpg
 

Notyourmomslx450

GIG 'EM GILL
Staff member
Cruise Moab Committee
Joined
Aug 4, 2014
Messages
3,902
Location
Westminster
We went down to Thousand Oaks, CA last weekend to see some friends. On the way back, we took a circuitous route including 20 or so miles of dirt in the vicinity of Pine Mountain Club. The truck did great through all of it.

I'm still thinking about a camper shell. After a camping trip to Big Sur a few weeks ago, I would really like at least a shell for more storage space but it would be cool to not take so dang long to setup a tent.

Anyway here are a few photos on the dirt we did. We were hoping to spot some condors but we only saw buzzards.


PXL_20241110_233528464.jpg

PXL_20241110_233544021.jpg
Don't you have to register as a commercial vehicle, even though you're not?
My wifes aunt was telling me if you have a camper shell your registration gets cheaper.
A good friend lives near Sac said his registration for his 03 Tacoma is over 300 bucks!
 

DouglasVB

Rising Sun Member
Joined
May 5, 2015
Messages
2,332
Location
People's Soviet Socialist Republic of California,
Don't you have to register as a commercial vehicle, even though you're not?
My wifes aunt was telling me if you have a camper shell your registration gets cheaper.
A good friend lives near Sac said his registration for his 03 Tacoma is over 300 bucks!
I looked into if the camper shell would mean I don't have to register as a truck and unfortunately it seems that there's no way around it anymore. Lots of people still post online that you can mount a permanent shell and then change the registration but that seems to be based on old information and folklore rather than anyone being successful at it. I might try though once I have a shell. But the price difference isn't great enough to make me want to take a half day off work to go to the DMV.

There are multiple components to the registration fee in California. It varies based on exactly where you live and vehicle details. It sounds like your friend is paying some local or regional fees on top of their state fees.

I paid $134 in 2023 for my 2001 Ford Focus to be registered here. The last time I paid for my old 1986 4runner here it was $125 (a couple years ago). Although the 4runner, even though the top could be removed, counted as an automotive (non commercial) rather than a pickup (commercial).

I paid about $650 for registration of my new-to-me truck plus about $4100 in sales tax in December last year.

Each year the amount I pay in registration will decrease as the truck gets older. I think I remember it working the same way in Colorado.

If you want, you can play with the DMV calculator: https://www.dmv.ca.gov/wasapp/FeeCalculatorWeb/newVehicleForm.do

I've gotta say... We get our money's worth for registration fees out here in Cali. We've got excellent roads compared to many other states I've been. The state highway patrol (primarily funded via DMV fees) is fast to respond and patrols all state highways usually multiple times a day including the extremely remote highways that only get a handful of vehicles a day. The money that goes to smog abatement is very well spent and has massively improved the air since I was a kid. Also while this state has a lot of people, it's also absolutely massive and there are many regions with very few residents so my DMV dollars from my 400k person county go to support highways in tiny counties with only a few thousand people who otherwise couldn't afford to maintain the state highways there. While we pay a lot, we get a lot in return.
 

allen.wrench

Rising Sun Member
Joined
Dec 7, 2018
Messages
653
Location
Syracuse, UT
I've been super happy with my soft(topper) taco shell. It's far lighter and more adaptable/functional than a hard shell. Also easy to install/uninstall, and more affordable. They're customer service has been great to work with if I've had any questions.

The downside of a softtopper is you really shouldn't put much weight on top of it and it could be sliced into by a determined thief. But if he/she is that determined then I'm just going to have the cops tag into the conversation.

Having any shell has transformed my sleeping/camping setup from doing the ground tent to just sleeping in the bed. It's far nicer, faster, and able to handle all the weather the shell sees on the highway.

That's my experience and opinion if it helps out. That's good stuff to know about Cali.

Allen
 

DouglasVB

Rising Sun Member
Joined
May 5, 2015
Messages
2,332
Location
People's Soviet Socialist Republic of California,
I had a Softopper on my 1st gen 4runner in the summers. It was great! I see a few people around the area here using them on newer tacos. One thing I've noticed with the 3rd gen trucks that have Softoppers is they seem to draw a healthy vacuum while driving (the fabric is sucked in tight against the frame). That tracks with how much dust gets into the bed when I have the bed cover on it.

I think regardless of which solution I go with, I'm going to need to install a positive pressure system to keep dust out of the bed and topper.
 

allen.wrench

Rising Sun Member
Joined
Dec 7, 2018
Messages
653
Location
Syracuse, UT
Hmm. Idk what the pressure differential is between the inside and outside.

Before the softtopper I had the Toyota trifold bed cover. There was more bed dust with the trifold. After I changed to the softtopper I did add a couple weather strips to the left and right side of my tailgate. But nothing else to intentionally keep dust out.

I've been happy with how little dust gets inside the softoppered bed ¯⁠\⁠_⁠(⁠ツ⁠)⁠_⁠/⁠¯ I have normally been driving at the front of trail runs so that helps, but even when I'm a gunner I don't notice much send I my bed.

Allen
 

DouglasVB

Rising Sun Member
Joined
May 5, 2015
Messages
2,332
Location
People's Soviet Socialist Republic of California,
In November we went down to Joshua Tree. The truck did wonderfully although now I need to figure out how to fix the pin striping on the paint from yucca plants.


1000042949.jpg


1000042976.jpg


1000042971.jpg

I hit a pretty good rock in a dry wash. Good thing I went with the steel skid plate 🤣

1000043073.jpg

1000043152.jpg


Then we went up to see my parents in the mountains and play a bit in the snow.


1000043311.jpg


And the snow led to baby's first winch recovery! It was a simple pull out of the snow using a tree saver and away we went.

1000043314.jpg


And then in December we had a bit more fun in the snow.

1000044450.jpg


Anyway that's what my truck has been up to 😁

Next is to make a decision on a truck topper or camper. I'm still trying to figure out what to do there.
 

DouglasVB

Rising Sun Member
Joined
May 5, 2015
Messages
2,332
Location
People's Soviet Socialist Republic of California,
I did my first at-home oil change today. It took a bit longer than it should because I fitted a Fumoto valve (F133S) in place of the OEM oil pan drain bolt. Once a pair of spring hose clamp pliers show up, I'll be putting on this F-LOCK in place of the plastic clip on the valve. I also got the MH-10 hose connector and some hose to make it less messy the next time I need to change oil and a NC-10 nipple cap to keep dust and such out of the valve.

I also picked up a MotivX Tools oil filter wrench, drain tool, and funnel bundle. That kit is surprisingly high quality for the price. It made pulling on and off the oil filter housing very easy.

I used a Toyota OEM filter that I picked up from the dealership in town. It was P/N: 04152-YZZA1.

I used Mobil 1 synthetic 0W-20 oil. A little less than 6.2 quarts brought it all the way up to full (checked after driving and also statically parked before driving).

Crawling around underneath I got a better look at the damage from that rock I hit just outside Joshua Tree last fall. It really jacked up the engine skid plate and bent it more than I realized. Good thing I chose the steel skid plates rather than the aluminum version!

The next two things I need to figure out are:
  1. How do I change the service reminder interval? I tried with an OBD2 tool (not the dealer tool) but it doesn't have that option. It's nowhere in the infotainment settings or drivers console settings. The service light turns on after 3500 miles which is very annoying since it only needs service (either a tire rotation or both tire rotation and oil change) ever 5k miles.
  2. How do I fix the scratches in the clear coat from yucca plants that we went through outside Joshua Tree?
Here are some photos of the clear coat scratches.


PXL_20250215_204527967.jpg


PXL_20250215_204530587.jpg


PXL_20250215_204534021.jpg


PXL_20250215_204547391.jpg


Here are a few photos of the damaged skid plate and the new Fumoto valve.

PXL_20250215_174849395.jpg


PXL_20250215_174854373.jpg


PXL_20250215_174858561.jpg


PXL_20250215_174901972.jpg


PXL_20250215_182228823.jpg


PXL_20250215_182255587.jpg


PXL_20250215_190652318.jpg
 

allen.wrench

Rising Sun Member
Joined
Dec 7, 2018
Messages
653
Location
Syracuse, UT
At first, I looked at the pictures only and thought you were showing the results from a recent trip with the Fumoto valve leaking oil after the skid plate hit a few obstacles. Then I read what you wrote up.

Seems the Fumoto should be protected well enough. I've stayed with the bolt and crush gasket, since it's simple and a gasket is included with every factory filter. But I've wondered if the valve would be as good since it appears to have decent enough protection, and lower risk of stripping the oil pan's threads for various reasons.

I ignore the built-in factory service interval reminders. I keep track in my mind, on a paper log, and/or digital notes app. Likely overkill, but it's the best kind. It's also how my dad taught me and when I'm away from my truck, like when shopping at Costco, I can check if I need to pick up oil or other stuff. If there were a simple way to make the built-in factory service reminders more helpful, I'd love to know. My truck's built-in service intervals trigger at 4,500 mile intervals from the last maintenance reset, giving a 500 mile service window. I could make sure to hit the reset each time, but I don't trust it since each reset is the same as the last. The truck has no way to log any real notes of what's done. If you forget what you did at the last reset, then you could go for 15,000 miles or more without changing your oil. This again comes down to keeping track outside of the limited capability built-in reminders. I'd say the best capability our trucks have is the odometer, Trip A, and Trip B; though Trips A & B get wiped easy if you accidentally hold the button too long or disconnect the battery.

I got white paint for reasons. You could just leave the pin stripes to standout from many other Tacoma owners at the mall. Sorry, pinstripes don't bother me unless they begin to rust and lead to real damage. But my understanding from a friend who likes keeping his Subaru and Mazda sports cars shiny, is if a scratch is shallow enough, it can be "removed" by polishing away the higher spots and smoothing over the edges of the scratch at the same time. If a scratch is too deep, then it's too deep.

Allen
 

DouglasVB

Rising Sun Member
Joined
May 5, 2015
Messages
2,332
Location
People's Soviet Socialist Republic of California,
I keep paper maintenance logs as well but that dash reminder light is really annoying 😂 Next time I go to the local dealer for a filter I'll ask them about it.

Because I live six blocks from the ocean, I need to figure out this scratch situation. I'm not bothered by the pin stripes but I am concerned about future rust. Everything rusts here super fast. Even the guts of desktop computers.

Sorry it was confusing with the valve! The skid plate damage was BEFORE I installed the valve. The valve is to make it easier for me to do oil changes in the future. I had a cracked oil pan at the drain bolt hole threads on my old 4runner that took forever to figure out. But that was a very abused truck before I ever got it. This new truck is still pretty pristine.

I also have evil thoughts about an oil filter relocation kit because it's annoying having to access the oil filter down there... Maybe when I hit 100k miles.
 
Back
Top