Axle Buildup-First stab at a tech writeup.

jps8460

Cruise Moab Committee
Joined
Feb 15, 2013
Messages
3,235
Location
Grand Junction
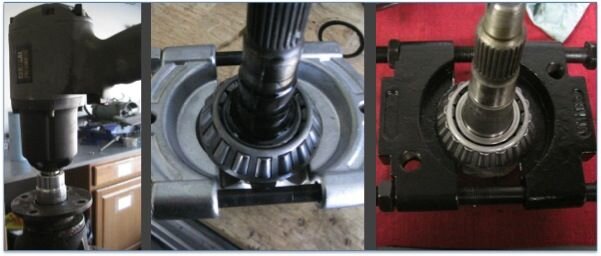
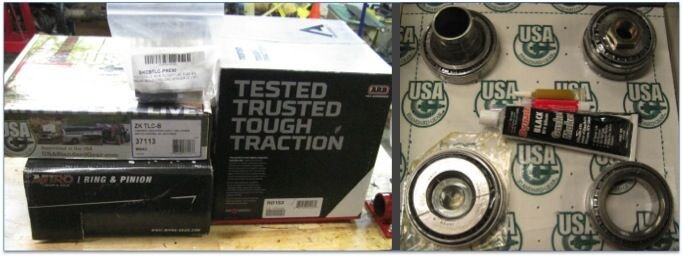
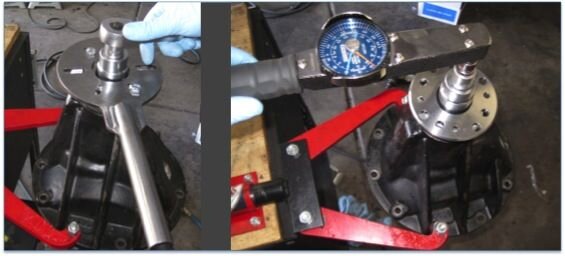
The dissassembly is fairly straight forward. After pulling the carrier out, I pulled the pinion out. I used a 3/4" impact on the pinion nut to facilitate a hasty removal :).

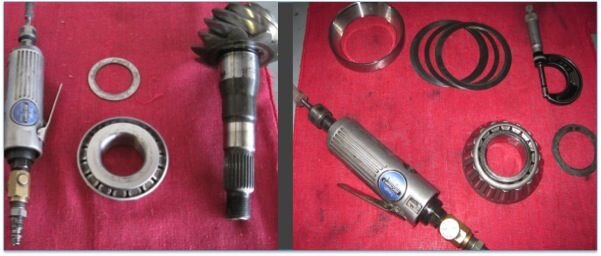
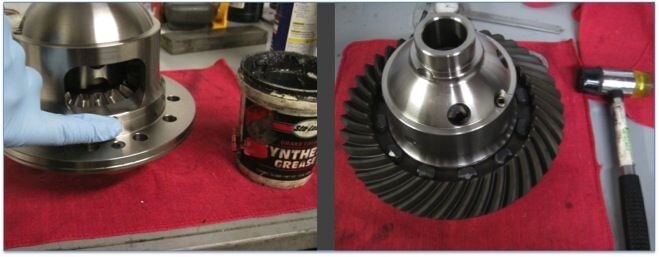
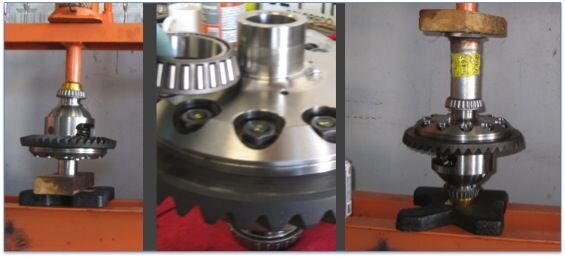
The largest bearing seperator in my kit wasn't quite big enough. So, I made a quick trip to china freight and got the "Large" bearing separator. I touched it up with the die grinder a bit to make the transition point a little thinner (I can post pics if anyone is interested).

After I bolted up the new separator, I threw it in the shop press. The separator goes on as show and then I pressed the pinion out of the bearing from the pinion nut side.
 

Attachments

  • Pinion Bearing.jpg
    Pinion Bearing.jpg
    28.5 KB · Views: 228

jps8460

Cruise Moab Committee
Joined
Feb 15, 2013
Messages
3,235
Location
Grand Junction
The factory pinion depth shim resides between the pinion gear and the bearing. To get ahead of the game, I decided to use my old bearing as a "setup" bearing.

I whipped out the die grinder and hogged out the ID. This makes it easy to slide on and off the pinion for setting up pinion depth. This exercise was unfortunately in vain.

I realized that my master install kit contains shims to be used behind the pinion bearing race. Not a big deal, I grabbed the die grinder and massaged a bit off the OD of the race to help it slide in and out of its seat easily.

I decided at this time to keep things consistent by replacing the factory shim (between pinion gear and bearing) with a stack of shims behind the race.

I measured the stock pinion depth shim (.0533) and then stacked various race shims until I achieved a similar thickness (.0538).

I thought this was kind of convenient, it is a lot easier to pound a race in and out than it is to press the pinion bearing on and off......especially with my setup.
 

Attachments

  • setup parts.jpg
    setup parts.jpg
    29.3 KB · Views: 227

jps8460

Cruise Moab Committee
Joined
Feb 15, 2013
Messages
3,235
Location
Grand Junction
After figuring out the pinion business, I decided to move back to the case. I wanted to get it tapped for the air line before I forgot and would have to do it post assembly :thumb:

I marked the case as shown in the ARB installation manual.

I center punched the mark, drilled a pilot hole, then a 7/16" hole.

I then used a counter sink to deburr inside and out.

I the reamed the hole with a 1/4" NPT tapered reamer, and finished it off with a 1/4" NPT tap.

After all of that I spotlessly cleaned the case inside and out.
 

Attachments

  • Tap hole.jpg
    Tap hole.jpg
    26 KB · Views: 215
  • Tapped and Cleaned.jpg
    Tapped and Cleaned.jpg
    29 KB · Views: 217

jps8460

Cruise Moab Committee
Joined
Feb 15, 2013
Messages
3,235
Location
Grand Junction
So on to the new stuff. I gathered up all of the boxes for the fresh assembly. This one gets an ARB RD 153, Niro gear solid spacer SKCSTLC-PRE90, Niro Gear R&P TLC-410-NG, and YUKON (Koyo) master install kit ZKTLC-B.

**I'm planning on using my old crush sleeve to get a baseline measurement on my preload spacers (I suspect it won't be very close). Anyone have any input here?
 

Attachments

  • New Gear.jpg
    New Gear.jpg
    36.4 KB · Views: 217

jps8460

Cruise Moab Committee
Joined
Feb 15, 2013
Messages
3,235
Location
Grand Junction
The gear install manual and ARB manual suggest "stoning" the ring gear mating surface. I pulled out my stone and made some friction. There were very definitive high spots, but it didn't take much to tune them up. I would say I have less than 2 minutes into this part.

Its hard to see, but the main high spots (the ones that would actually grab the stone), were spiral tooling marks or some kind of chatter. I suppose if it were really bad, it could throw off backlash. As for what I saw, I cat imagine I took of more that a few tenths.
 

Attachments

  • Whet Stone.jpg
    Whet Stone.jpg
    26.1 KB · Views: 215

jps8460

Cruise Moab Committee
Joined
Feb 15, 2013
Messages
3,235
Location
Grand Junction
My ring gear got stoned, then baked :lmao:

The landcruiser manual says to soak the ring gear in a 100 deg C oil bath prior to installation. I really didn't feel like doing this.

I placed it in a 200deg oven for 30min, and everything seemed to work fine.

The ARB manual says to lightly coat the shoulder with an EP lube to prevent the ring gear from seizing once it cools down.

The ring and pinion install manual says to be careful not to get lube between the ring gear and mounting surface.

I cautiously rubbed lube on the shoulder and wiped up any that touched the mating surface.

The ring gear slipped on and I was able to get all of the bolt holes lined up with ease.

PS Don't tell Megan about the oven.
 

Attachments

  • Heat it up.jpg
    Heat it up.jpg
    18.5 KB · Views: 204
  • Tada.jpg
    Tada.jpg
    30.1 KB · Views: 232

DanS

Rising Sun Member
Joined
Jul 30, 2010
Messages
1,638
Location
Dumont
**I'm planning on using my old crush sleeve to get a baseline measurement on my preload spacers (I suspect it won't be very close). Anyone have any input here?

No idea. But I'm watching, since I will almost certainly be doing the same in the very near future.

Added bonus of completely removing the ring and piñon: I could powder coat the housing, and make it super easy to clean!

The landcruiser manual says to soak the ring gear in a 100 deg C oil bath prior to installation. I really didn't feel like doing this.

I placed it in a 200deg oven for 30min, and everything seemed to work fine.

Oven works fine (and I've got an oven in the shop, and a big pan filled with oil ready to go). I've never bothered with lubing the shoulder, because I've never had a problem with the fit of the ring gear to the carrier. The hardest part is working fast enough not to burn myself. ;)

Dan
 

jps8460

Cruise Moab Committee
Joined
Feb 15, 2013
Messages
3,235
Location
Grand Junction
Important lesson learned today.

If you decide to make a "Set up" bearing, it is probably best to use a brand new one of the same manufacturer.

I spent 2hrs this dialing in my pattern this afternoon. I then pressed the new race and bearing on and found out that my "setup bearing" must have been pretty worn/different. So, I spent the rest of the afternoon dialing in my pattern with my "new" bearing. There was about a .018" difference between the two. Far from what I would have suspected obviously.

My pattern came out pretty nice. I'll post up some more pics tomorrow.

-Jackson
 

jps8460

Cruise Moab Committee
Joined
Feb 15, 2013
Messages
3,235
Location
Grand Junction
Alright :beer:

I got the ring gear installed. I torqued it in a 2 step sequence (hence the 2 dots on the ring gear bolts) in a star pattern. Hand tight first then from 60 to 80 ft-lbs using surface primer then red loctite. The yellow dot just helped me keep track of the star pattern.

After that I pressed the carrier bearings. The pic looks wonkey, but I gotr' straight before pressing it on. One side it straight forward. Normally I would have pressed them together, but I hadn't figured out a solution to the other side yet....

The air side of the locker has a very thin margin and is pressed further down on the carrier to make room for the air ring.

I wrangled up a piece of exhaust pipe I had left over from the 2FE build...it was perfect! After a couple of strokes on ye ol' press, my bearings were on.

I then put my companion flange on and temporarily set my pinion preload to 19in-lbs
 

Attachments

  • Carier bearing.jpg
    Carier bearing.jpg
    23 KB · Views: 190
  • PPL.jpg
    PPL.jpg
    26.8 KB · Views: 187

jps8460

Cruise Moab Committee
Joined
Feb 15, 2013
Messages
3,235
Location
Grand Junction
After my pinion pre-load (PPL) was set, I set the new carrier assembly in for the first time:thumb:

I set the assembly in place and then installed the caps in place using the match marks I had made earlier. I only hand tightened the bolts for now. Any tighter than hand tight makes it hard to turn the adjusting nuts, and might cover up a "cross-thread" situation......vera vera bad.

I removed the locking abs that are picture and proceeded to align the threads before installing the adjusting nuts. I used my knuckle to slightly tap each side into place.
 

Attachments

  • Place carier.jpg
    Place carier.jpg
    29.8 KB · Views: 185
  • thread alignment.jpg
    thread alignment.jpg
    25.1 KB · Views: 201

jps8460

Cruise Moab Committee
Joined
Feb 15, 2013
Messages
3,235
Location
Grand Junction
I proceeded by installing the adjusting nuts. the factory nut goes on the pinion side and the proprietary ARB does on the ring gear side.

I must say that the thread quality of the Toyota nut appears to be a little better that the ARB. The ARB ring was a bear to thread, so much so I started it 10 or so times thing I was cross threading it or had misaligned the cap/housing threads (see previous post). I even threaded the old yoga one in place to check myself.

After that I tweaked the ring gear nut until I had about .008" of backlash and then dialed in the pinion side nut until my indicator showed slight movement with no additional backlash.

After that I tightened the pinion side and extra 1/4 turn.

I re-checked my backlash and found that it was a tiny bit over .008". Time for my first pattern check...(insert a whole bunch of time and effort wasted by a bunk setup pinion bearing)......it came up way to deep, so I removed .020. went back and forth a few times. I'll post up my ending numbers later, they are out on the bench.

In the end my pattern came out pretty well, what do you guys think?

I'll be setting up my solid spacer tomorrow...more to come.
 

Attachments

  • CB preload.jpg
    CB preload.jpg
    30.3 KB · Views: 222
  • first pattern.jpg
    first pattern.jpg
    30.6 KB · Views: 201
  • Last pattern.jpg
    Last pattern.jpg
    25.5 KB · Views: 198

jps8460

Cruise Moab Committee
Joined
Feb 15, 2013
Messages
3,235
Location
Grand Junction
Added bonus of completely removing the ring and piñon: I could powder coat the housing, and make it super easy to clean!
I want to do this any chance you have some housings and we could split the lot fee?

Let me know, I'll be disassembling my housings end of this week and over the weekend.

I'm not sure of the lead time either. I need to have them under my truck at least 1 week ahead of cruise moab.
 
Last edited:

aprosise

Hard Core 4+
Joined
Mar 10, 2014
Messages
857
Location
Boulder, Co
Jackson, Practice makes perfect! My 4.56 gears just showed up! Now just waiting on the Front ARB. Good write up.
 

jps8460

Cruise Moab Committee
Joined
Feb 15, 2013
Messages
3,235
Location
Grand Junction
Swing down and help me "Practice" on my front diff :D It's actually kind of fun....I know that sounds weird, but I like things that require patience and being a little tweaky.
 

jps8460

Cruise Moab Committee
Joined
Feb 15, 2013
Messages
3,235
Location
Grand Junction
Also, we need to make a couple tools. A welder would be handy. I need to weld up a spanner wrench for the ARB side, My little guy isn't cutting it and has marred up the ARB ring pretty good :(
 

aprosise

Hard Core 4+
Joined
Mar 10, 2014
Messages
857
Location
Boulder, Co
I can bring down a swiss tool. It worked pretty dang good. Ive got a couple spares laying around up here that almost went in the trash.
 

jps8460

Cruise Moab Committee
Joined
Feb 15, 2013
Messages
3,235
Location
Grand Junction
Nice are they for the guide bushing? That would be sweet!
 

DanS

Rising Sun Member
Joined
Jul 30, 2010
Messages
1,638
Location
Dumont
Added bonus of completely removing the ring and piñon: I could powder coat the housing, and make it super easy to clean!

I want to do this any chance you have some housings and we could split the lot fee?

Let me know, I'll be disassembling my housings end of this week and over the weekend.

I'm not sure of the lead time either. I need to have them under my truck at least 1 week ahead of cruise moab.

I probably could. I do my own powder coating in NM though. I have a housing or two that I will probably have extra when it's all said and done (bad R&P and such). No idea how long it would take me though. Probably a day to strip a housing and get it blasted and coated--would depend mostly on how dirty the housing I started with was, and how long it might take to outgas.

corbet said:
I would not powder coat he housings personally. It's old school but I've had good luck with POR -15 if you do all the prescribed prep.

I've generally been a fan of PC'ing cast parts, because I feel like it normalized the metal a bit, and it's not difficult at all for me. I can also get parts that are prepped for powder much, much cleaner with the blast cabinet than I ever could with paint, but I'm open to reasons why I shouldn't. In the end, I'm after a coating that will stick, and be easy to clean for years to come.

Dan
 

jps8460

Cruise Moab Committee
Joined
Feb 15, 2013
Messages
3,235
Location
Grand Junction
Woops I was confused. I meant the entire axle housing, not the just the 3rd housing.

I'll probably just painter up with rustoleum or POR-15. :thumb:
 
Back
Top