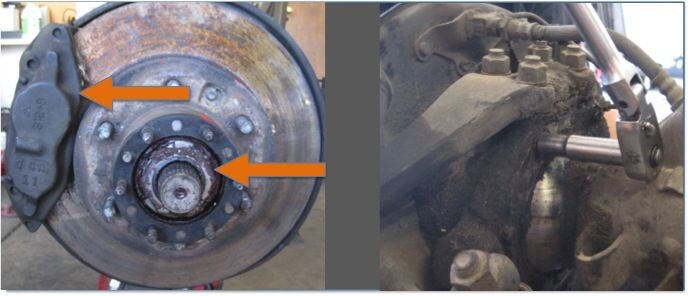
Axle Buildup-First stab at a tech writeup.

jps8460

Cruise Moab Committee
Joined
Feb 15, 2013
Messages
3,235
Location
Grand Junction
Hi All,

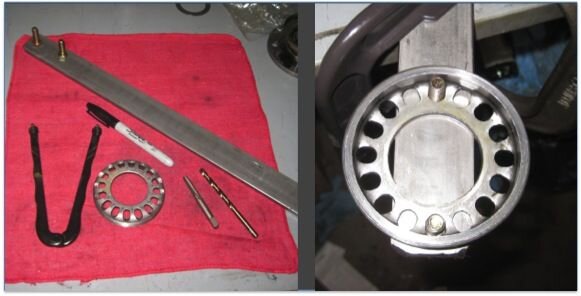
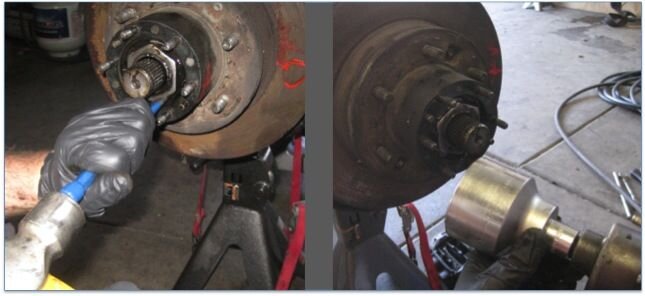
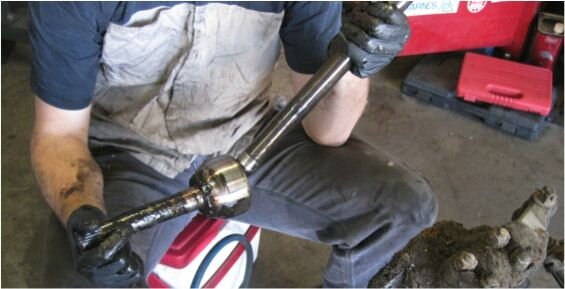
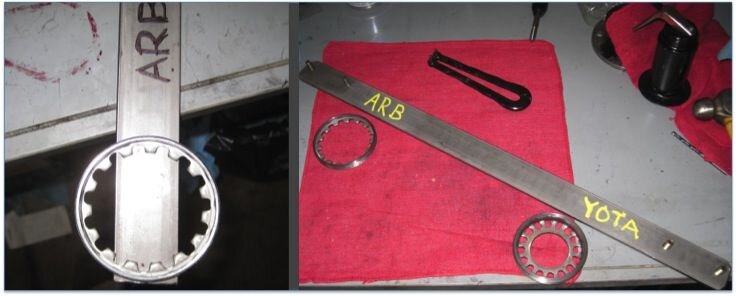
I knew that my little spanner wrench wasn't going to cut it for my final install and it was banging up my ARB nut.

I took a peek at Zuk's tools (http://www.gearinstalls.com) for inspiration and decided to whip up my own spanners.

I used some 5/16 - 18 grade 8 bolts for the "pin" part and a piece of 1/4" X 1 1/2 strap steel. Should work a lot better for future builds, and for setting final pre loads.

Check out Zuk's page if you have time. He's a total Toyota diff tweak.
 

Attachments

  • Tap and Drill Yota.jpg
    Tap and Drill Yota.jpg
    29 KB · Views: 249
  • Finished tool.jpg
    Finished tool.jpg
    33.4 KB · Views: 241
Last edited:

jps8460

Cruise Moab Committee
Joined
Feb 15, 2013
Messages
3,235
Location
Grand Junction
Issues

Well, was buttoning up my diff today and found that the seal housing (arb piece that supplies air) does not fit.

Steve had the same issue with his as well. The assembly is off by about .100"

I'm probably going to chuck the adjusting nut in a lathe and whack .100" off of it.

I've double and triple checked the entire build at this point. I guess it happens sometimes. Brian suspects that it is the aftermarket gear set.

Going to call ARB tomorrow and discuss it with them.

Anyone else seen or heard of this?
 

Attachments

  • IMG_0980.jpg
    IMG_0980.jpg
    154.3 KB · Views: 223

jps8460

Cruise Moab Committee
Joined
Feb 15, 2013
Messages
3,235
Location
Grand Junction
Alright, back in action. Going to proceed with the details on various specs.

My pinion depth shims ended up at .0567

I measured backlash in 12 places. For the first try (before I found out about the seal housing not fitting) my average was .0081 (.002 delta, from .0070 to .0092).

After I trimmed down the adjusting nut and surface ground it, my backlash average came down to .0075 with an overall delta of .0008ish.

After that I re patterned and found nearly identical results as before.

My solid spacer took my 4 try's. 1st try was 2.191 OAL (PL 0in-lb), 2nd was 2.182 OAL (PL 36in-lbs), 3rd was 2.184 (PL 11in-lbs)

My final solid spacer attempt was to take the pinion nut torque from 150ft-lbs at 2.184" OAL and add a few whacks with the 3/4 impact. That brought it up to a cool 19in-lbs.

1 diff down, 1 to go!!
 

Attachments

  • solid spacer.jpg
    solid spacer.jpg
    38.8 KB · Views: 229
  • 100k off.jpg
    100k off.jpg
    33.8 KB · Views: 245
  • sealnseal.jpg
    sealnseal.jpg
    36 KB · Views: 253

jps8460

Cruise Moab Committee
Joined
Feb 15, 2013
Messages
3,235
Location
Grand Junction
Tada!
 

Attachments

  • photo 5.JPG
    photo 5.JPG
    18.9 KB · Views: 231

jps8460

Cruise Moab Committee
Joined
Feb 15, 2013
Messages
3,235
Location
Grand Junction
Nice! I hope you have better luck with the seal housing. Are you doing and rd153 in an fj60 housing?

Are you reusing you gears?

Im anxiously waiting to see if I have the same issue with my front since I'll be reusing factory gears.

Staring to tare into my fj62 front this week. Should be interesting.

good luck!
 

DanS

Rising Sun Member
Joined
Jul 30, 2010
Messages
1,638
Location
Dumont
Nice! I hope you have better luck with the seal housing. Are you doing and rd153 in an fj60 housing?

Are you reusing you gears?

Im anxiously waiting to see if I have the same issue with my front since I'll be reusing factory gears.

Staring to tare into my fj62 front this week. Should be interesting.

good luck!

I've put two RD153s into Dad's 40--I didn't have the issue you did. But we reused stock gears on both.

This time I'm putting 3.70 gears onto a factory E-Locker housing. So similar, but obviously not the same as putting the ARB carrier in.

Dan
 

jps8460

Cruise Moab Committee
Joined
Feb 15, 2013
Messages
3,235
Location
Grand Junction
Talked to ARB and Nitro Gear today about the above issue. They were not aware of this issue. They recommended I check to make sure that my CB's were correct.

Of course they all pointed fingers away from each other.

I checked all 4 install kits (including 2 of Aprosise's, my 2nd and the CB's on the diff) they all include NACHI 50KB801 race and NACHI 50KB831LT bearing. This appears to be the proper race/bearing combo.

I told them I would keep them posted on the upcoming builds. Sure would suck to do this and not have access to a lathe/grinder.

For now I'm confident in the build I have and I'm moving on with life.

-Jackson
 

jps8460

Cruise Moab Committee
Joined
Feb 15, 2013
Messages
3,235
Location
Grand Junction
Back In Action

I packed up the finished diff and moved onto my front axle disassembly.

I wanted to try and gather the pros and cons of the 2 different ways of removing a birfield.

I decided that I should time myself on both ways to try and gather data on speed. The point was to detail the difference in speed, obviously a true trail version would take longer.

I started by getting my axle propped up securely.
 

Attachments

  • 1 Axle Stand 1.jpg
    1 Axle Stand 1.jpg
    50.5 KB · Views: 166

jps8460

Cruise Moab Committee
Joined
Feb 15, 2013
Messages
3,235
Location
Grand Junction
The first method is the "remove the entire hub/trunion as an assembly.

In this method, it is not necessary to remove the caliper or the spindle nut. This is nice because it preserves your bearing preload and keeps all the bearings and other goodies together.

This is the order I did it in

1. Unbolt the felt retainers and felts

2. Undo top trunion nuts and smack the studs with hammer and brass drift to remove cone washers. When I did this, 2 of the studs came out with the nut. It is not necessary to remove the tie rod end from the grunion.

3. Undo bottom trunion nuts.

4. Pop the top and bottom trunions off. (it would have beneficial to remove the entire soft brake line. Probably would have saved me 5min on jacking around with the top trunion).

5. Remove the entire brake/spindle/trunion as an assembly

6. Remove Birf.

Total Time 20min 12 sec

Im not going to time the reassembly, but there are some obvious advantages here. I could have saved an additional 5min by removing the entire soft hose assembly.
 

Attachments

  • 1 No caliper removal 2.jpg
    1 No caliper removal 2.jpg
    34.2 KB · Views: 161
  • 1 top and bottom trunion 3.jpg
    1 top and bottom trunion 3.jpg
    31.5 KB · Views: 170
  • 1 Trunion Off 4.jpg
    1 Trunion Off 4.jpg
    39.8 KB · Views: 183
  • 1 All Done.5jpg.jpg
    1 All Done.5jpg.jpg
    37.3 KB · Views: 169

jps8460

Cruise Moab Committee
Joined
Feb 15, 2013
Messages
3,235
Location
Grand Junction
I took a more traditional route on the other side.

One disadvantage of this method is that you lose your bearing preload and you also have the opportunity to damage a lot more bearings, seals, and gaskets.

One thing I forgot to mention as well...... These axles already had the hubs removed. For the 1st procedure it is only necessary to remove the most outer part of the hub.

For this part it would be necessary to remove the entire hub. So that time was not factored in, but I figure it would be in the neighborhood of an additional 5 min.

step 1: Remove the brake caliper

2. Flatten out the spindle nut retainer

3. remove the spindle locknut and nut

4. remove the hub and rotor assembly

5. Unbolt spindle and brake line (to get dust shield off)

6. Remove spindle and dust shield (the gaskets crumbled as I removed them).

7. Remove Birf

Total time was 9min 20 sec.

There is something to be said about having to remove the entire 4x4 hub. I think this could add up to 5min.

I would say for disassembly it's a wash time wise, both take about 15min. With method 1, you don't have to worry about bearing preload and I think it would be easier to keep your wheel bearing free of contamination. With method number one, it is almost possible to get it apart without removing any brake lines. I might look into using longer lines so that I could do all of this without a brake bleed.
 

Attachments

  • 2 Axle nut removal 1.jpg
    2 Axle nut removal 1.jpg
    31.2 KB · Views: 255
  • 2 hub and brake line 2.jpg
    2 hub and brake line 2.jpg
    35.3 KB · Views: 263
  • 2 Hub Remioved 3.jpg
    2 Hub Remioved 3.jpg
    35.5 KB · Views: 273
  • 2 Ripped gasket 4.jpg
    2 Ripped gasket 4.jpg
    44.9 KB · Views: 271
  • 2 done 5.jpg
    2 done 5.jpg
    30.9 KB · Views: 278

jps8460

Cruise Moab Committee
Joined
Feb 15, 2013
Messages
3,235
Location
Grand Junction
Had a boatload of help this week from Rockhound (Steve) and really laid the hammer down on the build. Aprosise (Adam) joined is on Sunday and helped muscle the axles into place. Huge thanks to these guys!!

My friend Brian was in town looking at some shop opportunities and gave me the thumbs up on my diff builds, big thanks to him as well. I'll have some photos and details posted of the rest of the build soon. Then we'll be putting Adam and Steve's diffs together.

Cheers
 

jps8460

Cruise Moab Committee
Joined
Feb 15, 2013
Messages
3,235
Location
Grand Junction
Finally got to the bottom of why the seal housing does not fit on any of the diffs I've setup lately.

We measured the spec Nachi bearing against a Koyo bearing and found that the Nachi (comes in yukon kit) is .080 thicker overall.

All the part numbers are proper, not sure what has happened. In a normal diff set up, a slightly thicker bearing would have no effect on setup. But it makes it a real pain when installing an arb.

Just finished building up 2 more this evening and we had to do the same thing with them......grrrrrr

I'll post up a pick later Aprosise has it on his phone. If you buy bearing kits get timken or koyo, stay away from Nachi
 

aprosise

Hard Core 4+
Joined
Mar 10, 2014
Messages
857
Location
Boulder, Co
Bearing thickness difference.
 

Attachments

  • IMAG0110.jpg
    IMAG0110.jpg
    112.8 KB · Views: 214

jps8460

Cruise Moab Committee
Joined
Feb 15, 2013
Messages
3,235
Location
Grand Junction
We also learned that with 4.56 and lower gears (higher numerically), you have to clearance the ring gear to get the cross shaft to slide in (c-clip axle).
 

jps8460

Cruise Moab Committee
Joined
Feb 15, 2013
Messages
3,235
Location
Grand Junction
I found that the delta in pinion angle appears to be ~2.5 degree. The pinion angle of the 62 is upward compared to the 60 axle. I measured from bottom spring Perch to drive flange using a magnetic angle finder.

The shims I purchased for castor correction appear to be too thick. Once installed, the center pin only appears to engage the Pearce by .040" or so. Seems sketchy to me, might try to find some steel ones that are specific to my rig.
 

PabloCruise

Hard Core 4+
Joined
Aug 23, 2005
Messages
2,786
Location
Northern CO
Yup. The AA cruiser gear sets are pretty sweet that way. 1.08 high range, 2.xx, 3.xx, and 4.0 options for low. I love how on cruiser cases they can run a reduction on the high range gear sets. I wish the mini truck cases were that way, rather than a straight through style output shaft.

I like that! Are we talking gear sets for split case, I presume?
Do you mind me asking what you paid? Sounds like it might be cheaper than a H55F and modifications...
 

AxleIke

Hard Core 4+
Joined
Apr 20, 2006
Messages
4,747
Location
Broomfield, CO
I like that! Are we talking gear sets for split case, I presume?
Do you mind me asking what you paid? Sounds like it might be cheaper than a H55F and modifications...

Don't have a cruiser, so I've never bought one. You can probably call Advanced Adapters and get the pricing. Sorry about that.
 

jps8460

Cruise Moab Committee
Joined
Feb 15, 2013
Messages
3,235
Location
Grand Junction
I did a rebuild kit and the 4:1 I think it came in at about $1800 with shipping. I did my own machining though. Probably add a 4-5 hundred for that (just a guess). I'm a novice machinist; it took me about 4hrs total. you'll need a good boring bar setup and several kant-twist clamps. :)

Give AA a call, they have overdrive and under drive kits. I chose an under drive kit for the low range and to get the effect of switching to 4.10's from 3.73's
 
Back
Top