• Jack-it Night: April 2024 RS Meeting Hey Guest: Wed. April 3rd is the next Rising Sun meeting, and you won't want to miss it. We're doing our annual offroad recovery equipment demonstration and trail skills training aka "Jack It Night." Meeting starts at 6:30 p.m. (early) Click here for all the details.

40th Anniversary salvage rebuild

HDavis

Hard Core 4+
Joined
Feb 13, 2019
Messages
1,116
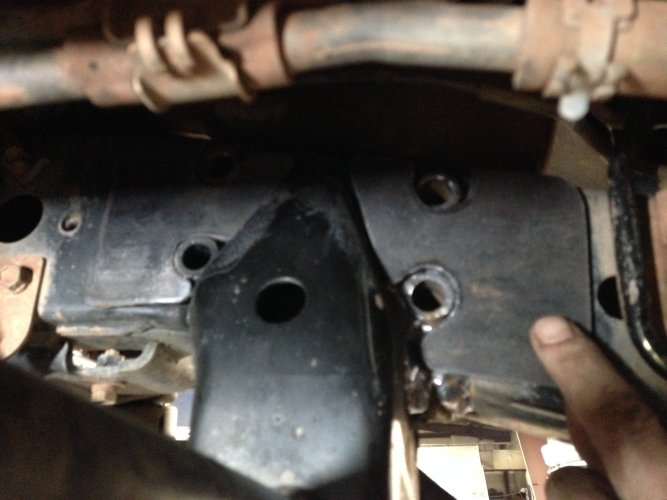
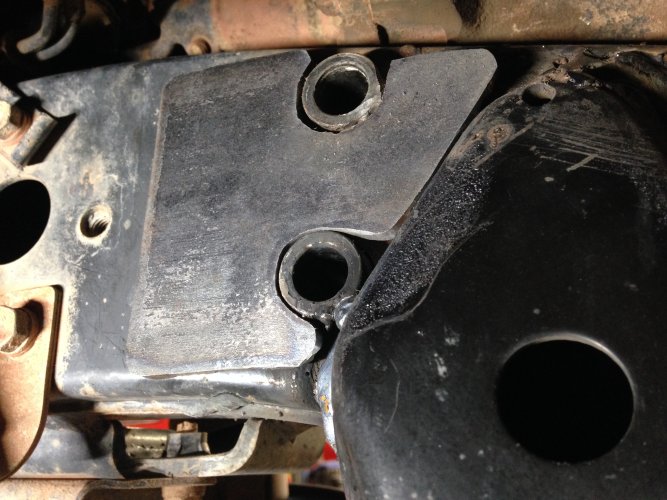
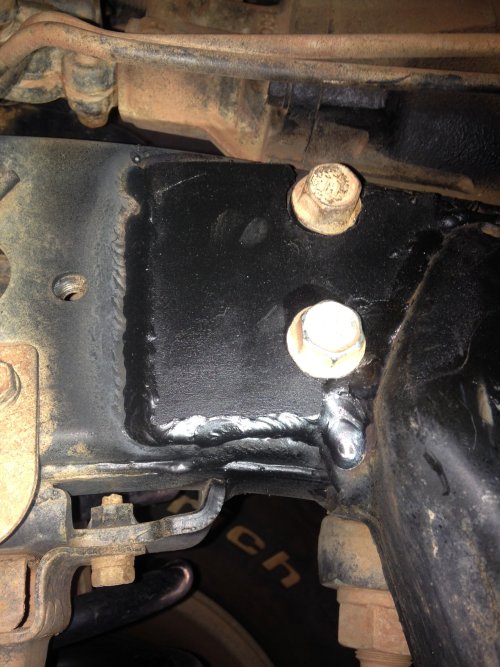
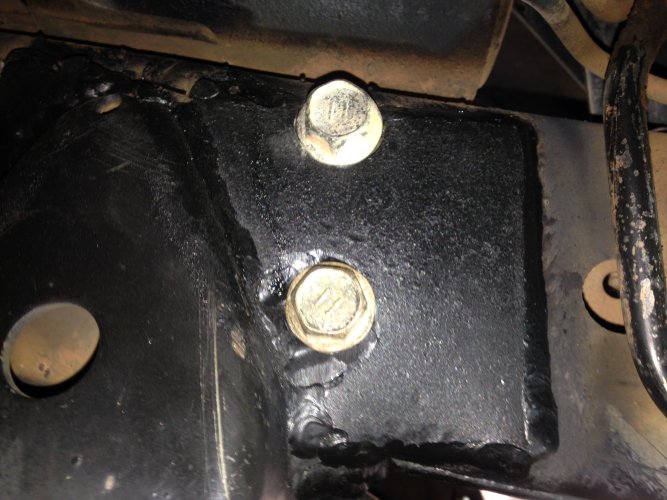
I have been focusing my attention on the frame the last few weeks with some great forward progress. I built a jig from scrap metal that locates the frame horns from the cross member. I also measured the stock gussets before I cut them off so I could draw them in CAD and have them laser cut. With the gussets ordered and having given the approach of repair substantial thought I started cutting away all of the damaged material. This consisted of the front frame section and outer frame channel back to just behind the front cross member. Cutting this section of the frame was surprisingly easy and provided the desired outcome. I also did the same with the donor frame section in preparation to put it all back together. Before I get started welding it all back together, I need to pick up some more shielding gas, grind down the welds and prep the surrounding frame. This is the point where I really start moving forward with the build as I just have to put the puzzle all back together.

IMG_2110.JPG

IMG_2124.JPG


InkedIMG_2127_LI.jpg

IMG_2141.JPG
 

White Stripe

Hard Core 4+
Joined
May 5, 2015
Messages
1,282
Location
Milky way galaxy
I probably would pull the motor and completely reseal everything. Headgasketr, rear main, upper and lower oil pan, valve seals. Easy to pull now. That's a sweet 80. Will be really nice when done
 

Inukshuk

Rising Sun Member
Joined
Aug 24, 2005
Messages
7,271
Location
Denver, CO
I probably would pull the motor and completely reseal everything. Headgasketr, rear main, upper and lower oil pan, valve seals. Easy to pull now. That's a sweet 80. Will be really nice when done
Also weld up the steering box bolt sleeves on the inside of the frame rail. Easy to do now. That is where lifted and wheeled 80's crack. Wish we had done mine when my engine was out. It was done later. Delta Vehicle Systems also sells a plate. Panhard to frame tower also cracks on the outside of frame mostly, but the is easy to get to later.


MonPetiteShoe

Cruise Moab Committee
Joined
Oct 7, 2020
Messages
424
Location
Aurora
Sorry about the highjack, but I can probably design/machine those parts cheaper and faster than Delta. I'll be running that fix myself when the time comes, and $85.00 is too rich for my blood. I'll pay with a bit of sweat equity when it comes to something within my wheelhouse.
It'd be even better/faster if I have access to someone's naked frame to confirm some measurements/positions.
No shade to DVS, but that's a pretty simple part.

If there's a big enough demand within the club, I could even make a run of them, no sweat.

</Hijack>
 

HDavis

Hard Core 4+
Joined
Feb 13, 2019
Messages
1,116
Sorry about the highjack, but I can probably design/machine those parts cheaper and faster than Delta. I'll be running that fix myself when the time comes, and $85.00 is too rich for my blood. I'll pay with a bit of sweat equity when it comes to something within my wheelhouse.
It'd be even better/faster if I have access to someone's naked frame to confirm some measurements/positions.
No shade to DVS, but that's a pretty simple part.

If there's a big enough demand within the club, I could even make a run of them, no sweat.

</Hijack>
I would be curious about your cost as $85 Is too rich for my blood. I actually drew up a dwg of the parts and got a quote from the same company that cut my gussets for a little under $22 each. The company is one of those mail order outfits, Send Cut Send https://sendcutsend.com/mild-steel/. I would much prefer to keep my money local though.
1644880889287.png
 

MonPetiteShoe

Cruise Moab Committee
Joined
Oct 7, 2020
Messages
424
Location
Aurora
I would be curious about your cost as $85 Is too rich for my blood. I actually drew up a dwg of the parts and got a quote from the same company that cut my gussets for a little under $22 each. The company is one of those mail order outfits, Send Cut Send https://sendcutsend.com/mild-steel/. I would much prefer to keep my money local though.
I was chatting with Nic Jones about this today, and I'm pretty sure he went through the same venue. I still have to pick up some measurements and program the cuts via MasterCam. With it being more a professional hobby balanced with work, it'll take some time (2+ weeks) to get materials sourced, and machine a working "prototype." Outsourcing to a CNC shop will most def be faster, especially if you've already got a model. Honestly, with a part like that, I'd mass produce via CNC cutter and make the money back for the cost of materials. It's a dummy simple part, I've only got access to mills and thought I'd extend the offer.

If you've got the drawing with dimensions, I'd say send it.
 

HDavis

Hard Core 4+
Joined
Feb 13, 2019
Messages
1,116
My 80 had stock suspension on it and little tires and that steering area was cracked. If you look on Australian websites some of they're plate kits have more than 2 plates. I tried to copy them.
View attachment 102043
This is cool, I did not see any with the lower section added to it. Thanks for the suggestion.
 

HDavis

Hard Core 4+
Joined
Feb 13, 2019
Messages
1,116
I was able to really focus my attention on the framework this weekend and managed to get everything cleaned up and the new sections roughed in. I did not manage to get any gas for my welder and want to spray this with weldable primer before I start to weld it all up. Regardless, it will need some work with a hammer and a little more cleanup before I am ready to start that anyways. I did get the gussets in and for the price and time they look pretty good. With that said I have drawn up some supports for the steering box and will print up the pieces on paper to confirm fitment before I get those cut as well. Its all coming together slowly but surely.

IMG_2163.JPG
IMG_2168.JPG
IMG_2166.JPG
IMG_2170.JPG


IMG_2173.JPG
 
Last edited:

HDavis

Hard Core 4+
Joined
Feb 13, 2019
Messages
1,116
I thought I would tackle the crank seal and oil pump seal since I am out of welding gas at the moment. I first tackled the oil pump screws that were visible. It wasn't easy but they all came free undamaged in relatively short order. I then moved on to tackling the crank bolt and pulley. I got everything set up and bumped the starter. To my surprise this did not break the bolt free. I checked everything and even bungeed like the photo @DaveInDenver shared and went at it a second time. I bumped the starter again, felt the resistance of what I thought was the bolt and then it broke free. To my surprise I did not break the bolt free but had actually broken the 3/4"-1/2" adapter that I was using. I guess it wasn't a joke that I needed the 3/4 drive through and through. I now have the 3/4 drive 30mm on order. :ROFLMAO::ROFLMAO:
IMG_2174.JPG
IMG_2175.JPG
 
Last edited:

HDavis

Hard Core 4+
Joined
Feb 13, 2019
Messages
1,116
I have a 3/4” drive torque wrench and 3/4” ratchet I bought when I did that job if you need it
I will absolutely take you up on the offer! I don't have a torque wrench that goes up to 305ft-lbs.
 

HDavis

Hard Core 4+
Joined
Feb 13, 2019
Messages
1,116
Having been detoured by the broken adapter I was determined to get the crank bolt off this weekend even despite having the gas to weld the frame. I got the new socket and breaker set up and gave it a crank.. It clunked but didn't break free. I gave it a second crank and it clunked and didn't break free again. After two new failed attempts I'm thinking of all of the bad outcomes if just keep trying until something breaks. So, I decided to just walk away and do something else.


I've been drawing the parts up for the steering box frame reinforcement and have reached paper mockup phase. To do this I needed to pull the steering box off and clean up the frame area to confirm final measurements. There is some rust developing on the frame where the steering box mounts that I'll be certain to tackle while I'm here.

IMG_2199.JPG
IMG_2200.JPG


After doing this it had warmed up considerably and I had forgotten about my anxiety about breaking something catastrophically, so, I decided I would give the crank bolt one last try. Well, good thing I did. I bumped it and there was no clunk. I guess 7th time is the charm, or something like that. I then made quick order of the other two oil pump screws, cleaned everything up, added new seals and got it back together.
IMG_2206.JPG

IMG_2207.JPG
 
Last edited:

nuclearlemon

Hard Core 4+
Joined
Aug 23, 2005
Messages
8,298
Location
windy wyo
I've had a couple that didn't break free enough to the point that I also have broken adapters and I broke a bar. We've been punched a hole through somebody's radiator when everything shattered. Good luck. It seems the torque is anywhere from 305 to 1305
 

HDavis

Hard Core 4+
Joined
Feb 13, 2019
Messages
1,116
I really took advantage of the weather and got some more work done this weekend. I printed out the paper mockups for the frame reinforcement and was able to confirm fitment of the parts. The lower section took a little back and forth to get the right shape, and I'm still not sure. @White Stripe, did you box in the lower section to meet the bracket or is that just flat plate? As for cutting them out, there's more to come soon with @MonPetiteShoe .

IMG_2225.JPG
IMG_2221.JPG


IMG_2220.JPG
IMG_2211.JPG


There was still some daylight left so I cleaned up the frame sections with a wire weel and sprayed the overlapping sections with some weldable primer to prevent rust between the overlapping layers. I took the opportunity to get the welder dialed in and practiced welding with the weldable primer on the scrap frame pieces. After getting it to a good setting I tacked the frame back into place before I ran out of time for the weekend. As long as the weather cooperates, I should be able to confirm alignment and get the final placement wrapped up in short order.
IMG_2230.JPG
 

Inukshuk

Rising Sun Member
Joined
Aug 24, 2005
Messages
7,271
Location
Denver, CO
The inside plate is great. Below are pics of what Proffitt's made for mine. On yours and Delta's, probably not strictly needed to have the plate cross the top since one would weld across the top, but for sure its nice.

The tower plate is a great idea. No idea if its needed but I was thinking of the same thing. Last Thursday, Travis and Justin at Envision Fabrication welded the outside crack on the limo (1996 LX450) on Thursday. It had been poorly welded before and visibly cracked again, so it was hard to know exactly where it cracked, but we had a pretty good idea after grinding away old weld.
Last night I looked at my 80, which Robbie welded a few years ago on the outside tower after seeing the beginnings of a crack. My conclusion is that for the outside crack, the bracket cracks where the bracket bends (has a radius). The weld on the bracket to frame does not crack. The frame in that location does not crack (as opposed to the inside of the frame where the frame itself cracks and the bracket stays intact).

Your plates will make it bombproof. For most people the inner plate and a reinforcement weld at the radius on the outside will likely be bombproof enough.

I have never head of it cracking where the outside plate on frame is and Delta Dave's plate is the first I ever saw anyone fishplating that side. A single plate joined where I circled in red, WOW, THAT would be bomber. Further, there are unwelded gaps on both undersides where I indicate in green. Good to connect those.

Hijack over. Great work!

IMG_2221.jpg
 

Attachments

  • 80 Frame crack (34).JPG
    80 Frame crack (34).JPG
    1.1 MB · Views: 109
  • 80 Frame crack (37).JPG
    80 Frame crack (37).JPG
    2.2 MB · Views: 112
  • 80 Frame crack (41).JPG
    80 Frame crack (41).JPG
    1.1 MB · Views: 112
  • 80 Frame crack (42).JPG
    80 Frame crack (42).JPG
    1.8 MB · Views: 109
Joined
Jan 5, 2012
Messages
47
Location
Aurora C.O.
I wish I would have seen this a week ago, I have the Otramm crank holding tool. If you want you can use it to make sure you have the required 307lbs of torque that nut needs.
 

HDavis

Hard Core 4+
Joined
Feb 13, 2019
Messages
1,116
The inside plate is great. Below are pics of what Proffitt's made for mine. On yours and Delta's, probably not strictly needed to have the plate cross the top since one would weld across the top, but for sure its nice.

The tower plate is a great idea. No idea if its needed but I was thinking of the same thing. Last Thursday, Travis and Justin at Envision Fabrication welded the outside crack on the limo (1996 LX450) on Thursday. It had been poorly welded before and visibly cracked again, so it was hard to know exactly where it cracked, but we had a pretty good idea after grinding away old weld.
Last night I looked at my 80, which Robbie welded a few years ago on the outside tower after seeing the beginnings of a crack. My conclusion is that for the outside crack, the bracket cracks where the bracket bends (has a radius). The weld on the bracket to frame does not crack. The frame in that location does not crack (as opposed to the inside of the frame where the frame itself cracks and the bracket stays intact).

Your plates will make it bombproof. For most people the inner plate and a reinforcement weld at the radius on the outside will likely be bombproof enough.

I have never head of it cracking where the outside plate on frame is and Delta Dave's plate is the first I ever saw anyone fishplating that side. A single plate joined where I circled in red, WOW, THAT would be bomber. Further, there are unwelded gaps on both undersides where I indicate in green. Good to connect those.

Hijack over. Great work!

View attachment 102410
This is great, I love the open dialogue about the issue as it is all new to me. I probably wouldn't have considered welding where you highlighted in green. Initially I had designed the outer plate as one piece like you mentioned, however, the material to cut something that width is considerably more expensive than a narrower stock. Breaking it up into two pieces that are later welded together is more cost efficient.
1646069492384.png
 

HDavis

Hard Core 4+
Joined
Feb 13, 2019
Messages
1,116
I wish I would have seen this a week ago, I have the Otramm crank holding tool. If you want you can use it to make sure you have the required 307lbs of torque that nut needs.
Thanks! You and me both! :ROFLMAO:
 

Inukshuk

Rising Sun Member
Joined
Aug 24, 2005
Messages
7,271
Location
Denver, CO
This is great, I love the open dialogue about the issue as it is all new to me. I probably wouldn't have considered welding where you highlighted in green. Initially I had designed the outer plate as one piece like you mentioned, however, the material to cut something that width is considerably more expensive than a narrower stock. Breaking it up into two pieces that are later welded together is more cost efficient.
Cool. That's exactly what I was thinking. I am unqualified to say whether one piece or two welded makes a strength difference, but we are discussing the same issue.

On the spot marked green, Travis welded it up on the limo last week, and last night I looked at my 93 and saw that the Proffitt's crew had welded that spot on mine.

And I just want to reiterate so not everyone worries reading this:
  • I have never heard of the bracket falling off completely.
  • My 80 is on 33's with a 2" lift and had caster bushings for many years. I gets flexed out regularly. An intermittent creaking noise alerted me to the crack.
  • I discovered the crack at CM 2019, at about 325,000 miles, after talking about the noise at Vendor Night and someone recommended I look for cracks.
  • Even the limo - which carried massive loads for years - appears to have no cracks inside the frame, though it is on the list to get reinforced.
  • For many, simply finishing the welds around the bolt sleeves on the inner frame face where Toyota did not would probably prevent the problem.
  • Access is tricky. For sure reinforce if you ever have your engine out.
 
Top