Tundra mods

nakman

Club Secretary
Staff member
Moderator
Joined
Aug 23, 2005
Messages
14,625
Location
north side
Alright may as well start it off... you other Tundrafolk please jump in also.

First mod is the rear seat fold-down mod, which only works on double cabs, not the bigger crew max. It gives better access to behind the seats by allowing the backs to fold down, rather than only the seat bottoms to fold up. Here's the video that I watched that slows how to grind off the hooks...


View: https://youtu.be/6dt9jM2KTRo


I didn't do the Tuffy, so far am actually pleased with what I can put into the plastic tray thing. And now I have better access to the area behind it also. This is one of the reasons I went with a double cab rather than the crew max, as the crew max doesn't have this feature due to another feature (the rear window slides) that would interfere with it.
 

nuclearlemon

Hard Core 4+
Joined
Aug 23, 2005
Messages
8,330
Location
windy wyo
one of my first mods too. definitely a great mod. especially if you need to access the jack/tools since the storage box blocks a lot of that.
 

AlpineAccess

Hard Core 4+
Joined
Nov 19, 2019
Messages
1,263
Location
Loveland
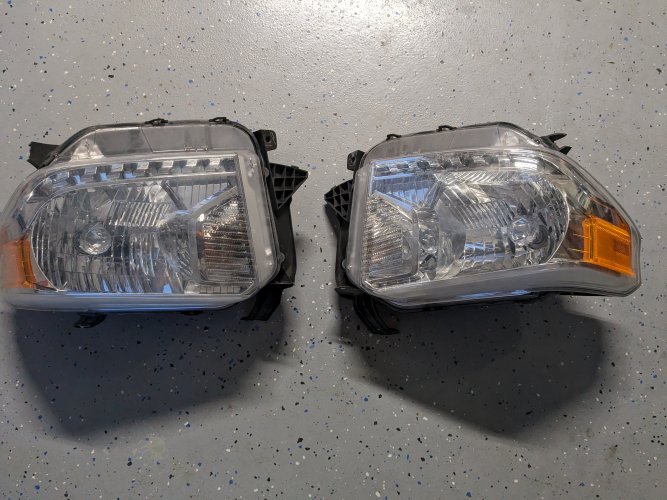
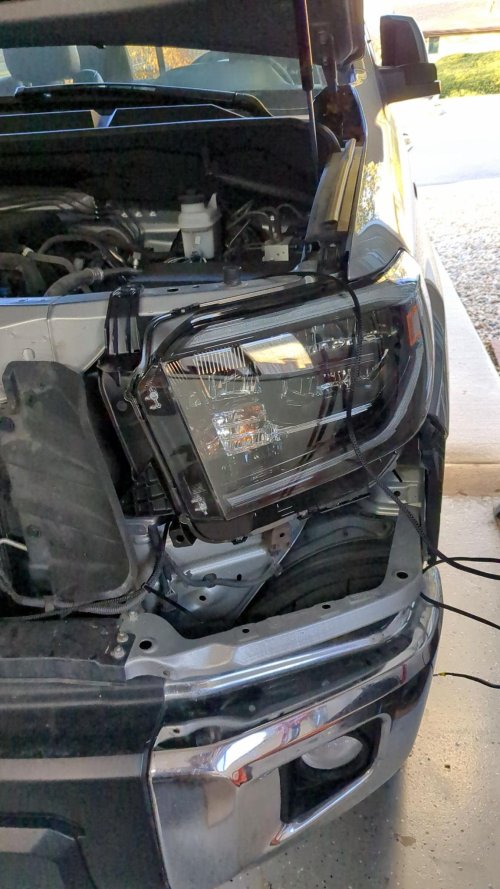
I have some 2018 OEM headlights and adapter harness on the way -These factory incandescent lamps in the 2014 are lackluster!

On the cheaper side, I did some Tackform 20mm ball mounts for the vents so I can put my phone up there.

 
Last edited:

nakman

Club Secretary
Staff member
Moderator
Joined
Aug 23, 2005
Messages
14,625
Location
north side
Swapped out some interior lights for LED's..

now I'm on the hunt for a replacement cup holder insert, one that will allow a standard Nalgene bottle to fit in there. Not looking for an insert that puts the water bottle up higher, but rather an insert that has a larger recess. Like this, but not for a Tacoma. anyone?

and then I installed an air compressor, using the bracket from Bannock Built. https://bannockbuilt.com/products/twin-air-compressor-mount
IMG_9574.jpg

IMG_9575.jpg


I chose that mount because the Rago one is on the driver side, and directly above the big fuse box. And I want to get into that fuse box occasionally... heck I already know where the dome fuse is. :rolleyes: Plus I thought maybe I should offset a little weight as I suspect at some point I'll have a 2nd battery, and the prevailing solution there is to just replace the factory tray on the DS and stick 2 batteries right next to each other.

And then the Slee mount looks like it installs the compressor vertically, which might actually be better on the ARB with one fan on top, and a compressor without a switch. But with the opposable fans on the UDA unit, I didn't want to bury a fan against the fender, plus I gotta be able to reach that switch! I'm impressed with how well the Bannock one fits though, I did add a hole for the compressor but not a big deal, it mounted up to the existing holes in the truck flawlessly.
 
Last edited:

nakman

Club Secretary
Staff member
Moderator
Joined
Aug 23, 2005
Messages
14,625
Location
north side
Picked up a set of Decked drawers from FB Marketplace. decently made, really deep but kinda narrow as the molded plastic is super drafted. The tool boxes they make that go inside are kind of clever, but I couldn't really find much stuff that wanted to fit inside them so didn't think they were worth the space they took up, ended up giving most of them to a contractor friend.

IMG_9727.jpg


My first mod was removing one side- just didn't like how anything/everything I wanted to put in the bed was now up higher, plus one of the drawers was essentially empty.. and I don't want to just fill a drawer because it's there. Considering making a "split kit" for these drawers, as I wonder now many other Decked users wish they could split their set up with a friend... anyway I like it better with just one drawer as it works for most of what I need to carry in the truck bed.
IMG_9777.jpg

IMG_9818.jpg


I also have visions of one day having a topper, then sleeping on top of the single drawer, with a nice way to sit there in the morning and put my pants on... essentially a day bed for the truck. But for now we have work to do.

My other mod was addressing the lack of any type of "hold" for the drawer in the open position, when on an incline. I removed one of the screws that holds the drawer together, replaced it with a slightly longer screw that I ground off to just the right length to slide upright inside the C channel, but then it falls down when the drawer is completely extended to keep the drawer open.


IMG_9819.jpg


bolt holding the drawer open....

IMG_9820.jpg


lift the bolt with your finger to close the drawer, and it rides inside the channel
IMG_9821.jpg
 

DaveInDenver

Rising Sun Ham Guru
Joined
Jun 8, 2006
Messages
13,137
Location
Grand Junction
Plus I thought maybe I should offset a little weight as I suspect at some point I'll have a 2nd battery, and the prevailing solution there is to just replace the factory tray on the DS and stick 2 batteries right next to each other.
I dunno if the Tundra shares the cheapening that the Tacoma does but I'd be wary of doing this.

I put a 25/35 Odyssey pair where there was once just 1 x group 27...

IMG_4430_mid.jpg

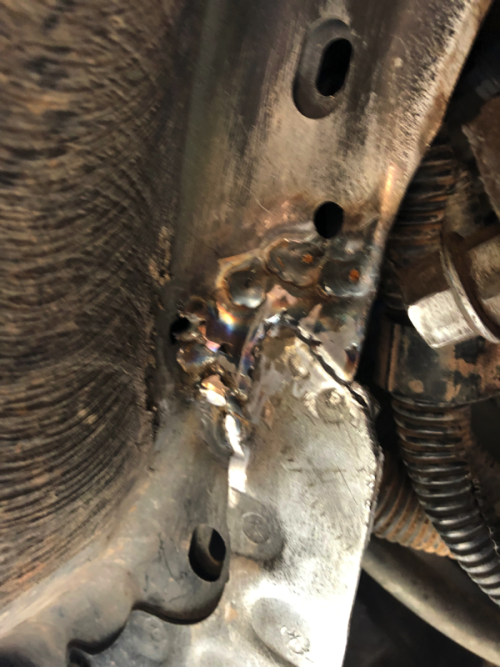
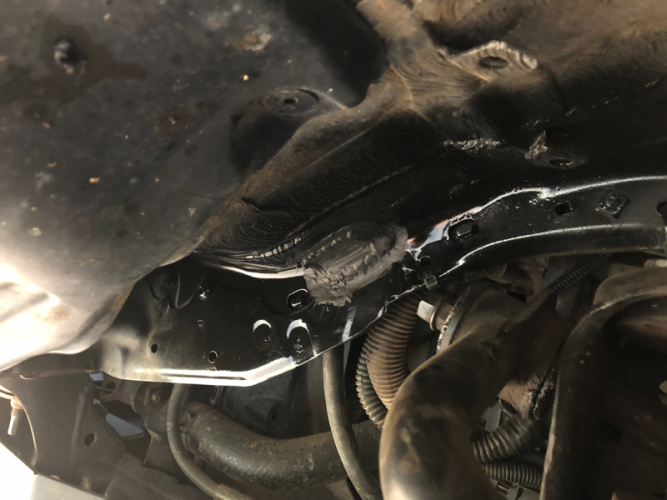
...and about 3 years later my inner fender started cracking right under it, around the thick reinforcement between it and the radiator core support.

IMG_2197_mid.png

It looks like this now after stitching and a touch of reinforcement.

IMG_2246_mid.png
 

nakman

Club Secretary
Staff member
Moderator
Joined
Aug 23, 2005
Messages
14,625
Location
north side
@DaveInDenver :eek: yes the only aftermarket dual battery tray I can find for the Tundra is the exact same thing... from Genesis Offroad


Their kit is actually pretty clever- total plug and play, the VSR is tied into the battery tie-down bracket, etc. But I didn't go that route, I knew about the weight but had no idea of the inner fender risk... yikes!
 

DaveInDenver

Rising Sun Ham Guru
Joined
Jun 8, 2006
Messages
13,137
Location
Grand Junction
It is clever and fit so well. I think it's a cool solution but requires that you put some sort of assistance in there. I went back to a single small battery for the time being.

My long term (e.g. unlikely to happen) thinking would be to open a couple of holes under the battery tray and put a bracket to the frame so that the fender floats under and around the batteries, which would be solely supported by the frame. Even just the stock situation isn't ideal, it's a fair amount of weight just trying to crack the sheet metal there.

Should note that I did do larger diameter poly mounting pucks under the core support. The factory ones are even worse about concentrating the force on a smaller area.
 

nakman

Club Secretary
Staff member
Moderator
Joined
Aug 23, 2005
Messages
14,625
Location
north side
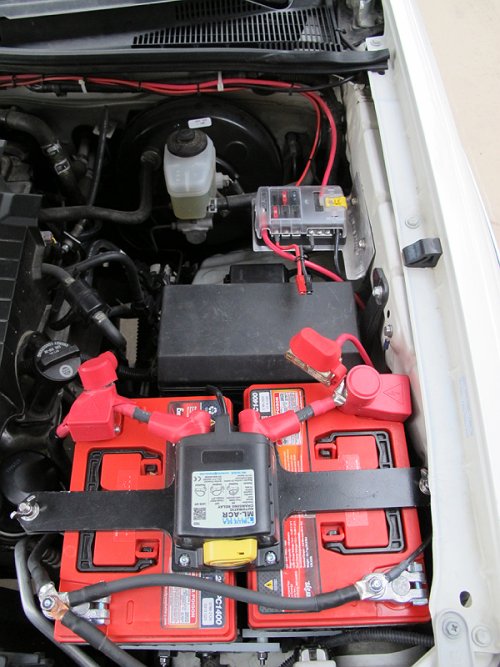
So for dual batts, I chose instead to stick with what I know and do my own system using the Blue Sea ML-ACR. Mounted it to the bracket for the air compressor.. and I gotta give new credit to Bannock Built as in the instructions for mounting this bracket they say to first remove the air cleaner housing. It's literally 30 seconds to do that, and man does it really open things up- I should have been doing this years ago, rather than fighting things around it. Anyway, squirted a little "add a thread" to the bracket and here's the Blue Sea ACR:

IMG_9737.jpg


After the ACR, the next stop for the juice is to run through a circuit breaker.. which I mounted to the fender with some freshly installed riv nuts

IMG_9755.jpg


I went with the puny 30amp as I'd prefer this sucker to trip sooner rather than later, if such an event would ever occur.. and I like circuit breakers better than fuses as I like the instant shut-off feature. I can easily access the switch between the fender and washer fluid reservoir, and can reach the Blue Sea switch easy enough by reaching over the top of the air filter housing.
IMG_9757.jpg


Overall the engine bay still looks pretty clean... one thing on the list though is pulling the air compressor wires back over to the passenger side, then hooking the + side up to exit terminal of the Blue Sea switch, running the ground to that side of the truck also. That removes a set of wires from the firewall, and essentially wires the compressor up to the 2nd battery, rather than the 1st. Full engine shot:
IMG_9756.jpg


Anyway after the circuit breaker, the + cable the passes through the big grommet in the firewall, as does a dedicated - cable. I don't know if it's old school or not, but I just prefer to have fewer grounds and know where everything is terminated, rather than grounding stuff all over the truck, etc. I know ultimately it's all connected in the end though.

IMG_9753.jpg


Those wires then run underneath the door jams to behind the back seat.

IMG_9754.jpg


The only potential mounting spots on the back of the cab are where a couple plastic doodads are attached, which hold the wire loom for the sliding rear window.
IMG_9758.jpg


So I added riv nuts to them, then drilled some holes in a prototype dashboard accessory panel I had from a GX460.. really just needed the sheet metal, but this part worked perfect for this.

IMG_9759.jpg


Installed the fuse block to the panel, through the rubber mat/insulation deal...
IMG_9761.jpg

IMG_9762.jpg


And then added a solar charge controller

IMG_9804.jpg


So there are currently 3 circuits coming off that fuse block- solar, and 2 hots that run back under the carpet to underneath the center console. I didn't get any pics of this, but just image all the door trim removed, the front seat removed, then reaching under the carpet and pulling a hunk of wire through.
 

nakman

Club Secretary
Staff member
Moderator
Joined
Aug 23, 2005
Messages
14,625
Location
north side
Now the install gets a little more interesting. For a battery, I went with an AGM as I wanted to put it under the back seat. I found some conflicting opinions about flooded batteries inside a cab, some saying they will outgas hydrogen when charging and kill you, others saying you can vent a sealed battery box and be fine. But the reality is, limited space was the ultimate factor, as there's just not much room underneath or behind these seats. I went with a Kickass Slimline AGM... https://kickassproducts.com/product...lqlypEPCXvNzDQLgVTaAB_u8Rffr74PhoCyDMQAvD_BwE

And in addition to the awesome name, it's got the unique feature of only being 5" tall when run on its side. Which means it will lay inside the big tray under the back seat.
IMG_9806.jpg

I still need to add a method of strapping it down, as it's currently just wedged in place by my tool bag.. with the seat clamped down though, it really can't go anywhere. But now I have a second battery installed, and the weight is literally right on top of the center of mass of the whole vehicle. I dig it.


So remember those hot wires that I ran from the fuse block to the center console. I replaced the cig lighter inside the console with a USB charging port, and this is now wired to be always hot, courtesy of the 2nd battery.
IMG_9822.jpg


The other wire is now running up inside the dash, behind the dash, to my new dashboard accessory mount. This is prototype #1 for the next Gamiviti Tundra product...
IMG_9799.jpg


The panel provides a new way to secure the headlight sensor, and uses the same threads that hold the speaker down to get bolted to the dash. Then a bunch of holes through which you can run wires and attach other goodies, like switch bezels and Ram mounts.

IMG_9800.jpg

IMG_9801.jpg


So the + side runs through the switch on the left, the powers the volt meter/usb charger on the right when turned on.

IMG_9803.jpg


And I added a simple cig lighter volt meter/charger to the port below the dash, so I can now monitor both main and second battery voltages.

IMG_9807.jpg


And of course mount up whatever accessory I need for the day... like a phone, or tablet, or Garmin. This fits all the same stuff that the 200 series versions all fit.. .as well as the aforementioned GX460 version coming out in a week or so. you can see this page for more on that https://www.gamiviti.com/dashboard-accessory-mounts


But alas, some 30ish install hours later, I now have a dual battery system in the Tundra...

IMG_9813.jpg


Here are the main components...

battery: https://kickassproducts.com/product...lqlypEPCXvNzDQLgVTaAB_u8Rffr74PhoCyDMQAvD_BwE

ACR: https://www.amazon.com/dp/B001VIXLRO?psc=1&ref=ppx_yo2ov_dt_b_product_details

fuse block: https://www.amazon.com/dp/B08XWQHMZJ?psc=1&ref=ppx_yo2ov_dt_b_product_details

circuit breaker: https://www.amazon.com/dp/B08GBYWFSC?psc=1&ref=ppx_yo2ov_dt_b_product_details

solar charge controller: https://www.amazon.com/dp/B0BML3FT5L?psc=1&ref=ppx_yo2ov_dt_b_product_details

14ga wire: https://www.amazon.com/dp/B09GJLGHM6?psc=1&ref=ppx_yo2ov_dt_b_product_details

4ga wire: https://www.amazon.com/dp/B01MXRVIPD?psc=1&ref=ppx_yo2ov_dt_b_product_details

crimping tool and wire terminals: https://www.amazon.com/dp/B0BJP8RN59?psc=1&ref=ppx_yo2ov_dt_b_product_details
 

nakman

Club Secretary
Staff member
Moderator
Joined
Aug 23, 2005
Messages
14,625
Location
north side
@DaveInDenver its true what they say about voltage drop across tiny wires... the volt meter on the stock wire harness is consistently showing .5v less than the one on the dash, which gets its feed from my 14ga wire. That's when both batteries are combined. The spread increases at night also, when the headlights are on.

And my primary reason for the solar is to augment the charging voltage from the alternator, which is higher than expected (14.0-14.2 when cold, 13ish other times). As we know AGM's like a little more juice than that, so when I'm parked in the sun I can just flip out the 120watt foldable panel, which can deliver more like 14.5 to the whole system.

And I went with the Blue Sea as I prefer a more traditional combine system, that I can manually combine or isolate. I also like the lack of internal panel like you get with IBS or National Luna... just not necessary IMO as those voltage displays are big, and kinda trash anyway. And I really dislike the RedArc stuff even though at double the cost it can do the math for you for AGM, it still lacks the ability to combine batteries unless you want to spend a lot more.. plus I don't want to run solar directly to it anyway, would prefer that be further back in the system- I like opening the back door rather than opening the hood. It's all about the click...


View: https://youtu.be/3pfa0AI6774


Ok that's probably all I need to say on dual battery systems, I think this is my 5th or 6th one and each time I feel I get a little better at it. lmk your questions :cheers:
 

DaveInDenver

Rising Sun Ham Guru
Joined
Jun 8, 2006
Messages
13,137
Location
Grand Junction
I replaced the ML-ACR with a Victron Orion 12|12-18 DC-DC charger. Despite that it's somewhat of an increase in complexity and cost I ruined two Odysseys due to I think uneven charging.

I've also punted an AGM as the starter for a plain old cheap flooded. The house battery is a X2 AGM, though, for the reason it's inside the WilderNest. It's probably 1/10th as airtight as a Toyota cab but it gets bounced around a lot more.

All lead-acid can outgas hydrogen during charging but the benefit to gel and AGM is that as long as you do not get too agressive charging they are sealed and recombine the gas internally. Flooded types might be sealed (typically called maintenance-free) or vented. If the caps come off to fill it with water then it will definitely vent hydrogen during charging.

A couple of concerns are asphixiation and explosion. What determines safety is how much air is exchanged to dilute the hydrogen and risk of ignition. Inside your truck cab isn't really that well sealed, otherwise you'd pass out. There are ways to get a spark, though. Like relay contacts, the turn signal switch, etc. But it's unlikely enough hydrogen is going to accumulate to really be an issue.

Now say you're in a building basement with a room full of batteries charging from solar. It's a low spot, not a lot of air moving. But hydrogen is lighter than air so it's not going to easily accumulate. But maybe you do have a furnance with an ignitor. That's a recipe for potential Hinderburg Home.

IMO the main issue with flooded batteries inside of vehicle spaces is the risk of spilling acid if it tips or you're in an accident.
 

nakman

Club Secretary
Staff member
Moderator
Joined
Aug 23, 2005
Messages
14,625
Location
north side
I keep popping dome light fuses. Have found several threads that all point to aftermarket LED's, and that's likely right on the money. I swapped the map lights for a different set I had, and the fuse lasted almost a week, which is up from its usual life of 1-2 days. My next test will be swap the original bulbs back in the map lights and see if the issue goes away... may need to reassess my need to LEDify everything.

I made some tool holders for the bed, repurposing some awning brackets. I kinda dig it, in fact am considering making more of them as a product, just need to so a little research though as maybe someone's already done it. Will get a pic tomorrow when it's light out.

Oh and I finally got a roof rack, sheesh took long enough. I do have pics of that one:
IMG_0222.jpg

IMG_0225.jpg

IMG_0231.jpg

IMG_0235.jpg

IMG_0240.jpg
 

nuclearlemon

Hard Core 4+
Joined
Aug 23, 2005
Messages
8,330
Location
windy wyo
what led's are you using? i put superbrights in my 2012 years ago and haven't had an issue yet.
 

AlpineAccess

Hard Core 4+
Joined
Nov 19, 2019
Messages
1,263
Location
Loveland
Finished installing 2018 TRD Pro LED headlights into my 2014 using one of the iHacker harness. I still need to button up the DRL adjustment part, but after a single drive they are one of my favorite things about this truck now. Got the headlights at a great price via the Decatur sale, and can't say enough good things about the quality of the ihacker harness - looks like an OEM product and installs so simply.

I took the time to do the leveling on my garage door before and after, and am pleased that I haven't had a single person flick high beams at me either. It is amazing how much more usable light is on the road, how clean the cutoffs are, and how this feels like it brings one of the really disappointing features of this truck up to snuff with just how good the rest of the vehicle is.

I also am embarrassed to say I had no idea this truck had a headlight level dial on the dash. I thought it was for dash brightness. LOL. So nice to get to lower the beams back onto the road with a heavier load.
 

Attachments

  • PXL_20231115_235301102.jpg
    PXL_20231115_235301102.jpg
    3.1 MB · Views: 40
  • signal-2023-11-15-16-00-55-166.jpg
    signal-2023-11-15-16-00-55-166.jpg
    278.1 KB · Views: 39
Last edited:

AlpineAccess

Hard Core 4+
Joined
Nov 19, 2019
Messages
1,263
Location
Loveland
I keep popping dome light fuses. Have found several threads that all point to aftermarket LED's, and that's likely right on the money. I swapped the map lights for a different set I had, and the fuse lasted almost a week, which is up from its usual life of 1-2 days. My next test will be swap the original bulbs back in the map lights and see if the issue goes away... may need to reassess my need to LEDify everything.

I made some tool holders for the bed, repurposing some awning brackets. I kinda dig it, in fact am considering making more of them as a product, just need to so a little research though as maybe someone's already done it. Will get a pic tomorrow when it's light out.

Oh and I finally got a roof rack, sheesh took long enough. I do have pics of that one:
View attachment 123197
View attachment 123198
View attachment 123199
View attachment 123200
View attachment 123201
I ran into this as well; PO had said he'd been to the dealership multiple times too. I just put incandescent bulbs in and haven't had an issue since. But a weird thing on these trucks!
 

nakman

Club Secretary
Staff member
Moderator
Joined
Aug 23, 2005
Messages
14,625
Location
north side

nakman

Club Secretary
Staff member
Moderator
Joined
Aug 23, 2005
Messages
14,625
Location
north side
Finished installing 2018 TRD Pro LED headlights into my 2014 using one of the iHacker harness. I still need to button up the DRL adjustment part, but after a single drive they are one of my favorite things about this truck now. Got the headlights at a great price via the Decatur sale, and can't say enough good things about the quality of the ihacker harness - looks like an OEM product and installs so simply.

I took the time to do the leveling on my garage door before and after, and am pleased that I haven't had a single person flick high beams at me either. It is amazing how much more usable light is on the road, how clean the cutoffs are, and how this feels like it brings one of the really disappointing features of this truck up to snuff with just how good the rest of the vehicle is.

I also am embarrassed to say I had no idea this truck had a headlight level dial on the dash. I thought it was for dash brightness. LOL. So nice to get to lower the beams back onto the road with a heavier load.
dude! Ok so with these lights you have the DRL's where the little dots in the headlights light up, instead of the marker lights? I was wondering how folks are doing that... can you share some links do the parts? and yes, that headlight adjustment dial is one of the coolest features, sounds like that continues to work with these new headlights also?
 

AlpineAccess

Hard Core 4+
Joined
Nov 19, 2019
Messages
1,263
Location
Loveland
dude! Ok so with these lights you have the DRL's where the little dots in the headlights light up, instead of the marker lights? I was wondering how folks are doing that... can you share some links do the parts? and yes, that headlight adjustment dial is one of the coolest features, sounds like that continues to work with these new headlights also?
Happy to share what I can! Can you send a pic of what you mean for the little dots/market lights?

The headlights I used were the OEM Toyota TRD Pro LED lights; PN #'s were:

Headlamp Assy, RH
Part Number: 81110-0C211
1
Headlamp Assy, LH
Part Number: 81150-0C211
1

Then I went to this thread:


And I messaged Mario (iHacker) to buy the dimmable DRL harness. I just told him my model year and trim level and what headlights I wanted to order and he told me which harness options I had. He has a set that isn't dimmable that is plug and play; and the one I got which I will say is 95% plug and play, all you have to do is de-pin one wire in one harness and connect it up.

The new headlights have the exact same functionality as the OEM TRD Pro headlights have while installed in the 2018+ trucks, including level adjustment with his harness. The newer trucks have it too, and its all the same motors and everything.
 
Last edited:
Top