You are using an out of date browser. It may not display this or other websites correctly.
You should upgrade or use an alternative browser.
You should upgrade or use an alternative browser.
Brahma's Saginaw/FJ60 Power Steering Conversion
- Thread starter subzali
- Start date
Those bolts were just for mockup/testing purposes because they're the correct diameter. Turns out they're too short anyway (reason why they don't have lock washers on them). I'm going to be getting JIS M12 bolts, correct length, with a flat washer, lock washer, and nut for each of those.
Thanks for the comments guys, I tried to think through as many issues/potential issues as I could, and though there are some things I would definitely do differently next time I think with my limited fabrication skills it turned out pretty good and will be safe and is not going to go anywhere.
Thanks for the comments guys, I tried to think through as many issues/potential issues as I could, and though there are some things I would definitely do differently next time I think with my limited fabrication skills it turned out pretty good and will be safe and is not going to go anywhere.
treerootCO
Rising Sun Member
- Joined
- Aug 22, 2005
- Messages
- 5,431
Just came in from flushing my power steering and thought I should post here a tip that was given to me when I installed my power steering. Jack both tires off the ground when first adding fluid. For some odd reason, you can't purge the system of air with the tires on the ground. If you don't believe me, get everything done and then jack the wheel up. The tine hole in the cap will shoot ps fluid about a mile high when the bubbles come out. I was unable to turn right when there was air in the system.
Congrats Matt. Thanks for the detailed account of your unique process. When I get around to my PS conversion this will be a very nice reference.
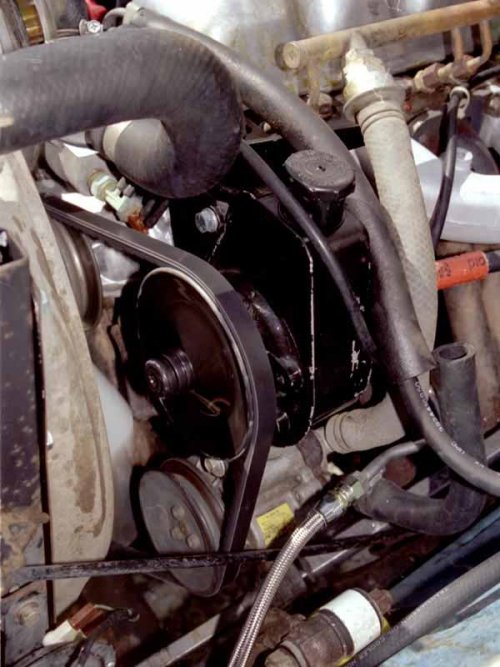
So are you going to do anything about that tight fit between the radiator hose and the belt?
So are you going to do anything about that tight fit between the radiator hose and the belt?
treerootCO
Rising Sun Member
- Joined
- Aug 22, 2005
- Messages
- 5,431
MDH33
Hard Core 4+
Good job Matt! 
So, am I the last hold out using ArmStrong steering in their trail 40??
So, am I the last hold out using ArmStrong steering in their trail 40??
Shark Bait
Rising Sun Member
Looks good, Matt! 
Good job Matt!
So, am I the last hold out using ArmStrong steering in their trail 40??
Nope, Zepp is right there with you
")
I am probably going to look into getting a new upper radiator hose that has a different bend or something, or a smaller pulley. The hose will probably be easier. And actually looking at it I can probably just cut 1/2 inch or so off my current hose and rotate it and that will probably be enough to clear the pulley. I also need to make sure my fender clearance is sufficient, because I don't want the u-joint to bind when I'm driving down the road, keeping me from steering!

EDIT: looking at Treeroot's picture, it looks like his hose goes further away from his radiator before making its bend. Should be a simple fix for me.
Last edited:
Thursday night I spent a couple hours doing some more trimming; got the fender clearanced so there is plenty of space and got the radiator hose cut a little bit shorter so there is more clearance there. I also measured for, bought and installed rear shocks so I'm working my way toward completion.
Today I spent 8 hours mounting my front Ford shock towers. I used a 1/4" spacer for the driver side, just a plate with two holes drilled in it to pass the bolts through, like I thought I would have to to clear the steering box/intermediate shaft. It was a good thing I had 8 hours because I thought this was only going to take 2.
I learned that the top shock tower bolt holes are .480" or so (clearance for M12 bolts?), so I'm boring them out to 1/2". Have to finish that up next time I head down. I also started to take off my front bumper. I have to get at the front frame rail and cut off the plate welded to it so I can get my steering damper off, and the easiest way, without doing upside-down grinding and getting sparks all over my body, is to take off the front bumper. Once I get the plate off then I will be able to determine whether my steering damper mount needs any work/modification. Hopefully it doesn't and I can measure for, buy and install a steering damper that will work hunky-dory. Then I'll basically be done. I had an idea today on what to do about the driver side radiator support rod that I had to remove because the intermediate shaft goes right where it used to go, I'll have to look closer and see if it will work and then at some point fabricate it up so I can have that installed again. And then I want to get on to my On-Board Air installation!
And I put locking washers etc. on my steering box and other components...
Last edited:
Outstanding! You are going to love yourself!
I love myself
Though it's not 100% done (not painted pretty etc.) I've been driving it for a bit, the Cruiser is my DD now for a little while, and I certainly do love the feeling of power steering! It just feels right! So glad I did this conversion!
Yesterday I spent about 3.5 hours cutting off the "hobo" plate welded to my front crossmember. Had to take off the bumper and I used Uncle Ben's advise of spooling the winch cable off the winch to lighten things up! Worked like a charm and I was able to lift the whole thing off and put it back on without taking the winch off the bumper! Once I got the hobo plate cut off I was able to get my old steering damper off using a TRE puller (again an UB recommendation, SO much better than a pickle fork or hammering on it with a mallet!
) and got to looking at sizing up a new steering damper.Something I learned yesterday while looking at my steering damper, is that if the box was any further forward (and I might have to do this anyway), the stock mount for the steering damper on the frame would probably have to be cut off and reversed. I'll try to take a picture sometime, but to keep the steering damper from interfering/binding because of the angles of the drag link, the frame side would probably have to get moved forward as well. I don't think that would be a problem, the winch sits far enough forward that the damper can sit just in front of the front crossmember and not interfere with it.
So even though above I said I would have liked to have the steering box a LITTLE bit further forward, it would definitely dictate that this damper mount moves forward a bit too (by flipping it).
wesintl
Moderator
I don't even have a steering damper on my spring over 40 with 60 ps. You don't really need it.
PabloCruise
Hard Core 4+
Matt, the Pig does not have a steering damper either (60 series PS) - no shimmies...
Yeah, I think I killed my steering damper when I did the saginaw ps -- I'll have to look to be sure. It's been a while, and I tend to forget project details within days of completion.
belaw
0
Matt:
TJ referred me to this writeup, and I'm hoping you can give me some more details about how you went about sleeving the frame. In particular, I'm curious about how you went about drilling the holes for your bolt pattern? I gather that you first drilled to 1/2" and then, after dry-fitting everything, bored them up to 11/16"- correct? Did you bore both sides of the frame out to 11/16" or just the outside? I guess I'm asking do the sleeves pass all the way through the frame, or are they just welded on the outside? Also, how did you go about reaming the 3/8 schedule 80 pipe to 1/2"- did you use a lathe or drill press (I only have a drill press is why I'm asking)?
Any guidance you can provide will be greatly appreciated; there just isn't much information out there on sleeving a frame.
Another question: you mentioned that you couldn't use straightened F250 shock towers because they interfered with the steering shaft. Was the problem because of the size of the u-joint? I'm planning on using a lower profile u-joint (borgeson or wildwood), and was wondering if that would allow me to use straightened towers.
Brian
Last edited:
There are several ways to get the holes drilled in the frame. The easiest way would be to get a 12mm (15/32" I think) transfer punch, and once you have the steering box located where you want on the frame use the transfer punch to locate your holes. Then drill them out to whatever size you want and use a transfer punch that matches that size hole to punch the back side of the frame and through-drill the holes.Matt:
TJ referred me to this writeup, and I'm hoping you can give me some more details about how you went about sleeving the frame. In particular, I'm curious about how you went about drilling the holes for your bolt pattern?
Yes but if you have the pipe bored out you could just drill it up to the 11/16" size and do the dry fit that way. Or you can drill it to M12 and do the dry fit that way. Your choice, it's kinda hard to know what exactly is the right way to do it until you're there in the middle of it.I gather that you first drilled to 1/2" and then, after dry-fitting everything, bored them up to 11/16"- correct?
Ideally the sleeve would be welded on both sides of the frame. But I think if you butted the sleeve to the inside of the frame and then welded the opposite side it would in essence have the same effect. Maybe somebody else could comment on this. Welded on both sides is best as long as you can keep everything square.Did you bore both sides of the frame out to 11/16" or just the outside? I guess I'm asking do the sleeves pass all the way through the frame, or are they just welded on the outside?
I had to get creative with many things on this project; whatever works for you is really the best. Again, a lathe would be ideal, but if you can find a way to secure it in a drill press then that would be good too. Realistically, there is enough warping when you're welding that things might not end up in perfect alignment anyway and you might have to take a reaming bit to open up the sleeves just a tad on one side or the other anyway. Also, the bolts that hold the box on are 12mm, not 1/2", so that's what I bored the sleeves to. I started with 1/2" on the frame because that's the only bit I had at the time that was about the right size.Also, how did you go about reaming the 3/8 schedule 80 pipe to 1/2"- did you use a lathe or drill press (I only have a drill press is why I'm asking)?
I'm no metal fabricator, really, so there are probably many many ways this could have been done. My limitation was that I don't know how to make good welds, so a lot of the final fitting and welding of the sleeves etc. was being done on the welder's time, so I didn't have time to figure out the optimum way to do it; I had his input and we figured out the best way we thought would work and give me what I wanted. I'm sure there are a lot of other guys on this forum who have advice on a better way it could have been done, or they have a better knowledge of the tools of the trade so they could provide input there too.Any guidance you can provide will be greatly appreciated; there just isn't much information out there on sleeving a frame.
Another question: you mentioned that you couldn't use straightened F250 shock towers because they interfered with the steering shaft. Was the problem because of the size of the u-joint? I'm planning on using a lower profile u-joint (borgeson or wildwood), and was wondering if that would allow me to use straightened towers.
Brian
Yes, the intermediate shaft u-joint was large enough that it was hitting the shock tower. But also the steering box input is large enough that it overhangs the frame a bit on the outside, so even with a smaller u-joint I don't think a straight shock tower will sit flush on the frame on that side without a spacer. You'll just have to mock it up and see. Just make sure that the input shaft is sitting up just a tad from your frame; I have a couple posts/pictures showing that I almost messed that up quite a bit by having it too low.
Hope that helps, a lot of the how-tos are hard to explain and are probably better left to your judgment once you're in the middle of it, so you can come up with a solution that will work for you.
Last edited:
Couple updates:
getting ready for my wedding in September is keeping me pretty busy and I'm watching my pennies. Jacki and I are also taking Dave Ramsey's Financial Peace University, so I am really watching it because it sounds pretty cool to be debt-free, and it won't be that hard for us because we're young. Also since I got the Tundra things have been a little bumpy just getting that all in order (with the red truck and everything too). So I haven't really had a chance to do much to the Cruiser. I need to address some electrical issues (headlights, instrument panel, etc.) before I will let myself do too many other mods - even though I've got two on the back burner that I would really like to get done (OBA and aux fuel tank). Anyway I cleaned out my dad's barn of a lot of parts that were swapped out for this conversion, I'm sure he appreciated that (it's good to purge once in a while).
Anyway, I took it out on Argentine a couple weeks ago and am loving it! Driving on the road is a lot more enjoyable (I think my vibrations are down some), and the trails are PLENTY more enjoyable as well! Doing one-handed u-turns over rocks, driving over boulders and not having the wheel pull from my hand, every part of it is amazing!
I'm still not running a steering stabilizer, and after thinking about the comments above some more and reading on MUD a little bit, and after driving it and seeing how it has done, I am thinking it's ok to leave it off for now. I think I would feel like the conversion is more "complete" if I got one on, but I will save that for a day when I don't have a bunch of other things to do.
I also would still like to install a cooler, but again same issue as before. The steering wheel is a little closer to me than I would prefer as well, but it wouldn't be hard for a fabricator to cut it down some, or I could put in some seats that sit up higher and further back. Just all part of the process and the evolution.
I also found out that Poser and others on MUD, who sell the kits for the Saginaw conversions, also sell sleeves (and I'm assuming instructions) for how to sleeve the frame properly so everything lines up. I haven't looked into it any further, but for someone who is contemplating that just know the information is out there. I don't know if that would have helped with my conversion though; what would have made mine a LOT easier would have been to remove the engine so I could drill the frame from both sides and mark exactly on both sides where I wanted the holes to be. But I was able to figure it out without doing that and it's fine.
Anyway, very happy with the conversion, after driving it for a bit, and would say it is very well worth the time, money, and effort!
The steering wheel is a little closer to me than I would prefer as well, but it wouldn't be hard for a fabricator to cut it down some, or I could put in some seats that sit up higher and further back. Just all part of the process and the evolution.
How about a smaller steering wheel? You still have the OEM steering wheel? With PS you don't need that big wheel anymore

I know they are OEM but the Grant wheels are pretty nice. I installed one of the security dealyos as well that allows you to remove the steering wheel
 - Anyway, the smaller diameter steering wheel really seems to open up some space.
AxleIke
Hard Core 4+
Awesome work Matt! Very cool thread. I love the detail, and attention to little stuff.
How about a smaller steering wheel?
for some reason that option doesn't appeal to me as much as modifying the steering column or getting some heated seats that sit a little higher and further back
I guess I like the look and feel of a stock cockpit, at least for now.
PabloCruise
Hard Core 4+
Great recap Matt!
I like the stock wheel as wheel. It keeps things looking stock...
I like the stock wheel as wheel. It keeps things looking stock...