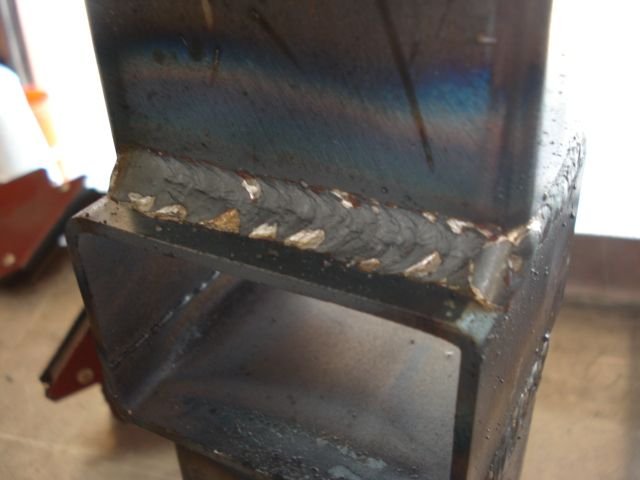
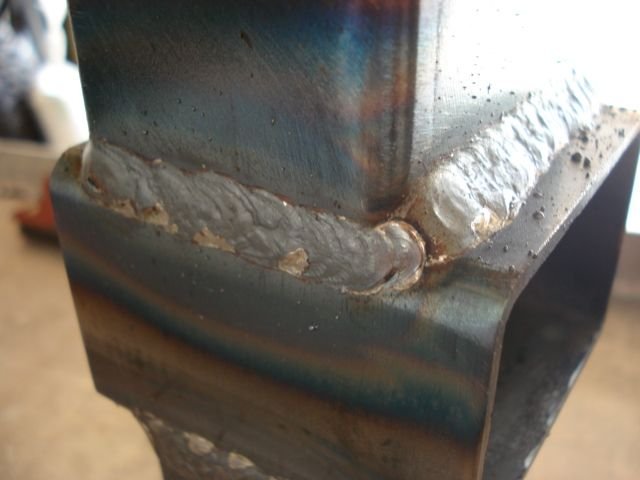
School me on my welds...

Beater

Hard Core 4+
Joined
Dec 7, 2005
Messages
2,786
Location
denver
much better. now, two things, buy some weld kleen 404, (anti-splatter) you can get it at the better welding shops, it's pink/red and comes in an environmentally friendly spray bottle with refills. After you clean your metal, not just the joint either, but about 6" in each direction, spay it lightly in the weld area and HAF (heat affected zone) about 6" out in radius or area. Stuff is the bomb, and the little splatter you get won't stick.

Next, you need to turn your gas up a bit. Leave it where it is set now, and grab your gun (welding gun that is) and turn around so you can see your gauge while squeezing your gun's trigger. Notice how much your gauge drops while running. You need to set your flow to your desired setting while running.

Also, notice your HAF colorations start narrow, then expand, then go narrow again. The goal is to have the discoloration be the same throughout the bead area. Use your HAF coloration as well as your bead contour to help yourself figure out your speed and penetration control.

All told, VERY good in a short amount of time. I'm jealous.

As my uncle johnny said (my namesake and the guy who tought me said) "Remember, welding is just like being with a woman. Size matters, but you want a good fit, and it's gotta be clean. You want it to be hot, but not too hot and you can't go too fast either, and by the same token if you go to slow, she'll break up on ya. When your done, you should be able to just wipe it down and feel satisfied"

He was about 65 when he taught me.. what a great guy he was..
 

Beater

Hard Core 4+
Joined
Dec 7, 2005
Messages
2,786
Location
denver
That was a charming, heartwarming story, John. You can test it out tonight.

From: your wife.
 

Red_Chili

Hard Core 4+
Joined
Aug 24, 2005
Messages
8,335
Location
Littleton CO
:eek:

Busted!

Ahem, back to the subject-
You now have sufficient cowbell, Drew!
 

nakman

Rising Sun Member
Staff member
Joined
Aug 23, 2005
Messages
15,201
Location
north side

Rezarf

Hard Core 4+
Joined
Aug 25, 2005
Messages
5,914
Location
In Uncle Ben's Shadow
on end pieces, put some bevel on the edges,fill the "valley" sort to speek.
you will get real nice penetration.
i'll take a pic today of what i mean.

Jim, I think I know what your talking about, I just didn't do it, I have beveled the edges on a few butt welds to get more penatration on the edges and "fill the gap."

However, I would still love to see how you prep you stuff before burning the ends in :thumb: :cheers:
 

Rezarf

Hard Core 4+
Joined
Aug 25, 2005
Messages
5,914
Location
In Uncle Ben's Shadow
What should the back of the metal look like? Discoloration? Metal punching through along the bead? It is glowing orange like crazy... just as orange as the weld...

Anyone?
 

Rezarf

Hard Core 4+
Joined
Aug 25, 2005
Messages
5,914
Location
In Uncle Ben's Shadow

Red_Chili

Hard Core 4+
Joined
Aug 24, 2005
Messages
8,335
Location
Littleton CO
The backside will show the coloration of a heat affected zone. Yeah, it goes as orange as the weld, depending on thickness.
 

Rezarf

Hard Core 4+
Joined
Aug 25, 2005
Messages
5,914
Location
In Uncle Ben's Shadow
The backside will show the coloration of a heat affected zone. Yeah, it goes as orange as the weld, depending on thickness.

Thanks Bill-

It is hard to clean the inside of the tubing but I can tell that it is discolored and buring up the mill scale.
 

Red_Chili

Hard Core 4+
Joined
Aug 24, 2005
Messages
8,335
Location
Littleton CO
Sounds like enough cowbell to me!
 

Rezarf

Hard Core 4+
Joined
Aug 25, 2005
Messages
5,914
Location
In Uncle Ben's Shadow
Calling Uncle Ben, RedChili, GreenMachine, and 2bad...

Okay fellas here is where I am at. If I punch the heat up one tap, I start to burn through :(

However, each of my welds are consistently burning through the mill scale on the inside of the tubing and discoloring all the material back there. I have beat on these tubes with a 3lb hammer and tried to pry them off with a huge lever to no avail, and no movement.

Below are the welds I am starting to make every time.

...John, the discoloration thing really helped :thumb: , I am spending more time at the start and finish to make sure not to cut the weld puddle short.

...Jim, the bevel thing works great, I can tell a difference when I cut the joint now, I am no seeing any line (joint) anymore.

So to each of you, do you think I can go ahead and weld up the chassis of my trailer, and have it be safe? I feel good about it, but if there is something else I should do/practice/test/try... I am wide open to your advice. This thing will roll down the road behind my 40 someday.

I feel my welds are consistent and I have practiced the only joint (a T intersection) I will be doing on my chassis on 8 different tubes, all the way around the tubing.

Whadda' you thinks? :eek: :D :eek:

I appreciate all the help!:cheers:

Here is the last weld I did, I have had about the last 4-5 joints all look like this:
 

Attachments

  • final test1.JPG
    final test1.JPG
    30.5 KB · Views: 266
  • final test2.JPG
    final test2.JPG
    33.1 KB · Views: 261

Uncle Ben

Hard Core 4+
Joined
Aug 23, 2005
Messages
14,144
Location
Northside
That is a beautiful weld! Run your puddle a tad longer so when you pick it back up on the next side you don't have a pinhole. WELD THAT TRAILER DUDE! You are more than ready! You welds already look better than most of the backyard blazers and when you consider how many homebuilt trailers are running down the road (most of them overloaded) you will beam with pride knowing yours is rock solid. Welding is better with practice and you have one heck of a good start! Your puddles look like your heat is spot on! :thumb:
 

Beater

Hard Core 4+
Joined
Dec 7, 2005
Messages
2,786
Location
denver

The only thing you should be caring about is the puddle size and shape. Period DO NOT look anywhere else

the top picture, that weld will crack, if it hasn't already. Do not bevel more than 50% of the base material. In fact, 30-40% is more than enough.

remember, your tapped side is voltage, not amperage. On this machine, it is a constant voltage machine, your amperage is a function of the resistance caused by the variation in the stick out (or distance to the puddle) and the wire feed.

You can lightly vary the heat by changing the wire speed and stick out.
 

wesintl

Moderator
Joined
Aug 22, 2005
Messages
8,740
Location
in da house
Already light years ahead of me. Well done so far Drew!
 

Rezarf

Hard Core 4+
Joined
Aug 25, 2005
Messages
5,914
Location
In Uncle Ben's Shadow
Thanks guys, your expertise has been wildly helpful. It has been a few good days. I am blown away how much time it takes to measure/cut/clean/prep and then fit, just to run about a 10" section of tubing! :D

I am going for it, if I screw up... well then, I will start over!


Already light years ahead of me. Well done so far Drew!

Wes, I have cheated a bit, Stacy is in Iowa for the week with her sister who just had a baby, I took the past three days off just to burn weld after weld, and get the hang of this. I am happy so far, but I would have taken months without being able to be in the garage for 12+ hours each day.

We'll see! :thumb: :cheers: :eek:
 
Back
Top