The Anti-anti-build

Stuckinthe80s

Rising Sun Member
Staff member
Joined
Dec 29, 2017
Messages
2,326
Location
Lakewood, CO
UPDATE 8/12/2023: I've changed the thread title because I'm going a different route with this one. It's going to be a pretty cool build as I'm going to pull the body and put it on an 80 series frame. It's crazy this thread started almost 4 years ago, but that's life. I'm just glad I'm getting back to it.

@Hulk can you move this to the builds section?
-------------------------------------------------------------------------------------------

I've never done a build thread before so here goes...

This will be slow going as I plan on taking my time on this one. Really it will be more for documenting everything that needs to be done to the truck and will hopefully help give others some reference points for similar projects.

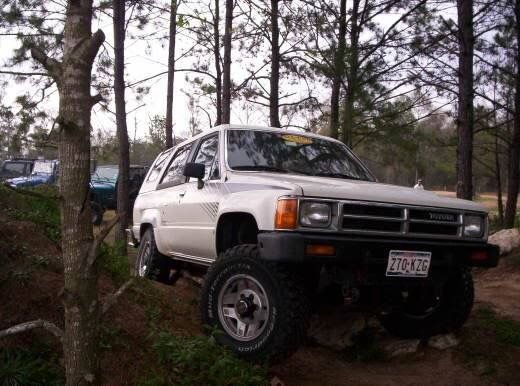
Here is Charlie the day I brought her home:

4runner.jpg


I named her Charlie because the end result will probably be a white and black color scheme and she'll look a lot like my other Charlie:
Charlie.jpeg


She's lean, nimble, a good companion and loves going off-road with me. Hopefully the 4runner will be the same way.

I'm calling this the anti-build because really I just want to get it back to stock. It will be my daily driver and will pull occasional trail duty. What little building I do to it, I will try to keep it light as possible as well. Lift will be minimal, tires will be 31" max, very minimal armor, no drawers, just a nice, clean truck that will be a joy to drive. When I go off-road with it, I'll keep it to the bunny slopes at best. The IFS has its limitations but that's ok. If the truck can't do the trail, I don't want to be on it with her anyways. "The Beast", my 80, is the built rig in the family and will probably stay that way. That thing is purely utilitarian and is kind of ugly to look at. When I'm done with the 4runner, I hope it will turn heads from how pretty she is.

Although the body is in rough shape, the big appeal is that it has had the 3.4 swap done to it and the conversion has been done for quite some time. The conversion wasn't done exactly right but there's nothing that can't be fixed and it runs like a top!
 
Last edited:

Stuckinthe80s

Rising Sun Member
Staff member
Joined
Dec 29, 2017
Messages
2,326
Location
Lakewood, CO
THINGS TO DO:

Functional:
1. New tires
2. Front suspension rebuild
3. New shocks all around
4. New calipers
5. New pads
6. Re-route the exhaust
7. New window/door gaskets
8. Seat swap

Baseline everything else (this will be expanded on as I get to it)

Form:
1. Rust repair
2. Paint
3. Better wheels - I really like the 3rd gen steel wheels
4. Bed-line interior floors
5. Window tint (that's really a functional thing for me)

That's all I care to think about for now and I'll add more to the list as I get to it.
 

Stuckinthe80s

Rising Sun Member
Staff member
Joined
Dec 29, 2017
Messages
2,326
Location
Lakewood, CO
Went ahead and put on some newer tires and wheels because I had them. These were actually serving emissions test duty for the 80 but they'll work for now on this old girl. I actually think she looks better with the skinnies.

4runner on tacoma wheels.jpg


This picture shows some of the rust I'm going to have to tackle: wheel wells, windshield frame, etc. I really hate rust and body work but that's ok, it will be another thing to learn.
 

SteveH

Hard Core 4+
Joined
Aug 10, 2006
Messages
2,922
Location
Colo Springs
I liked stock-ish 1st gens - (except the 3.4 swap rocks). Looking forward to seeing what you do with it.
 

Notyourmomslx450

Cruise Moab Committee
Joined
Aug 4, 2014
Messages
3,270
Location
Westminster
Makes me miss my old 87
 

Attachments

  • B12DBECD-978B-4756-AE3E-E82C3212AE17.jpeg
    B12DBECD-978B-4756-AE3E-E82C3212AE17.jpeg
    48.2 KB · Views: 131

Notyourmomslx450

Cruise Moab Committee
Joined
Aug 4, 2014
Messages
3,270
Location
Westminster
Sorry Nic. your build thread is going to turn into a Memorial for all of that loved and lost a first gen 4Runner.
 

Stuckinthe80s

Rising Sun Member
Staff member
Joined
Dec 29, 2017
Messages
2,326
Location
Lakewood, CO
Sorry Nic. your build thread is going to turn into a Memorial for all of that loved and lost a first gen 4Runner.

LOL, it's funny you say that because that is kind of what it is. My first 4x4 Toyota was an 86 and I've regretted selling that forever :
023.JPG


That thing was in MUCH better shape cosmetically, nearly perfect even! So this will also be an opportunity to make this one close to what that one was and then some!

Notice the Marlin Crawler sticker in the window? I didn't even know who he was before I bought that truck.
 

Stuckinthe80s

Rising Sun Member
Staff member
Joined
Dec 29, 2017
Messages
2,326
Location
Lakewood, CO
One of the things that is bugging me, and I know I'll have to get fixed, is how the motor was set in during the conversion. It looks like it isn't straight and is slightly clocked:

3.4.jpeg

3.4-.jpg


Do you guys agree? Every 3.4 has the timing belt cover sitting level. I can't really see the condition of the motor mounts but really I think this was done on purpose to clear the hood. I thought these conversions couldn't be properly done without cutting the hood to clear the intake? You can see in the first picture that it is definitely making contact with the hood but just slightly. There isn't a dent in it but there are rub marks.
 

Notyourmomslx450

Cruise Moab Committee
Joined
Aug 4, 2014
Messages
3,270
Location
Westminster
definitely cockeyed. I know that a body lift or a hole in thr hood is whats needed to make the 3.4 fit.
I didn't realize that this was swapped! mow its even cooler, and it needs a sas.
 

Stuckinthe80s

Rising Sun Member
Staff member
Joined
Dec 29, 2017
Messages
2,326
Location
Lakewood, CO
Well, now I'm getting in deep....

I decided to start with the body work portion of the build as I really had to know what I was dealing with. I'm usually a go before show kind of guy but this one already runs pretty good and I really needed to know what was under the windshield. The rust around the wheel wells is pretty obvious but you never really know how bad windshield frame rot is until you pull it. Holy crap that thing was on there!

The tear down started with making a spot to store the top. There are eight billion videos and threads on different ways to do this and I followed a super simple method for now. When everything is done I'll probably make it a lot easier to use with a hand crank and some pulleys but this is good for now:
20200519_120521.jpg
IZCC2772.JPG


Next was getting the interior out. I was going to just remove enough to get to the windshield but I couldn't help myself once I got started. This will be good anyways because I really need to get the inside protected. There is a lot more surface rust on the inside than I like and the best thing to do is just get it taken care of now.

IMG_1283.JPG


Now it's all out! I even took the window and regulator out of the rear hatch. Here is how she sat when I was done.

IMG_1294.JPG
 

Stuckinthe80s

Rising Sun Member
Staff member
Joined
Dec 29, 2017
Messages
2,326
Location
Lakewood, CO
The windshield rot is bad but it's not as bad as I've seen on some cars. (I guess that makes me feel better? :help:)

IMG_1284.JPG

IMG_1285.JPG
IMG_1287.JPG
IMG_1288.JPG
IMG_1290.JPG


So now I'm at the point of where I'm trying to decide what to do...

Part of me wants to go straight redneck and repair it with a no-weld method. I don't have a lot of money in this so far and from an investment perspective it can last me a few years while I track down a donor for a body swap. I've read a lot about using Por-15 saturated fiberglass cloth and it seems to hold up well. I think if I prep the metal well enough to stop the spread and then apply this then I can get a good seal for the windshield and be back in business.

The other part of me want's to take a stab at my metal skills and try cutting out the rot to replace with good metal. The problem with this is that my metal fab skills aren't the best and those window corners are going to be a real challenge getting it right. I guess I can find a truck or 4runner in a scrap yard and just cut those sections out. I'm going to chew on it some more. I'll hit it with a wire wheel and see how well it all cleans up.
 

White Stripe

Hard Core 4+
Joined
May 5, 2015
Messages
1,287
Location
Milky way galaxy
The windshield rot is bad but it's not as bad as I've seen on some cars. (I guess that makes me feel better? :help:)

View attachment 86054
View attachment 86055View attachment 86056View attachment 86057View attachment 86058

So now I'm at the point of where I'm trying to decide what to do...

Part of me wants to go straight redneck and repair it with a no-weld method. I don't have a lot of money in this so far and from an investment perspective it can last me a few years while I track down a donor for a body swap. I've read a lot about using Por-15 saturated fiberglass cloth and it seems to hold up well. I think if I prep the metal well enough to stop the spread and then apply this then I can get a good seal for the windshield and be back in business.

The other part of me want's to take a stab at my metal skills and try cutting out the rot to replace with good metal. The problem with this is that my metal fab skills aren't the best and those window corners are going to be a real challenge getting it right. I guess I can find a truck or 4runner in a scrap yard and just cut those sections out. I'm going to chew on it some more. I'll hit it with a wire wheel and see how well it all cleans up.

I dont know if this is in your price range or not but you could tell him u dont want the v8 and offer 700 bucks and combine the 2 trucks. Even get a solid axle swap out of it.

https://fortcollins.craigslist.org/cto/d/fort-collins-solid-axle-runner/7123575587.html
 

Notyourmomslx450

Cruise Moab Committee
Joined
Aug 4, 2014
Messages
3,270
Location
Westminster
Buy some pillars from a second gen truck or first gen runner and graft them in.
 

DaveInDenver

Rising Sun Ham Guru
Joined
Jun 8, 2006
Messages
13,114
Location
Grand Junction
That's Rust Belt quality windshield rot. That's not going to be easy learner level fabrication to get right and seems to me you'd need a jig to make sure the finished body comes close to the right profile for new glass. Find a donor I'd think.

You know what I'd be stupid enough to try is using the body from something common and newer, like cut out the pillars, cowl and roof from a 1st gen Tacoma if it's the same size, and graft that in. It'll be easier to find a suitable donor and easier to find a cheap windshield, too.
 

Stuckinthe80s

Rising Sun Member
Staff member
Joined
Dec 29, 2017
Messages
2,326
Location
Lakewood, CO
Yeah, i think Im going to try to graph (graft?) A section from same gen mini truck. If i go that route im going to go all the way back to the b-pillar. I dont like sunroofs
 

Stuckinthe80s

Rising Sun Member
Staff member
Joined
Dec 29, 2017
Messages
2,326
Location
Lakewood, CO
Well, I figured since the 80 is about 90% done, it’s time to start back on this thang.

20230812_152334.jpeg


Got the drivetrain out, which could have gone better, but whatever.

IMG_1962.jpeg


I updated the first post and re-titled the thread to show how plans have changed quite a bit. What started as something that was going to be a simple, modest refresh has turned into something a lot more. The body is too rusty to try to do a resto, so I'm going to use it as a shell for a moderate crawler.

The reason I'm pulling the drive train is two-fold:
  1. It's pretty greasy and I'm going to do a re-seal and baseline on it.
  2. I'm no longer keeping the IFS setup, or the entire frame for that matter. I am pulling the body and putting it on an 80 frame --- WOOT!
More details to come!
 
Last edited:
Top