Sink Creek (2f rebuild)

Yakubj

Rock Stacker
Joined
Nov 2, 2021
Messages
30
Location
Golden CO
Hello, figured I’d give an update as got some problems worked out. Thanks for the info on yards, I was able to salvage a virgin block for $200 from a 83 fj60. It’s all at Gunns now and just waiting for the machine work to be done before I throw it back together. Thanks for all the help! Definitely saved a lot of time and money.
 

Yakubj

Rock Stacker
Joined
Nov 2, 2021
Messages
30
Location
Golden CO
The day has come, the motor is back and it’s time to assemble.
E4550913-6B39-4131-B139-0C9D61BF3F6F.jpeg
75C0BFE9-8511-4A31-AEA7-CB4032B13564.jpeg
7314C6BB-898E-4276-A32E-866C85F1FDD5.jpeg

Look at those beautiful parts. Gunn’s did a great job. Special thanks to Mr. TJ for helping me out and answering any questions I have had so far. Exited to start putting it together. Gapped the rings, no grinding needed which was nice. They are a little large on the gaps though (still within tolerance) so apparently I am building a race motor. New piston heads are domed too.
B1E77202-BEBD-45DF-AF70-D2A1504A0412.jpeg

Cleaned everything and didn’t open the garage so me and the god of brake clean had a quick chat. Dropped in the crank, did a little plastigauge torqued at 50 ft/lb and got between .004-.005, which according to my manual is right in the middle of tolerance. Added some assembly lube and got everything torqued up. Then threw on some pistons.
09E93149-D9D7-43E7-921D-825919C33620.jpeg
FADD6527-B2F1-4737-9272-E488EFB17244.jpeg

That’s where it sits for now. I’m just starting up my semester so don’t have a ton of time during the week but I am going to try to put in an hour or two every night and hopefully I can get the top and bottom done by the end of this weekend. Also for those wondering what is with the chains on the front are for, we accidentally dropped the block that came out of the motor when it was too top heavy and we are not taking any chances with this one. Lucky that old one was already too far gone before we dropped it and it’s now going to spend it’s days as a very heavy bar table. Any advice from y’all who have done this before is always appreciated. I am sure that some roadblocks will appear soon but so far it is going smooth. My goal is to have the 40 running by the beginning of March, but the earlier the better. I’ll update soon, and hope to finally come to another rising sun meeting next week now that I’m not out of town or swamped with midterms and finals.
 

White Stripe

Hard Core 4+
Joined
May 5, 2015
Messages
1,287
Location
Milky way galaxy
Nice progress. Quick question for you. Did you clean the block after getting it back from the machine shop? The block should be cleaned with soap and water and dried with compressed air making sure to blow out all holes. I would also blow out all oil passages in the crank. Did you paint the block? It doesn't look painted to me.
 

Yakubj

Rock Stacker
Joined
Nov 2, 2021
Messages
30
Location
Golden CO
I did not paint the block yet, I have been told it is a lot easier after the motor is mostly assembled?
 

Yakubj

Rock Stacker
Joined
Nov 2, 2021
Messages
30
Location
Golden CO
I did not paint the block yet, I have been told it is a lot easier after the motor is mostly assembled?
On that point though I was going to paint it the factory black and silver (my buddy that’s helping me is trying to convince me to go blue and silver) anyone know the best paints/colors for this?
 

DaveInDenver

Rising Sun Ham Guru
Joined
Jun 8, 2006
Messages
13,114
Location
Grand Junction
I did not paint the block yet, I have been told it is a lot easier after the motor is mostly assembled?
There's probably no one way to do it. Most engine factories paint long blocks, e.g. substantially assembled. I think an argument could be made that it's easier to prep and clean the short block before you have a lot of gaskets and such so I'd guess the paint will adhere better. Some people prefer even earlier so the freeze plugs are bright highlights but since they're steel I'd rather them painted.

In the end it only really matters when it's on the stand or at show-and-shines. An engine in a driver, nooks where you'd notice minor details like that are going to collect dirt and oil anyway so as long as it's doesn't get too rusty on the surface the basic purpose of painting is fulfilled.

Toyota paints blocks and pans black but there again, unless you're restoring don't feel obligated by the factory choices. I prefer lighter colors so you can see leaks easier and the engine bay doesn't seem so dark. It's your truck, if you want to use Ford Blue or hi-viz yellow or John Deere green instead don't apologize for it to a bunch of nitpicking forum dweebs. LC Engineering uses red on things like their valve covers.
 
Last edited:

Yakubj

Rock Stacker
Joined
Nov 2, 2021
Messages
30
Location
Golden CO
A few more day a few more things done. Oil pump, front end plate, crank timing gear, cam w/ timing gear, oil pan, flipped the motor CAREFULLY.
08232E40-B883-41C1-BE32-EA3C30B0950D.jpeg
BC22E76C-8312-4994-8392-64E3AA98A8B7.jpeg


Head gasket, head, torque them down. Used royal purple on the bolts as our “light coat of engine oil on the bolt threads and under the bolt head” because it is what we had left over from an oil change earlier that day. In this I am also skipping the amount of time spent cleaning. I think right now the engine build has been 10% putting parts together 5% looking for where a part is, and 85% cleaning.
E2460D73-9C5B-4EA1-B390-6DE31BB4989B.jpeg
10B0FA51-41C6-416A-88CC-178D807D2F98.jpeg

Here one of those previously mentioned road blocks popped up. The push rods have disappeared. Spent about 2 hours searching the garage, then some more time checking the truck and any other boxes that might happen to contain auto parts. Decided they were not around and we would have to call the shop and find out if they had them. Quick strategy sesh later we decide to finish putting it together, at least to the paint stage, basically already there. After painting we’ll take off the covers to put the lifters and push rods in.
Spend the rest of the day masking and that’s were we are at for now. Decided to wait for warmer weather to start the painting as it was 10 in our garage this weekend even with the small heater going. Luckily Colorado has decided that it is going up to 50 by Friday. While masking the front, do y’all mask the whole machined surface or just the surfaces that line up with cooling components?
61AADD4C-1389-433E-8DFE-F9E129D4796B.jpeg

I called the shop before posting this and still have no idea what happened with those push rods. I figured the shop didn’t have them, calling was a hail marry. They were in a box that I brought with me there but I think they just took the pistons and lifters out of it, leaving me the oil pump and push rods. The old oil pump is around, but no sign of the push rods. Now I’m looking around for new ones. Probably the smart thing to do anyways as I have a new cam and lifters. My question is do I need to go OEM or are aftermarket’s ok for these. The dealership quoted me $435 for 12 push rods. Cruiser Corp has a set of 6 aftermarket’s for $99, bringing the total for 12 to $198 + tax & shipping. Not sure if there are other aftermarket’s that work, the website does not list what company makes this set of 6.
 

Yakubj

Rock Stacker
Joined
Nov 2, 2021
Messages
30
Location
Golden CO
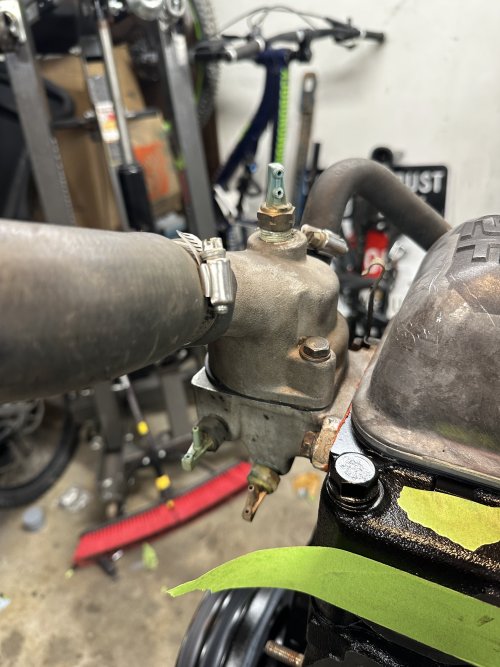
So I have run into a bit of an issue and I can't seem to figure it out. The nipples on all my BVSV (Bimetal Vacuum Switching Valve) broke off during the takedown, or sometime in the last few months of being in the garage. I am trying to figure out if I can fix them or if I need to get new ones. The one thing pushing me in the direction of new ones is that I am not sure if the ones in right now are correct. Right now I have a 90925-05017 top and bottom and a 90925-05035 in the middle. As far as I can tell from diagrams I have, the top should be pink, the middle should be light blue, and the bottom should be violet. But I can't find any parts for that, all the light blue ones are 90925-05047, but from mud it seems like I need a 46 because they are different temperature ranges. I ordered another 35 cause that seemed to be right and I found one on ebay. But based on my current position that one should be light blue, but the 35 is violet to me. Which means it should go on the bottom. Still have no idea for the part number on the top 'pink' one. Anyone have any ideas?
 

subzali

Hard Core 4+
Joined
Aug 22, 2005
Messages
10,320
Location
Denver CO
If you want it correct, you may have to get a used one from cruiserparts or something. In actuality there is probably no noticeable difference between the different BVSVs
 

Yakubj

Rock Stacker
Joined
Nov 2, 2021
Messages
30
Location
Golden CO
Post pictures of what you need
I have a tote of emissions parts
Here’s what’s on there:
Top:
91FFB994-025B-4528-859D-95AD11D14DCC.jpeg

Middle:
FC800024-2E75-4935-9023-5AA12FEB9A3B.jpeg

Bottom:
47C26E8D-4666-41ED-8C8D-6B0BEC7BB1CF.jpeg

Picture of whole system:
BD15037E-C364-48CC-947C-EA268ACE7058.jpeg

Picture of diagram for what is should be:
59133B0C-AC4A-4BF7-A07D-8030F905A094.png
 

Attachments

  • 2DA45C42-F20C-410E-ADFC-C3E353AE5DDA.jpeg
    2DA45C42-F20C-410E-ADFC-C3E353AE5DDA.jpeg
    1.7 MB · Views: 59

Yakubj

Rock Stacker
Joined
Nov 2, 2021
Messages
30
Location
Golden CO
I believe I have figured out all the BVSV issues. City Racer LLC seems to carry the pink and light blue one I was missing and for a reasonable price. Now the new issue I have is that I have 3 oil cooler bolts (from my original cooler and the one that came with the new block), but none of them are tapped for an oil pressure gauge. Anyone happen to have one or know where I can find one?
 

simps80

Rising Sun Member
Joined
Jan 22, 2009
Messages
2,720
Location
Arvada, CO
I dug out my carton of emissions
Unfortunately no luck on what you need sorry

But I did find a rear hitch that someone wanted off to go find that thread
 

jps8460

Cruise Moab Committee
Joined
Feb 15, 2013
Messages
2,926
Location
Broomfield
Awesome to see the progress. Curious about the Domed Pistons. I thought 77 and later 2fs used a closed chamber head and a flat top piston. Is this a 2f trick to get more “modern” compression numbers? Any issues with piston to valve clearance?
 

Yakubj

Rock Stacker
Joined
Nov 2, 2021
Messages
30
Location
Golden CO
I wish I had a complicated answer to give you but they are what the shop ordered and I trust them on this. I'm really hoping that higher compression will be the result though. Also I do have a few more updates. Got new BVSV's and fuel pump and got them on.
4ACF9941-C7BE-4CA4-B383-D03B3D164752.jpeg

Also it's painted, been that way for a bit but I forgot to update once I did.
32E2E5F1-4A02-4459-8A0A-66261D7EF637.jpeg

Still need to clean up the cover but it’s looking pretty for now. Now all the bolts are soaking to get them cleaned up and I'm gonna lay everything out for the final push this weekend.
9E223936-8DB5-4857-BACE-7600AC546D57.jpeg
 
Top