FJ40 Won't Start

RicardoJM

Hard Core 4+
Joined
Jul 18, 2007
Messages
2,570
Location
Centennial, CO
The FJ40 won't start up. A couple of weeks ago we disconnected the fuel filter to replace it. We tried to fire it up last weekend with a jump start but it was a no go. The starter would crank, crank, crank but the engine would not ever get going. I could see through the glass that there was fuel in the carb, so I figured that it just needs a little starter fluid and would get to it next (this) weekend.

This afternoon we sprayed a whole can of starter fluid in (not all at once) to the carb but no joy. I understand the basic principle is to get fuel from the tank to the carb, mix the fuel with air, put the mist into the engine cylinder where power is applied to the spark plug to get combustion.

I could use some help in guiding me through debugging the problem...

I am pretty sure that the fuel is getting to from the tank to the carb as I can see it in through the glass. But it could be that I have an air gap and fuel is not making it to the carb. That is to say, the fuel I see in the carb could be what was in there a couple of weeks ago - after all it has not run. How could I go about confirming that the fuel is getting from the tank to the carb?

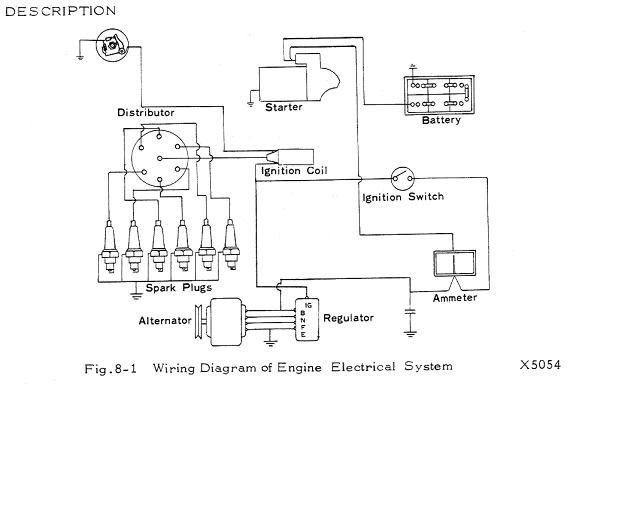
One of the other things I would like to check is the power getting to the spark plug. I remember (when I was much younger) touching the spark plug on my go-cart while it was running and getting a nice shock. While I'm sure I could replicate this experience to test for power on the FJ40 - there's got to be a safer way. Do I remove each spark plug wire and hook it up to a multi-meter? Can I hook a multi-meter up to the plug wire without disconnecting it?

I'd like to check these two things out before moving on to the carb. Any guidance?
 

nuclearlemon

Hard Core 4+
Joined
Aug 23, 2005
Messages
8,333
Location
windy wyo
remove plug wire, if your boot will slide on the wire, slide it back, place very close to block, turn key and see if you see spark. i'd start at the coil wire and work from there
 

subzali

Hard Core 4+
Joined
Aug 22, 2005
Messages
10,322
Location
Denver CO
Spark plug wires should have a pretty good insulator on them, so you shouldn't get shocked too bad. Do as Ige says and start with the coil wire going to the distributor. Hold it gently to reduce the likelihood of voltage transfer to you (kinda like touching a hot pan lightly).
 

wesintl

RS Moderator
Moderator
Joined
Aug 22, 2005
Messages
8,603
Location
in da house
I usually hold it with some insulated pliers or use a camp and clamp it somewhere on the block
 

leiniesred

Hard Core 4+
Joined
Aug 29, 2005
Messages
1,306
Location
Conifer, CO, USA
Ricardo:

I helped the father-in-law with his FSJ (Full Sized Jeep) this weekend. We found a dead coil.

The Craftsman Phillips screwdriver is the exact diameter of a spark plug head AND it has an nice insulated handle.

While getting 20,000 volts to your hand is fun, the screw driver works a lot better.

Jam screwdriver into a plug wire, hold it about 1/4 inch from ground. Get someone to roll the engine over. Watch for a nice bright blue spark from screwdriver shaft to the
ground. Orange spark is marginal.

Nothin? put that wire back on a plug and move to the coil wire at the distributor. Same routine.

Nothin? ok, well the coil isn't firing for some reason. put the wire back on the center of the cap. Get out the ol' test light.

Test your test light on the battery first. Maybe Jr. burned it up stickin' it in the wall outlet again.

One side of the coil should be HOT with the ignition on. The other side will be "cold."
Get Jr. to hit the starter again. The light should dim on the hot side of the coil, and it should flash on and off or at least flicker on the other terminal.

If it flickers, as least you know the ignition system is doin' the thing, if not, you gotta check points or your spark box.

So it'll flicker, but no spark from the coil, you gotta bad coil most likely. they do die about every 20-30 years ya know.
No flicker, you gotta fix that first. point if you still have them. Condenser coil maybe?
spark at the coil, but not hte plugs? Get out the ohm meter and check the plug wires. Then pull the cap/rotor and fix that cracked rotor or remove the carbon tracks from the cap. (doubtful)

Summary:
If it doesn't run on ether, you have no spark. Check for spark at the end of the plug wire first, then the coil, then use a 12v light on the primary coil windings to check for poer to the coil and that the coil is firing. It's no big deal.
 

RicardoJM

Hard Core 4+
Joined
Jul 18, 2007
Messages
2,570
Location
Centennial, CO
Coil wire is not connected - where does it go?

Thanks for all the help so far. I've been able to confirm that there is a Ignition Coil wire that is not connected up. It is the black wire on the bottom right side of the Ignition Coil, you can see in this linked picture.

Looking at this diagram in the F-Engine Manual I can see there are (3) Ignition Coil wire connection points and have been able to deduce a little bit of insight about my situation.
fig_8_1.JPG


In the diagram, the bottom wires from the Ignition Coil go to the Ignition Switch and Regulator. In my situation, these would be the (2) wires on the bottom left side of the coil. The thicker wire from the center of the coil into the center of the distributor is just where I would expect it to be.

With all the other wires accounted for, my disconnected wire would be the top one (off the Ingintion Coil) on the diagram. What is the this wire supposed to connect to? I don't know what the circled part up in the left corner of the diagram is and I can't find the answer in any of the narrative. I've searched on MUD and it looks like the wire should be connected to the distributor, but that does not match the diagram. Is is not obvious to me where the wire was previously located. Any thoughts?
 
Last edited:

leiniesred

Hard Core 4+
Joined
Aug 29, 2005
Messages
1,306
Location
Conifer, CO, USA
Ricardo:

That icon in the top left is a top view of your distributor with the cap off. You can just make out the points in the icon. (more 'lectrics to go bad)

Yep. you need a wire from the coil to the distributor. Usually it is on the "-" connector of the coil. The other side of the coil, "+" usually goes to ignition power.

Usually, there is a do-dad on the side of the distributor with a spade connector. The do-dad is in a notch between the cap and the distributor body.


If you still have points on that bucket, ask around about an electronic ignition upgrade. They make some that fit INSIDE the distributor for that sano look we all want. There is nothing wrong with the external units either, except a little more wiring junk visible in the engine bay.
This will replace your points, rubbing block, condenser coil with an optical pickup that simply works. We've been running a PERTRONIX brand unit in the '63 Austin Healey for 15+ years. WAY less work than keeping points in good shape.
 

wesintl

RS Moderator
Moderator
Joined
Aug 22, 2005
Messages
8,603
Location
in da house
It should be on the side of the dist as spanky says
 

timmbuck2

RS Club TLCA Delegate
Cruise Moab Committee
Joined
Oct 5, 2005
Messages
4,377
Location
Denver
but touch it to your tongue while cranking the starter just to be sure....
 

RicardoJM

Hard Core 4+
Joined
Jul 18, 2007
Messages
2,570
Location
Centennial, CO
Spanky's explanation was spot on, I did have to pop off the distributor cap to see the connecting post where the wire connects. Once exposed, I found the piece of the connecting tab that was still on the post - the metal edge matched up perfectly with the edge of the unconnected wire.

I spliced on a new connecting tab and hooked up the wire. There was a insulator disk on the post right next to the distributor case that was so brittle from age that it fell apart as I was loosening the nut on the post. After connecting the wire I put the distributor cap back on and hooked up the jumper cables. With TheBoomBoom's help we turned over starter and while it sounded promising at first, still no combustion.

So I pulled off a plug wire, peeled back to hood grabbed it with insulated pliers (Thanks Wes) and held it close to the engine block as TheBoomBoom turned the starter - no spark. So the disconnected wire while definitely a problem it is not the only thing that needs to be addressed. By this time the sun was going down and this being a fun project I decided to call it for the day.

That said, running the Bronco in the garage while the jumper cables are hooked up to the FJ40 is getting a bit old, so I went to the parts store and picked up a battery charger. It is a small one and will take 6-8 hours to charge, but it is on the battery now and in the morning we'll use the test light on coil to see how the power looks on the ignition and the distributor sides.
 

RicardoJM

Hard Core 4+
Joined
Jul 18, 2007
Messages
2,570
Location
Centennial, CO
This morning's update. The test light confirms we have power on the ignition side post of the Ignition Coil (with the key off and rolling the starter over) but no power at all on the distributor side post of the Ignition Coil (with the key off and rolling the starter over) - much less any flicker of the test light. I did not conduct the spark test with the center wire from the coil and will do that this afternoon when I get home.

If I am tracking correctly with the debugging process...
My Ingition Coil may or may not be ok - the spark test with the center wire needs to be done. If there is spark, the Ignition Coil is likely ok. If there is no spark, the issue with no power on the distributor side post needs to be resolved and then the center wire spark test redone.​

Not having any power on the distributor side post of the Ignition Coil needs to be dealt with whether the coil is good or bad. The no power situation indicates an issue with the points and/or spark box, or it could be I did not reconnect that wire very well. I will double check my wire connection this afternoon and start researching points and/or the electronic ignition upgrade. BTW Sparky is Spark Box the same as Starter?​

Either way, the battery voltage was reading well this morning, after rolling the starter a few times it was still reading like 12.7 on the volt meter. We put it back on the charger so it will be good to go for later this afternoon.

Thanks for all the help so far, when I get through this I'll probably put together a flow chart and step by step of everything that is going into the the problem isolation process. :hill:
 

leiniesred

Hard Core 4+
Joined
Aug 29, 2005
Messages
1,306
Location
Conifer, CO, USA
no flicker on the post that goes to the coil when trying to start engine with ignition ON = problem in the distributor most likely. If that wire shorts out anywhere in the distributor, or your points are fouled you get nothin'.

Your description of crumbling plastic parts makes me think you'll find the problem under the cap with the points/condenser or wiring.

If you really like the nostalgia of adjusting points or are on a tight budget, get new points and condenser. That'll get you some new wires in there too. Otherwise, I strongly advise an aftermarket ignition system to replace the points. Save you hours and hours of trouble on the side of the road/trail.

Something like this: http://www.shopatron.com/product/part_number=91665A/591.0
I don't know if that is the right part number, but it might be. Hall affect is even cooler than optical, and it all fits in the distributor for that STOCK look.
The coil still COULD be the problem. (a problem?) The primary windings may have failed open. Hence, no power on the "-" post.
You are a ham guy. Bust out the ohm meter and check that coil's resisitance; primary + to primary - post. Should be around 3 ohms. You mentioned you might have a ballast resistor hanging around that coil. Ballasted coils are around 1.5 ohms. Infinity or 0 = bad coil.

Spark box = fancy electronic igniter like linked above, or a stocker which will probably be something like a 5x5" flat metal box with a buncha wires stickin' out of it (for your vintage). Ham guy notes: In that box is a big power transisitor that takes the tiny signal from the optical or hall affect pickup and controls the flow of power to the coil. Wanna "go big?" get a modern multiple spark discharge unit.
All of the racecars I have worked on ran MSD ignitions of some kind. My Dad's current 1970 Vintage Mustang Racer runs 1 or 2 6AL. On a carb'd truck, the MSD boxes seem to keep the engine running a lot longer when things get bad (flooding). Cough-sputter-cough-cough-smoke-smoke-shudder-cough instead of CHUG-Chug-chug.
 

wesintl

RS Moderator
Moderator
Joined
Aug 22, 2005
Messages
8,603
Location
in da house
There is a pretty easy test for the coil and ignitor in the FSM. Do you have the fsm or are you working with a haynes/chiltons etc? When I blew my ignitor I had heat into and out of the coil but no spark. I was baffled for some time about that. The problem is I didn't have the proper heat out of it.
 

RicardoJM

Hard Core 4+
Joined
Jul 18, 2007
Messages
2,570
Location
Centennial, CO
There is a pretty easy test for the coil and ignitor in the FSM. Do you have the fsm or are you working with a haynes/chiltons etc? When I blew my ignitor I had heat into and out of the coil but no spark. I was baffled for some time about that. The problem is I didn't have the proper heat out of it.

I have the both the f-engine manual (No. 98087) and a Chiltons. In the f-engine manual, the Coil testing is covered on page 8-32 and the procedure is consistent with Sparky's advice on checking resistance (total lack of continuity) on the posts. Being a Ham guy, I'm a bit embarrassed to admit this, but this evening I'll find out if my multi-meter measures resistance. To date I have only ever used it to check continuity and measure voltage.:eek:

If you really like the nostalgia of adjusting points or are on a tight budget, get new points and condenser. That'll get you some new wires in there too. Otherwise, I strongly advise an aftermarket ignition system to replace the points. Save you hours and hours of trouble on the side of the road/trail.

I hear what you are saying. As I set out to find a project one of the key points was to keep within a reasonable monthly budget. So for me the decision boils down to $20-30 versus $140-$160 out of the budget this month. The latter route feels like the sound long term play, but it would push out getting the exhaust that had been planned for this month - which has the ripple effect of it being a bit longer before I can get emissions, plates and start driving it around. ;)
 
Last edited:
Joined
Nov 29, 2007
Messages
193
Location
Mat-Su Valley, AK
If it doesnt measure resistance you could use physics. Ohms law Volts = Amps x Resistance. a bit crude but It'll get you closer
 

RicardoJM

Hard Core 4+
Joined
Jul 18, 2007
Messages
2,570
Location
Centennial, CO
This evenings update. There was no spark from the center wire of the coil. I removed the coil and found it to have 3 ohm when tested from post to post. The FSM indicated that anywhere between 3 and 4 and it is good. So I'm inclined to call the coil good, not that it wouldn't be good idea to replace anyway it as it is old and likely has fewer good days ahead than it has behind but the testing would seem to indicate it is not the cause of my no spark problem.

Armed with that information I ordered points and condenser for the distributor. They will be ready for pick up at 4:00 tomorrow afternoon. Hopefully they are straight forward to install. For those following, I know these things are well documented in the FSM but being new to all of this I am not yet as seasoned as others in taking the FSM words and diagrams and translating them to the real world. That coupled with me not being naturally mechanically inclined probably makes reading these posts a chore for you all. :blah::blah::blah: However I do appreciate the patience, help and interest from you all.

I took some pictures of the coil testing, and the distributor innards and attachments, but had my hard drive go out on my main computer so I'll post them up after I get it back running. I kicked my son off of this computer so I could post an update and he needs it back.
 

wesintl

RS Moderator
Moderator
Joined
Aug 22, 2005
Messages
8,603
Location
in da house
Your doing a good job. :thumb: Keep it up :D

If the coil is giving you the proper ohms there isn't a need to replace it. I don't know the early stuff as well as I know my 76. I've heard the condensers can go bad. Make sure the coil wire is fully seated into the coil and in the cap. Same with the plug wires.
 

Rzeppa

Rising Sun Member
Joined
Aug 24, 2005
Messages
8,283
Location
Kittredge CO, USA
This evenings update. There was no spark from the center wire of the coil. I removed the coil and found it to have 3 ohm when tested from post to post. The FSM indicated that anywhere between 3 and 4 and it is good. So I'm inclined to call the coil good, not that it wouldn't be good idea to replace anyway it as it is old and likely has fewer good days ahead than it has behind but the testing would seem to indicate it is not the cause of my no spark problem.

Super-duper easy way to test and see if a coil is good or not:

Instead of using the points to make and then break the connection to ground, simply do it manually. This method uses VERY little power out of that battery you've got charging, and doesn't require turning the engine over. First hook a spark plug to the coil output, you will be using the spark plug to look for spark/no spark. Lay the spark plug on a ground somewhere so you have a good view of the electrode end.

Apply 12 V to the positive connection of the coil, Doesn't matter where the 12V comes from, could be direct from the battery if desired. Hook a wire, any wire onto the negative connection on the coil and brush it against ground, any ground that's handy. The moment the wire un-touches the ground, you should see a spark on the plug. No spark, bad coil, and you've eliminated everything else that could be the problem except the coil!

Coils are super cheap, $10-$20 or so at any parts store. If you need a new coil, you don't need a fancy one and don't let ANYONE talk you into a fancy one, these old engine don't need it, and they are a total waste of money!
 

RicardoJM

Hard Core 4+
Joined
Jul 18, 2007
Messages
2,570
Location
Centennial, CO
It starts!!!

Thanks everyone. The FJ40 starts right up. I think my points and condenser were just fine. After replacing them and initially setting the gap on the rubbing arm (realizing my mistake) and then getting the gap set on the points, the truck would still not start. I had power on both ends of the coil and the flicker - but it there was no spark on the center coil wire and no way it would turn over.

Using Jeff's testing method we confirmed the coil was good. Went back around and double, triple checked everything and were basically stumped. About that time Max P. stopped by to pick up a carb and drop off a transfer case and we got to looking at the problem. As I mentioned the the fragile insulator thing that crumbled off the distributor post when I first disconnected the coil wire, we all got to thinking that not replacing might be the problem we were having.

A quick run to Max's house and a look at the 69 FJ40 in the garage confirmed that there is an insulator thing on the post that butts right up to the distributor housing. Max's dad pulled out a small rubber faucet washer from a plastic bag that was a close enough approximation. A quick look over Max's FJ40 and all the work that has gone into it (great truck Max :thumb:) and home we went.

I put the washer on the post, connected the wires up and was holding a plug wire in my hand ready to test for spark. As TheBoomBoom turned over the ignition the engine started running. Having become used to it not turning over and focused on looking for the spark, it both startled the crap out of me and tickled my funny bone at the same time, don't really know why but it did. :lmao:

Postmortem on parts details, the coil was good but tested right at the bottom range of what is acceptable for resistance. So I replaced it a shiny new one that tests out much more solidly in the acceptable range. Looking at my old points they are in real good shape. I will keep the points and old coil as spares. While I was in there I took the time to replace a few wire ends with the connectors that have the heat shrink so they are nice and weather tight. Overall things are in much better shape than a week ago.

I learned a bunch and have a much better understanding of how the engine fires, which pieces do what and how they work together. Thanks again all. :risingsun
 
Top