Inukshuk
Rising Sun Member
The hardest part of this job was wading through the nonsense on MUD to get to the good stuff. I plan to do this to my other 80 soon before all these alternators sell out.
This thread on Mud https://forum.ih8mud.com/threads/possible-bolt-in-140-145a-alternator.960770/page-4#post-14776878 discovered the alternator to use. I modified my bracket in a way that seems far more simple than anything else out there. Read on:
I read the 27 page “Upgrading stock alternator to 130/150 amp” thread to see what people were doing. Wow, that was a lot. I concluded this was the easiest and a very good way to go. This truck (LongCruiser!) managed on 80A for 26 years. But the stock alternator was struggling. It would drop below 12V when at idle. It would be just above 13 at speed. I have 2 aux blowers for the passenger area. The interior lights are all LED so a nominal load. Still, with everything full blast, the stock alternator was at 82 amps. I have three batteries.
60A additional should be good. I'm adding about 40A of lights and maybe another amp.
I have R&R alternators on my other 80 before, so removal was straightforward. Since I was not sure what I’d need to do for install I removed the battery and box, cap & rotor, unbolted the PS reservoir to move it out of the way, moved the throttle cable out of the way, removed the idler pulley, and unbolted the bracket for the grey connector above the alt to move it aside. That all gave me easy access. I did not remove the oil filter.
When installing the Jag alternator:
I plan to remove the factory B terminal wire bundle from the back of the alternator and attach it to the post of the 150A fuse block (on the non-fused side) so I can use my clamp gauge to see what amperage I pull when all accessories are on.
.JPEG")
.JPEG")
.JPEG")
.JPEG")
.JPEG")
.JPEG")
.JPEG")
.JPEG")
.JPEG")
.JPEG")
This thread on Mud https://forum.ih8mud.com/threads/possible-bolt-in-140-145a-alternator.960770/page-4#post-14776878 discovered the alternator to use. I modified my bracket in a way that seems far more simple than anything else out there. Read on:
I read the 27 page “Upgrading stock alternator to 130/150 amp” thread to see what people were doing. Wow, that was a lot. I concluded this was the easiest and a very good way to go. This truck (LongCruiser!) managed on 80A for 26 years. But the stock alternator was struggling. It would drop below 12V when at idle. It would be just above 13 at speed. I have 2 aux blowers for the passenger area. The interior lights are all LED so a nominal load. Still, with everything full blast, the stock alternator was at 82 amps. I have three batteries.
60A additional should be good. I'm adding about 40A of lights and maybe another amp.
I have R&R alternators on my other 80 before, so removal was straightforward. Since I was not sure what I’d need to do for install I removed the battery and box, cap & rotor, unbolted the PS reservoir to move it out of the way, moved the throttle cable out of the way, removed the idler pulley, and unbolted the bracket for the grey connector above the alt to move it aside. That all gave me easy access. I did not remove the oil filter.
When installing the Jag alternator:
- I purchased the alternator from Rock Auto. More Information for ACDELCO 3341501 - https://www.rockauto.com/en/moreinfo.php?pk=1000815&pt=2412&jsn=1 Took the pulley off with an impact and swapped on the 80 pulley.
- I made a 4GA sister wire for B terminal to the battery + with a 150A Mega Fuse in a holder (take your pick, there are many on Amazon)
- I drilled a new but overlapping hole on the adjustment bracket that allowed the bracket to pivot downward on the stud mount and thus clear the alternator with only a tiny additional bit of grinding – 1/8 inch ish – at the top of the bracket. I did not grind the alt case. The force of the belts on the alternator are downward towards passenger side and the slot is below the mountng bolt. It won't move.
- I slid the stock belts (good so I did not replace) over the pulley while the alt was free and then put the Alt into the bracket. Easy. When I need to replace belts the 1/2 longer ones would be a good idea, or I'll just pull the alternator out of the bracket.
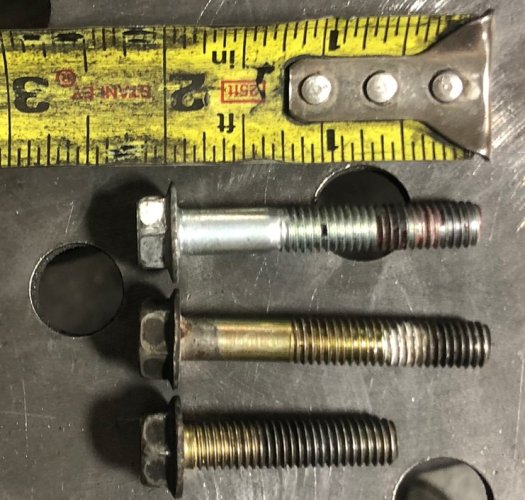
- For reference, the bolt I used for the lower alternator hole (through the adjusting block) is the same length and size as the bolt that goes through the now slotted hole driver’s side in the bracket. But since it now has a nut on the back, whatever fits will work. It was easy to get a socket on the nut.
- The wire harness was plug and play.
I plan to remove the factory B terminal wire bundle from the back of the alternator and attach it to the post of the 150A fuse block (on the non-fused side) so I can use my clamp gauge to see what amperage I pull when all accessories are on.


") Keeps Kirchoff happy.
Keeps Kirchoff happy.