Brand new FJ60 dash bezels being made

Cruisertrash

Rising Sun Member
Joined
Aug 18, 2020
Messages
1,992
Location
Denver
This just got posted on Mud ... a guy is 3D printing new dash bezels out of ASA plastic. I don’t think I’ve ever seen one that’s not cracked. He’s currently doing preorders at a discounted price ($120) and I think most of those have been sold in the last hour or two.

So if you need one go to the link below. I ordered and installed his radio bracket and it was a good product - he seems like a stand up small time/budding manufacturer.

FJ60 Solutions
 

Rzeppa

Rising Sun Member
Joined
Aug 24, 2005
Messages
8,240
Location
Kittredge CO, USA
I recently modeled and fabricated a 3D printed FJ60 dash pocket, it fits perfectly and works well for my customer (who found me here). A radio bracket is whole different ball game (much easier and simpler) than something as large as the entire bezel. FYI, ASA is a UV resistant version of ABS, which is super hard to build (in high quality) something that big without a large, expensive enterprise class 3D printer. Cheaper Chinese printers have that kind of build volume but I would be super suspicious of the build quality of anything that big that was built on a cheap Chinese printer. If you have an enterprise class machine like a Stratisys Fortus or a 3D Systems 3600 series, you're either doing it on the side from your work, or maybe somehow got one used (they are still expensive to own and operate even if you got one for free). Either way, I am super suspicious about this having been a 3D printing professional for over 8 years. I don't know of any competitors of mine that can do this object for this cheap.

I would INSIST in high resolution photos and/or customer reviews before plunking down any money.
 

Cruisertrash

Rising Sun Member
Joined
Aug 18, 2020
Messages
1,992
Location
Denver
@Rzeppa I appreciate the feedback! I know nothing about 3D printing so this is helpful. I get the impression the guy is contracting out a machine he doesn’t own - probably “bigger” and “better”. I plunked down the $$ and I’ll report back in about a month when they are expected to arrive. I’ve been burned for more than $120 before, and I’m willing to take the risk - and “take one for the team” so to speak.

For what it’s worth, I called around to some injection molding outfits last year about getting this done. Minimum run was $10-15k (includes the mold fee), and would yield 200-300 pieces. So the pricing this guy’s at isn’t too far off what you’d have to charge for injection molding, shipping, R&D work, miscellaneous time, margin etc. It worked out to ~$40-60 cost per piece, not including intangibles like R&D mentioned above. This guy’s only doing $120 for the first few people and then the price goes to $160. I know this is an apples-to-oranges comparison, but it’s the only insight I have to offer with regard to pricing.
 

Cruisertrash

Rising Sun Member
Joined
Aug 18, 2020
Messages
1,992
Location
Denver
Well, it has arrived. I have some sanding in my future. I’ll need to find a rattle can with something that matches the caramel color of the dash.

6D055520-3DA7-46D1-BCC2-1A2836142A34.jpeg
 

ChaserFJ60

Brand New
Joined
Jul 3, 2021
Messages
2
Location
Texas
Hey I just made an account here. I'm the FJ60 Solutions dude. I can say that I do 3D print these myself, Ive built my own enclosure with a DIY pain in the a** actively heated chamber. I programed a micro-controller and hacked into a space heater to keep the enclosure at a constant 50C to help prevent warping. The printer I choose can get the job done but there are some definite modifications that need to be made to improve longevity and improve quality.

At the time the CR-10 Max was the obvious choice at the time with decent online reviews. The warping wasent as bad as I imagined with the huge enclosure, Definatley easier to print in than ABS. As comparing printing a bezel to printing a radio bracket the only real difference is a slower printing speed and a larger nozzle.

For quality control I give each bezel a good twist before sending them out, I want any layer separation/cracking to happen while I still have the bezel in my possession. I do this for all my products. You should find that the bezel is very dimensionaly accurate.

I used up about 3kg of ASA to get the bezel to a point where it would be sturdy enough for production, and of course if anyone has any issues with their bezel I will gladly assist with replacement or a refund. I'm printing these parts to help pay for my College which I am perusing a degree in Mechanical Engineering, so a good customer service reputation is absolutely required to keep sales coming in. And I agree. $120 was way too cheap after all the time I spent getting this printer to work and material costs. what a nightmare.... But at the same time I know that my print quality wont be the best compared to other machines, and I'm still growing my reputation so I want to price things at a point where potential customers don't feel like buying from me is a huge gamble as I'm still in the "Building a Reputation" phase.
Thanks @Cruisertrash for the shoutout!

Here's a demo of what I did with my 3D print. Please reachout to me with any questions!
Don't be afraid to take a power sander to this bezel! It speeds things wayy up.
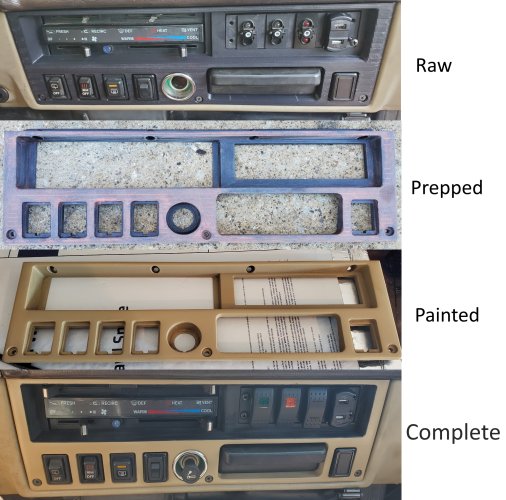
demo.jpg
I
 
Last edited:

ChaserFJ60

Brand New
Joined
Jul 3, 2021
Messages
2
Location
Texas
I guess I'll share my setup too aswell.

As mentioned before I have the CR-10 Max and an actively heated chamber made from a hacked space heater and an Arduino Nano.
I'm sure there are temperature regulating systems out there, but I already had all the parts here at home to make one. The only thing I had to buy was the Solid State DC/AC Relay. Ive included features in the Arduino to shut down all power and engage an audible alarm if the enclosure gets too hot or if the temp sensor falls off or fails. If all else fails the space heater has an adjustable mechanical thermal shutoff switch.

I have some new JST connectors coming in Tuesday, I'm going to make extension cables to move the printer controls out of the heated enclosure for added longevity of the electronics and improved fire safety. Until I can move the main control box out im using a 3D printed vent I designed that allows the PSU to get cooler outside air as seen to the left of the printer with PVC pipe sticking out of it.

This printer is more than capable of doing what I need as it sits. However, there is never a situation where room for improvement does not exist. I plan on making many modifications and improvments to this 3D printer template.


20210704_010654.jpg
20210701_162748.jpg
 
Top