rushthezeppelin
Rising Sun Member
- Joined
- Oct 14, 2022
- Messages
- 1,186
Posting this on t4r.org as well but figured I'd post here for the few 3rd gen owners we have.
I have grand ideas of doing this swap so that I can have a nice touchscreen head unit in a spot that I don't have to look down to look at maps or cameras or any number of things. As we all know the stock location is crazy low and not ideal for things like navigation especially.
So this has been done for sure in at least two different cases that I've found, no more. One seems to have routed the ducts down to were the head unit goes and just installed some generic vents on a flat plate there.

The other seems to have made a totally custom bezel. While the custom bezel would be awesome I assume probably the only way I'm going to pull that off is with 3d printing and a lot of cad work so I'm going to stick with the first option while I'm brainstorming this to even decide whether I want to do this mod (probably a little ways down the road but I want to be prepared). Figured I would start this to document things since none of the other examples seem to have done that.

Right now I've found as many photos as I can of the bezel being off and head unit removed.
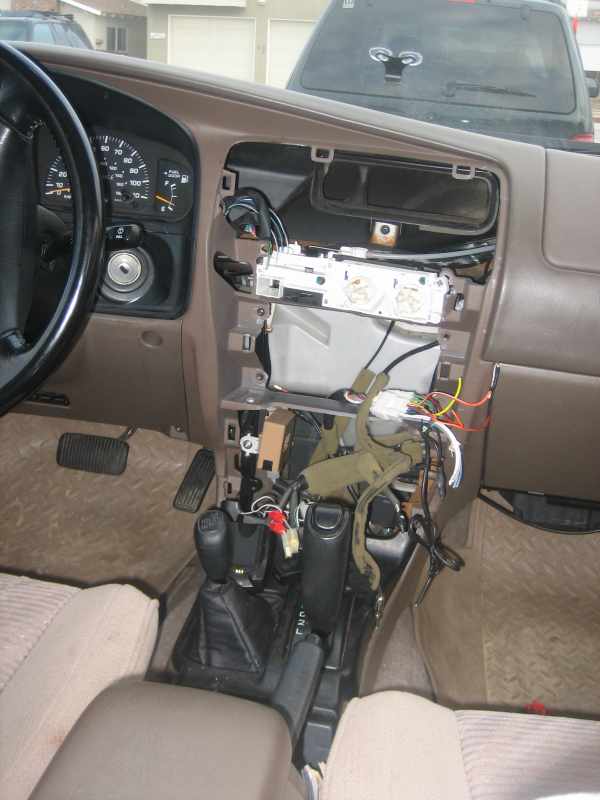
So right behind where the head unit goes there is this white thing. What I assume that is a box containing the a/c coil and fan but I'm not sure. So what I'm wondering at this point is if in fact I could tap into that to create said vents. That would vastly simplify that part of the job. However my fear is that this area is below the part of the ductwork that directs air based on what selection you choose between front vents, floor vents and defrost vents. If true this means these vents would have air no matter what although I guess you can just close them completely if you don't want air coming from them. I actually see a potential advantage to this though in that I could get all three directions of vents at once. I guess the other option is to figure out a way to route some flex ducting off the stock vents. Obviously the stock vents will need to be closed off as well.
The next hurdle would be relocating the rear defrost and hazard buttons. I'd imagine just relocating the buttons either to the plate where the vents go or perhaps into the dash bezel. Making it look clean might be a little tricky and I'm betting the harness would have to be cut and extended (nothing terribly hard). I also wonder if aftermarket switches could be used to accomplish this. Obviously if you have a 99+ you only have the hazard button probably to worry about. For those of us with the 96-98 dash we could probably chop out the useless cup holder even though the example I found didn't do that.
The last piece of the puzzle would be to create a DIN slot where the vents are. Considering my plan would be to use a big touchscreen head unit I don't think I would even have to make this look super clean but would probably involve some plastic welding.
Kind of thinking of going to a pick n pull and at least messing around in a few third gens in one of those to try and get a better idea of what I need to do before hacking away at my own truck. Need to go anyway to grab some LCAs. I might actually be doing that tomorrow depending on whether I end up doing an activity with some scouts tomorrow or not. Might even be a good idea to grab one of those bezels from the scrap yard and try and create all the bezel parts of this before hand so that when I do tear things apart it makes it a little less work.
I have grand ideas of doing this swap so that I can have a nice touchscreen head unit in a spot that I don't have to look down to look at maps or cameras or any number of things. As we all know the stock location is crazy low and not ideal for things like navigation especially.
So this has been done for sure in at least two different cases that I've found, no more. One seems to have routed the ducts down to were the head unit goes and just installed some generic vents on a flat plate there.
The other seems to have made a totally custom bezel. While the custom bezel would be awesome I assume probably the only way I'm going to pull that off is with 3d printing and a lot of cad work so I'm going to stick with the first option while I'm brainstorming this to even decide whether I want to do this mod (probably a little ways down the road but I want to be prepared). Figured I would start this to document things since none of the other examples seem to have done that.
Right now I've found as many photos as I can of the bezel being off and head unit removed.
So right behind where the head unit goes there is this white thing. What I assume that is a box containing the a/c coil and fan but I'm not sure. So what I'm wondering at this point is if in fact I could tap into that to create said vents. That would vastly simplify that part of the job. However my fear is that this area is below the part of the ductwork that directs air based on what selection you choose between front vents, floor vents and defrost vents. If true this means these vents would have air no matter what although I guess you can just close them completely if you don't want air coming from them. I actually see a potential advantage to this though in that I could get all three directions of vents at once. I guess the other option is to figure out a way to route some flex ducting off the stock vents. Obviously the stock vents will need to be closed off as well.
The next hurdle would be relocating the rear defrost and hazard buttons. I'd imagine just relocating the buttons either to the plate where the vents go or perhaps into the dash bezel. Making it look clean might be a little tricky and I'm betting the harness would have to be cut and extended (nothing terribly hard). I also wonder if aftermarket switches could be used to accomplish this. Obviously if you have a 99+ you only have the hazard button probably to worry about. For those of us with the 96-98 dash we could probably chop out the useless cup holder even though the example I found didn't do that.
The last piece of the puzzle would be to create a DIN slot where the vents are. Considering my plan would be to use a big touchscreen head unit I don't think I would even have to make this look super clean but would probably involve some plastic welding.
Kind of thinking of going to a pick n pull and at least messing around in a few third gens in one of those to try and get a better idea of what I need to do before hacking away at my own truck. Need to go anyway to grab some LCAs. I might actually be doing that tomorrow depending on whether I end up doing an activity with some scouts tomorrow or not. Might even be a good idea to grab one of those bezels from the scrap yard and try and create all the bezel parts of this before hand so that when I do tear things apart it makes it a little less work.